thinking about chairs at the close of the year

I’m not big on the New Year’s Eve situation, but I did turn on the third set from  the Closing of Winterland while I’m writing this post. 2018 has been quite a year from my perspective. Among lots of other projects and programs, the Australia trip was a stand-out, now that the horrors of the flights have passed. But Jennie Alexander’s death was the defining moment. If you’ve been following this blog a while, you’ll know that even before JA died, I had been putting a good bit of attention into re-learning how to make the iconic JA chair. I just put a hickory bark seat on one the other day, and a Shaker tape seat on one a couple of weeks ago.

chair in ash & oak, hickory bark seat

As I work these chairs, I’ve been thinking about chair-making, furniture history and the various forms of this post-and-rung chair over the years and across several cultures. When I first learned the chair from JA and Drew Langsner, I just assumed the shaved chair was the principal format. As I learned about furniture history, I found out that the turned chair version was more common historically than the shaved one. Regardless of the fabrication method, the construction is the same – dry rungs fitting into posts with some moisture still in them. Here’s a turned chair I made about 16 years ago, also ash with oak slats & arms. Several times heavier than the previous chair. 

I kept a lot of Alexander’s books, among them is “Handicrafts of the Southern Highlands” – it includes this paragraph about chairmaking:

“The posts for the chair frame, commonly maple…are cut and worked while green, but the rounds or rungs, usually of hickory, are well seasoned…as the green posts shrink over the ends of the already dry hickory rounds, they grip them in a vise “which will hold till the cows come home…”

There’s more to this joint than that, but it’s the gist of it. That was written in the 1930s. Over the years, as I specialized in 17th-century reproductions, I made lots of chairs. This year, in addition to about 6 of the JA chairs, I made the usual wainscot (joiner’s) chair, it has no relationship to the rest of these chairs tonight:

The only period-style post & rung chair I made this year was the Bradford chair; a board-seated chair with four legs. The joinery at the seat level is more complicated than the usual wet/dry joint, but all the other horizontal tenons are done just like on the smaller chairs. 

I wrote a lot about that chair as I made it – https://pfollansbee.wordpress.com/?s=bradford

Back in my museum work. I used to also make very quick, rough shaved chairs with rush seats. These latter were mostly derived from one example I knew at first. Over time I got to see others too. Mostly they’re known from Dutch paintings and other artwork. One of mine from way back when, maple & oak:

plain matted chair, PF

This style hung on over the centuries. Many years ago I wrote a post about old chairs some friends have collected, including this one:

sq post 1a

I’ve seen these described as “birch” and being French Canadian. Not sure where that story comes from. Through tenons, rung-skipper (no middle rung in back. Very commonly done this way). These rear posts were sawn to that canted shape, not bent. Here’s that original post: https://pfollansbee.wordpress.com/2013/08/29/house-of-chairs/

Jennie Alexander often told the story of how s/he switched from turning chairs to shaving them. I always thought s/he never went back to a turned chair, but when we cleaned out the shop, our friend Nathaniel showed me this chair, a late-period JA chair turned on the lathe. I think it was a collaboration with Nathaniel. Thicker at the foot.

But in all of these, the concept of tenons drier at assembly than they will be in life, driven into mortises in wetter posts working together for a joint that will “hold till the cows come home…” is the common thread.

I finished my square table by mid-day on the last of the year, just under the wire. I’ll write about the squiggle paint soon. I have one leftover piece to finish before I start in on my 2019 projects, but there will be chairs. Count on it. 


Bradford chair finished

I often get requests for an “old” finish, i.e. something that looks like those pieces that are 350-400 years old. Often the look these pieces have is more about their 19th-century restorations than about the years of use & handling. But no matter, that’s what people want to see much of the time.

Finishing is not something I have ever really studied. I can finish pieces so they look new; looking old is harder. This chair was the best result I’ve got on making one look dark/old/used; whatever we might call it. To do it, I finally jumped on the Windsor chairmaker’s bandwagon and used milk paint! I’d done it years ago, and was never thrilled with my results, but now using Curtis Buchanan’s video and Pete Galbert’s book I went step-by-step and got something I was very pleased with. I shot almost no photographs of the process for several reasons. Godawful hot out. It looks hideous in the early stages; and I didn’t want the customer to see anything but the result.

Here’s some of the first two coats of red paint – I tried to show how burnishing it when it dries gives it some polish, and brightens things up. On this first one, the horizontal rails have been burnished, the vertical post and spindles are just the dry, chalky paint.

And on this one, the two spindles on our left have been done, those on the right are still the dry paint. 40 spindles, it was no small job to do 4 coats of paint on this chair. Two red underneath, then two brown over those. Then 2 coats of linseed oil.


I shot no more of the process, it was too messy and sweaty, so I didn’t need another task like running the camera. Jump to the finished product:


Those same spindles:

If you want to learn about painting this way; Curtis’ video series on painting starts with this one: https://www.youtube.com/watch?v=xCFE8CzvNNg

Then there’s three or four more. Not hard to find…

You know Pete’s book – https://lostartpress.com/products/chairmakers-notebook

And Elia Bizzarri did a video about using milk paint too – http://handtoolwoodworking.com/milk-paint-dvd/

now they know how many holes it takes to make the Bradford Chair

Done. what a relief. Assembling this crazy chair is quite a test. One pair of hands is just barely enough. Earlier I had assembled the front and back sections. Now it was time to do the whole thing – sides and seat. Start by knocking the spindles in the rails. There are three sizes of spindles on the sides – longest under the arm, shortest under the seat and slightly longer than that above the bottom stretcher. Gotta keep them all together and ALL RIGHT SIDE UP. I hope none of mine are upside down.

Here’s one side unit driven into the rear post. I glued this chair, and wish I had bought a new bottle of glue. I was down near the bottom of this one, and it make horrible farting sounds as I squeezed it to get the glue out. I don’t use glue often enough to keep it fresh, or I would have used the liquid hide glue. My bottle of that went “off” due to neglect.

Test-ftting the front on to gauge the seat pattern. I didn’t drive this all the way on – that only happens once.

After much fiddling around, I made a seat template that I felt was close enough, then cut out and beveled the oak seat board.

and knocked things together. It took some heavy pounding, and eventually some bar clamps to pull things together.

I got it in the end – no calamity.

it’s funny to stand it beside the JA chair. Both icons. Both for adults, but you wouldn’t know it from this photo.


I think the answer is 112, but that counts the rectangular mortises too. Skip them it’s 108.

Thanks to Pilgrim Hall for letting me copy their chair(s). https://www.pilgrimhall.org/ce_funiture.htm 

Here’s Scout the Cat. He sleeps like that.


Bradford chair; the groovy bits

I hate making jigs. I am not set up for it. I make almost all of my stock by hand, so getting lots of parts carefully dimensioned and then assembled is a pain. Screws? Glue? I stink with these things.

But I made a jig the other day to hold the turned seat rails for grooving them with the plow plane. I’ve done it free-hand with the plow’s fence before, but it has its moments that way. Most plow fences won’t reach very far down the turned stock’s side for support.

This cradle will hold either turned seat rail; those with turned tenons, or those with rectangular tenons. It’s just over 1 3/4″ inside, so I can hold rails that are either just a tad too thick, or thin. Or even those that are just right. If it can wiggle in there, I shim it with 2 wedges. It’s important to use 2, so I can keep the centerline of the rail centered within the jig. So one on each side of the rail.

The front end of the jig has a small block in it that supports the rectangular tenon at the right height for running the plow plane. There’s a hole bored in this for the turned tenon, then the block is sawn apart so it’s only 1/2 the height.

Here’s the rectangular tenon sitting on top of that front end:

And a turned tenon nesting in the half-hole, You can also see the centerline scribed along the top of the seat rail:

In use, the plow plane’s fence rides along the outside of the box/cradle. I had scribed a centerline down the length of the rail, and set the fence accordingly. The back end of the cradle is held under a holdfast to keep it steady.

A good result – the groove is perpendicular to the rectangular tenon, just as it should be.


Bradford chair: joinery

A reader asked if I cut the joinery before turning or after, thinking it would be difficult once the stock is round. I do cut it after, I bet you could do it lots of ways, but this is the way I’ve always done it, and with care you can get accurate joints this way. I learned some of these techniques way back with my predecessors at Plimoth Plantation, Joel Pontz and Ted Curtin. As always, it starts with careful layout. This seat rail is sitting in two “joiners’ saddles” – blocks with notches cut in them. I tend to position the stock with the growth rings running horizontally, this is probably over-kill. But it helps later on.

The reason the saddles are boosted up on that scrap board is because I’ve mis-placed my small square that I normally use to scribe the center plumb line across the end grain of this turning. I want the blade of the square right snug against the turning. Then I scribe a vertical line right through the center. Repeat on the other end.

These plumb centerlines become the basis for accurate tenon layout (same for mortises on the posts, actually). I scribe a line along the top of the turning connecting one end to the other. This line is only on the tenon, not along the seat rail itself. Then I can mark out from this centerline the thickness of the tenon – in this case 1/2″. Drop these down the end grain too. I highlighted these lines with a pencil so they show up.

Then it’s just a matter of cutting the shoulders and forming the tenon. I held it in the wooden bench hook, sawed with a backsaw. Careful to check that you’re coming down evenly. No need to hurry here.

Then I split the tenon cheeks. Once they’re both roughed out, check them with winding sticks so you know both tenons are in a plane. Then pare them flat.

Straight-grained ash splits like nobody’s business. Whatever that means…


Mortise layout is just the same. Then bore holes at the top and bottom end of the mortise. I use the square to help align the brace and bit. I have forsaken period accuracy for plain ol’ accuracy and am using auger bits instead of spoon bits. There’s 112 holes to be bored in this chair. One hundred and twelve. That’s a lot.

Chopping out between those holes is much like when we make hurdles with Plymouth CRAFT, just tighter tolerances. https://pfollansbee.wordpress.com/2015/10/11/riving-hewing-drawknife-at-plymouth-craft/

A finished mortise.


Test-fitting the tenon. 

Pilgrim Hall’s web-page about their collection: http://www.pilgrimhall.org/ce_our_collection.htm 

Bradford chair project

I have a project underway that relates back to one of my earliest posts on this blog. I’m making a copy of a seventeenth-century turned chair with a board seat captured in grooves in the seat rails, rather than a woven seat around the seat rails. The chair I’m now building has four legs, back in July 2008 I wrote one of my first blog posts about a three-legged version.  https://pfollansbee.wordpress.com/2008/07/05/three-footed-chair/

here’s an earlier version I did of this chair:

My 2007 version of the Bradford chair

Its main feature to my eye is the construction of the seat rails. Because the seat is a panel captured in grooves, the seat rails need to all fall at the same height. With woven seating, the seat rails are staggered in height, so the joints don’t interfere. (usually the side rungs are higher than the front and rear rungs, maybe always) But with the board seat, the joints actually intersect. Often, like the chair I’m working on now, it’s a combination of a rectangular tenon pierced by a round tenon. One thing all this means is the parts are very heavy and thick. Here’s the rectangular tenon test-fit into one of the posts. 

test fitting a seat rail into the post

I’ve used the following photo a lot over the years, it shows the round tenon running right through the rectangular one. This is from a 3-legged version, but the effect is mostly the same for 4-legged ones. Easier geometry.

joint-detail

This chair is ash, (Fraxinus, usually around here Fraxinus americana) riven from a straight-grained log, hewn and prepared (either by planing or shaving with a drawknife) then turned on the lathe. The seat rails are 1 3/4” in diameter, the posts are 2 1/8”-2 1/4” thick. That’s heavy stuff. Good straight ash splits evenly and easily, it’s a real treat to use. 

The original chair I’m working from is one of two by the same unknown maker, both at Pilgrim Hall Museum in Plymouth Massachusetts. One belonged to Governor William Bradford,

William Bradford’s chair, Pilgrim Hall, photo Gavin Ashworth

the other to the church elder William Brewster.

William Brewster’s chair, Pilgrim Hall, photo Gavin Ashworth


Brewster died in 1644, Bradford in 1657. His inventory included lots if itemized and well-described furniture:


“a Court Cubbard £1-05, winescot bedsteed and settle £1-10,

4 lether Chaires £1-12, 1 great lether Chaire 10s, 2 great wooden Chaires 8s, a winscott Chist & Cubburd £1-05, 2 great Carved Chaires  £1-04, a smale carved Chaire 6s, 1 great Chaire and 2 wrought stooles £1, a Carved Chist £1″

Well, we know this chair at Pilgrim Hall is not the “carved” chairs, nor is it leather. So it’s either one of the “great wooden Chaires” or just simply the “great Chaire” that was listed along with the “wrought” stools. Aren’t they all wooden chairs, you ask? Often the adjective describes the seating material – thus these could be referred to in the period as wooden chairs. “Great” is taken to mean either “large” or often, “with arms.” One thing about the Bradford inventory that vexes me is the value assigned to the 2 great wooden chairs – 8 shillings. If the chairs are equals, then 4 shillings isn’t a lot for a chair like this. If the 2 great carved chairs are also equal, they’re worth 12 shillings each. A pretty big difference, I’d guess this chair is as much work as a carved one, maybe more. The great chair listed with the 2 wrought stools is harder to estimate because of the stools. “Wrought” usually means “worked” in some way. In stools and chairs, it’s often considered upholstered.

The Bradford chair is in better condition than the Brewster. It’s missing some height, the bottoms of the posts are right at the stretchers. One thing I like about this wear & tear on this original object is it clearly shows the type of bit used to bore this mortise – a round-bottomed hole like that is the result of using what we now call a spoon-bit.

front post worn or cut down right through the stretcher’s joint

Here’s a spoon bit, showing the rounded tip that makes a hole like the one above:

The upper rear rail is thought to be a replacement, as is the board seat. Brewster’s is missing several spindles, a couple of stretchers, upper rear rail and has a leather seat wrapped around the rails.

I’ll post construction notes and photos as I go. Lots to see in this chair.

For some details about the chairs’ histories, see the page at Pilgrim Hall’s website about their furniture. If you’re near Plymouth, don’t miss the museum. They have great stuff. http://www.pilgrimhall.org/ce_funiture.htm

Here is a link to Trent and Alexander’s article from American Furniture http://www.chipstone.org/article.php/569/American-Furniture-2007/American-Board-Seated-Turned-Chairs,-1640%E2%80%931740 


Made room in the shop for turning

Since I moved into my new shop a year & a half ago, I have shuffled semi-finished projects in & out of the way as I worked. I have a chest that has no customer; I made it for photos I needed for my book. I kept thinking I’d find a spot for it in the house. Seemed unlikely, meanwhile it fit nicely under the lathe. So, out of sight, out of mind. Until I needed to turn something. In fact, fitting under there it collected lots of stuff inside it, then I even put boards across the top for more storage. Terrible idea. 

With a lot of turned components coming up in my work, I had to finally deal with it. Spent several hours shuffling stuff around here & there – fitted the chest (still lid-less, still unsold) into the basement and cleaned up the shop. Now, all I need to do is re-learn turning.

Here’s a view from outside, through the open door. All that open space means I can get at the lathe when I need to. I have plans to make a shorter bed for it, so it takes up less floor space. But for now, I need the full-length for some long turning projects in the near future.


Prior to turning, I chop all the mortises.

Even bore the pin holes.

Mark the centers.

Turn ’em.

on a good day, I can make them look like this:

Here’s the square table frame, test fitted. Like an over-sized joined stool.

After this one, there’s a large turned chair coming up. That calls for ash. This is a five-footer, splits like it’s perforated. The rear posts will be 4′ long, 2 1/4″ in diameter. Whew.

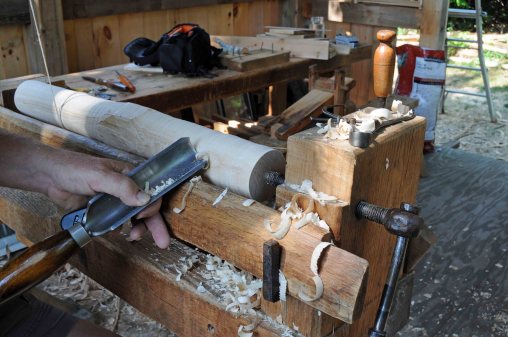
Shaved octagonal with a drawknife, then mark the center and turn it.

The straight clear ash works like a dream. what a wood…

3-footed turned stool


It feels like a long time since I’ve written about furniture-making. Shop-building & spoon carving have taken up a lot of space here. This week, I’m building a stool that reaches back to the beginnings of this blog in 2008. Here’s one I made many years ago for the museum where I used to work.  These things don’t exist in the wild – not 17th century ones anyway. Chairs built along these lines are common in England and elsewhere. Not New England. These stools are found frequently in Dutch paintings. Note that the three stretchers are at different heights. The seat rails are all at the same height. More on this below.

OLYMPUS DIGITAL CAMERA

I am a joiner who does some turning, not a turner by any means. Especially these days. My lathe had been packed away in storage for 18 months. That’s a long hiatus between turnings! This is almost where the lathe will be in the shop, I plan on moving it further back into the corner when the real setup happens. The pole is up in the peak, about 14′ above my head.

turning

These turnings are pretty basic, just a large gouge & a couple of skew chisels. Wood is straight-grained ash. Riven & hewn before mounting on the lathe.

gouge

skew

one main feature of these stools, and the related chairs, is the joinery at the seat level. All the seat rails are at the same height, so the joints intersect. A large rectangular tenon gets pierced by a smaller turned tenon. Like this:

joint-detail

Here I am scribing a centerline on the end grain of the seat rail. This is the basis for the layout of the tenon.

centerline

Sawing the shoulders.

sawing

Splitting the cheeks.

splitting

Paring to the finished dimension.

paring

The seat rails get a groove plowed in them to receive the beveled panel that is the seat. Here’s how I held it to the bench for cutting with the plow plane. The rectangular tenon is pressed into the teeth of the bench hook, and a notched stock pressed against the round tenon. Holdfast keeps that stick in place. I eyeball that the rectangular tenon is parallel to the benchtop, then the groove goes in the resulting top center of the rail’s surface.

setup for plowing

groove

boring and chopping joinery next time.

here is the same information, in one of my first posts  https://pfollansbee.wordpress.com/2008/07/05/three-footed-chair/

https://pfollansbee.wordpress.com/2008/09/03/board-seated-turned-chair/


Chairs

cod 2003

At my house, the carved joined stuff is in every room. I have tried many times, and always failed, to count the pieces of furniture in this 4 1/2 room house. You’d be amazed at how much stuff you can cram in here. (I’m in the kitchen right now – 9 pieces of free-standing furniture, 3 hanging on the wall, and all the built-in cupboards above the counters)

 plain chair

This week, I have been making this little, big rush-seated chair. Little because it’s a low seat, generally small-size chair. Big because it’s not subtle – the posts are almost 2” square, the rungs fit in holes that are 15/16” in diameter. So little big chair. It’s based on 17th-century chairs that we mostly know from Dutch artwork, more-so than from surviving examples. (next up for it is trimming the posts here & there, weaving the seat…) These are ancestors of the ladderback chairs that I first learned back in the late 1970s/80s. Here’s one that I did about 1984 or so. A more recent kid’s version too.

ladderback

kids


I began as a chairmaker. Made ladderbacks, rockers, Windsors – then got into the 17th century & made wainscot chairs, 3-legged & 4-legged. Turned chairs ditto. Leather chairs. Chairs w boxes in the seat. Kid’s chairs, high chairs. My semi-latest chair was the walnut brettstuhl.

But at our kitchen table, the chairs we use at every meal and then some are Windsor chairs I made 20-25 years ago.

c a chair

At my desk too. I once had one of those stupid office chairs, then I came to my senses & remembered that I am a chairmaker. Windsors are lightweight, comfortable, attractive. Sturdy. Fun and challenging to build; carving, turning, shaved work, sculpted seats. good all around projects. And so much variety.

Two things happened this week to remind me of how much I like good Windsor chairs. Lost Art Press announced the release of Pete Galbert’s long-awaited book on Windsor chairs. You already know about that…

One of the days that the mail got through here, I received Curtis Buchanan’s next installment in his printed plans for his chairs, this one a fanback side chair, one of my favorites.

Curtis Buchanan fanback side chair

c b plans

I learned Windsors from Curtis, starting in 1987. I really like his approach, both to his chairs and to his life. If you’ve seen his youtube series on making a Windsor chair – then you’ve seen Curtis’ style, very human, simple, direct – and he makes especially beautiful chairs. This set of plans is 4 pages; some 1/2 scale, some full scale. Two different turning patterns, bending forms, seat profile & plan. Boring angles – a course in Windsor chair making in 4 pages. I’m ordering Pete’s book, but I’m keeping Curtis’ plans too – you never know when I might reach into my past & make some more chairs. We must be able to squeeze one or two more in here…

links:

Curtis’ plans & videos http://www.curtisbuchananchairmaker.com/store/c1/Featured_Products.html

Pete’s book: http://lostartpress.com/collections/books/products/chairmakers-notebook

my wainscot chair video  https://pfollansbee.wordpress.com/book-dvds/


some chair terms illustrated w period examples

some pictures, spurred on by Chris Schwarz’ last 2 posts on his blog, and my earlier one from today.

A stool. common as can be, but early ones (16th/17th centuries) are less common than hen’s teeth. This one’s from the Mary Rose (1545)

OLYMPUS DIGITAL CAMERA

Joined stool. simple, you’ve seen this sort of thing here hundreds of times.

MET stool small file

Its cousin – the joined form. same thing, just stretched out.

OLYMPUS DIGITAL CAMERA


While we’re at it, let’s get the wainscot chair out of the way.

wainscot chair Pil Hall


a variant – the “close” chair, “settle chair” of Randle Holme, although his illustration might be a different version.

metcalfe chair


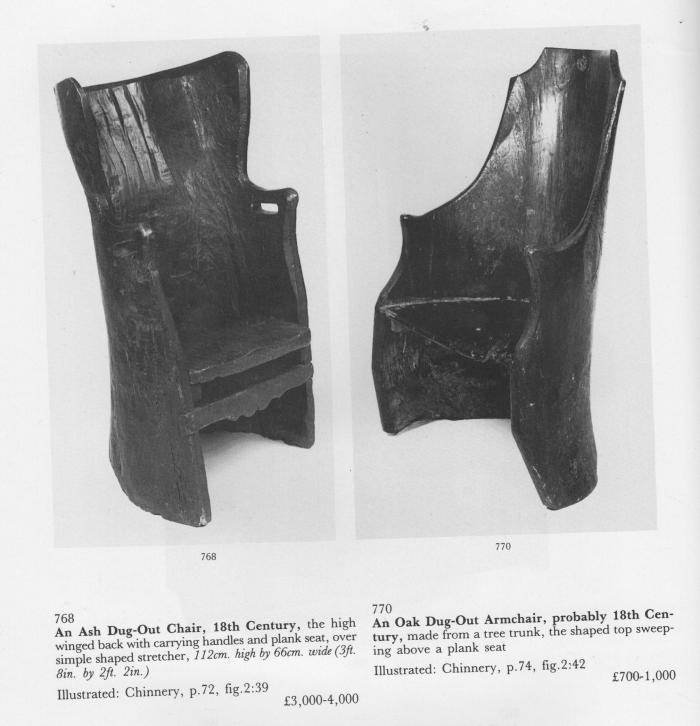
This is what Holme illustrated, I can’t imagine a more difficult way to build a chair.

dug out chair 001

Turned chairs. Ugh. these get weird. First, the “turned chair”  “great (meaning large) chair” “rush chair” – lots of names could mean this item.

BARTLETT CHAIR (2)

This is the one Holme said made by turners or wheelwrights, “wrought with Knops, and rings ouer the feete, these and the chaires, are generally made with three feete.’ = I would say, except when the have four feet.

welsh chair overall 2 welsh chair 12


Like this one: the real kicker here is that these chairs have beveled panels for seats, captured in grooves in the seat rails. Thus, sometimes called: a “wooden chair” = chairs often being categorized by their seating materials.

DUTCH turned chair


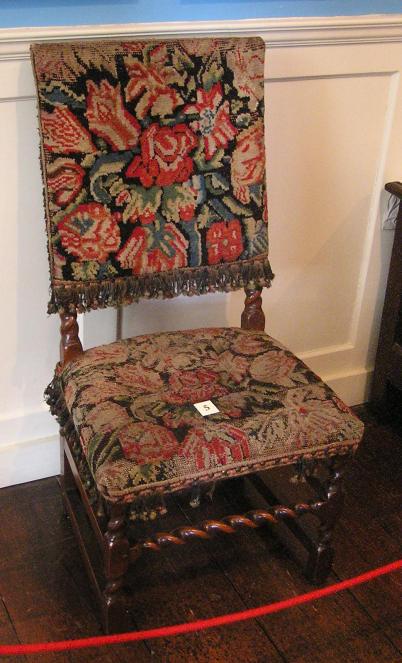
Now we have a “wrought” chair, “turkey-work chair” – and so forth. I mentioned in a comment on Chris’ blog the other day, forget the construction here, (joiner’s work, w turned, and in this case, twist-carved bits) it’s the upholstery that makes the splash. These were top-flight items in the 17th century.

OLYMPUS DIGITAL CAMERA

OLYMPUS DIGITAL CAMERA

Same gig, only leather. (this photo is I think from Marhamchurch Antiques)

_ALG5130


Randle Holme’s turner’s chopping block looks a lot like Chris’ image today from Van Ostade, of a “country stool” – I’d have a chopping block in my kitchen if I could…but we’re out of space.

turners chopping block


That was fun, I never get to use much of that research these days.

Back to spoon stuff tomorrow…there’s a mess of them available here = https://pfollansbee.wordpress.com/spoons-a-bowl-or-two-jan-2015/