Birds finally (Hey Marie – I swiped some photos)

Business first = I spent part of a recent evening blabbing about me & woodworking to Cory Mickelson  http://craftsmansroad.com/ . I understand why it’s a “-cast” but I don’t know what the “pod” part is… I couldn’t get to it from the website; and used Itunes to hear it. Once it started, I shut it off. I can’t listen to me. Cory was very nice – some of you might want to hear it. for some reason. 


But finally – birds.  Daniel & I have been making some early morning trips to try to get shots of the glossy ibis and Little Blue Heron that our friend Marie told us about over in Marshfield. Today we had great views of 2 of the ibises; the Little Blue Heron –  which you will note is white – was not too far, but still far enough that we couldn’t get good photos. The young LB Herons aren’t yet blue/purple like the adults. 

backlit glossy ibis

2 ibises

ibis better light

lbh

lbh walkin


To really see these birds; let’s swipe photos from Marie – hers are great…she had a Great Blue Heron one day she was there – Daniel & I saw him there one morning, but not today. then the ibis & the Little Blue Heron. 

Marie's GB Heron head_bill_close-crop

Marie's glossy mouth-open

Marie's LB Heron

baskets continued

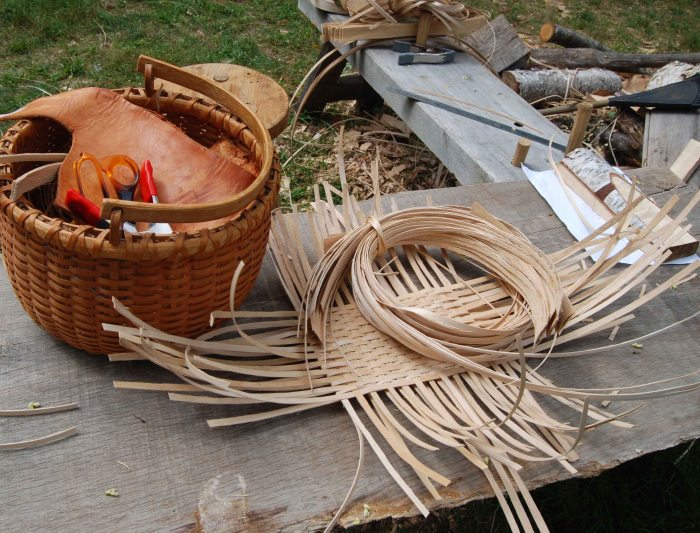
Basket bottoms. Two of our household baskests; c. 1987-90. The one on the left is a standard item; square bottom, round top. Ash with hickory rims; hickory bark lashing. The one on the right is our colored-pencil basket. Gets lots of use. A rectangular basket, all ash, rims either oak or hickory.

2 baskets

Here’s the bottom of the square one. Typical weave, resulting in openings between the uprights. Probably most splint baskets are like this.

open bottom

Here’s what I call a “filled” bottom – thin and narrow filler strips woven between the uprights.

filled bottom


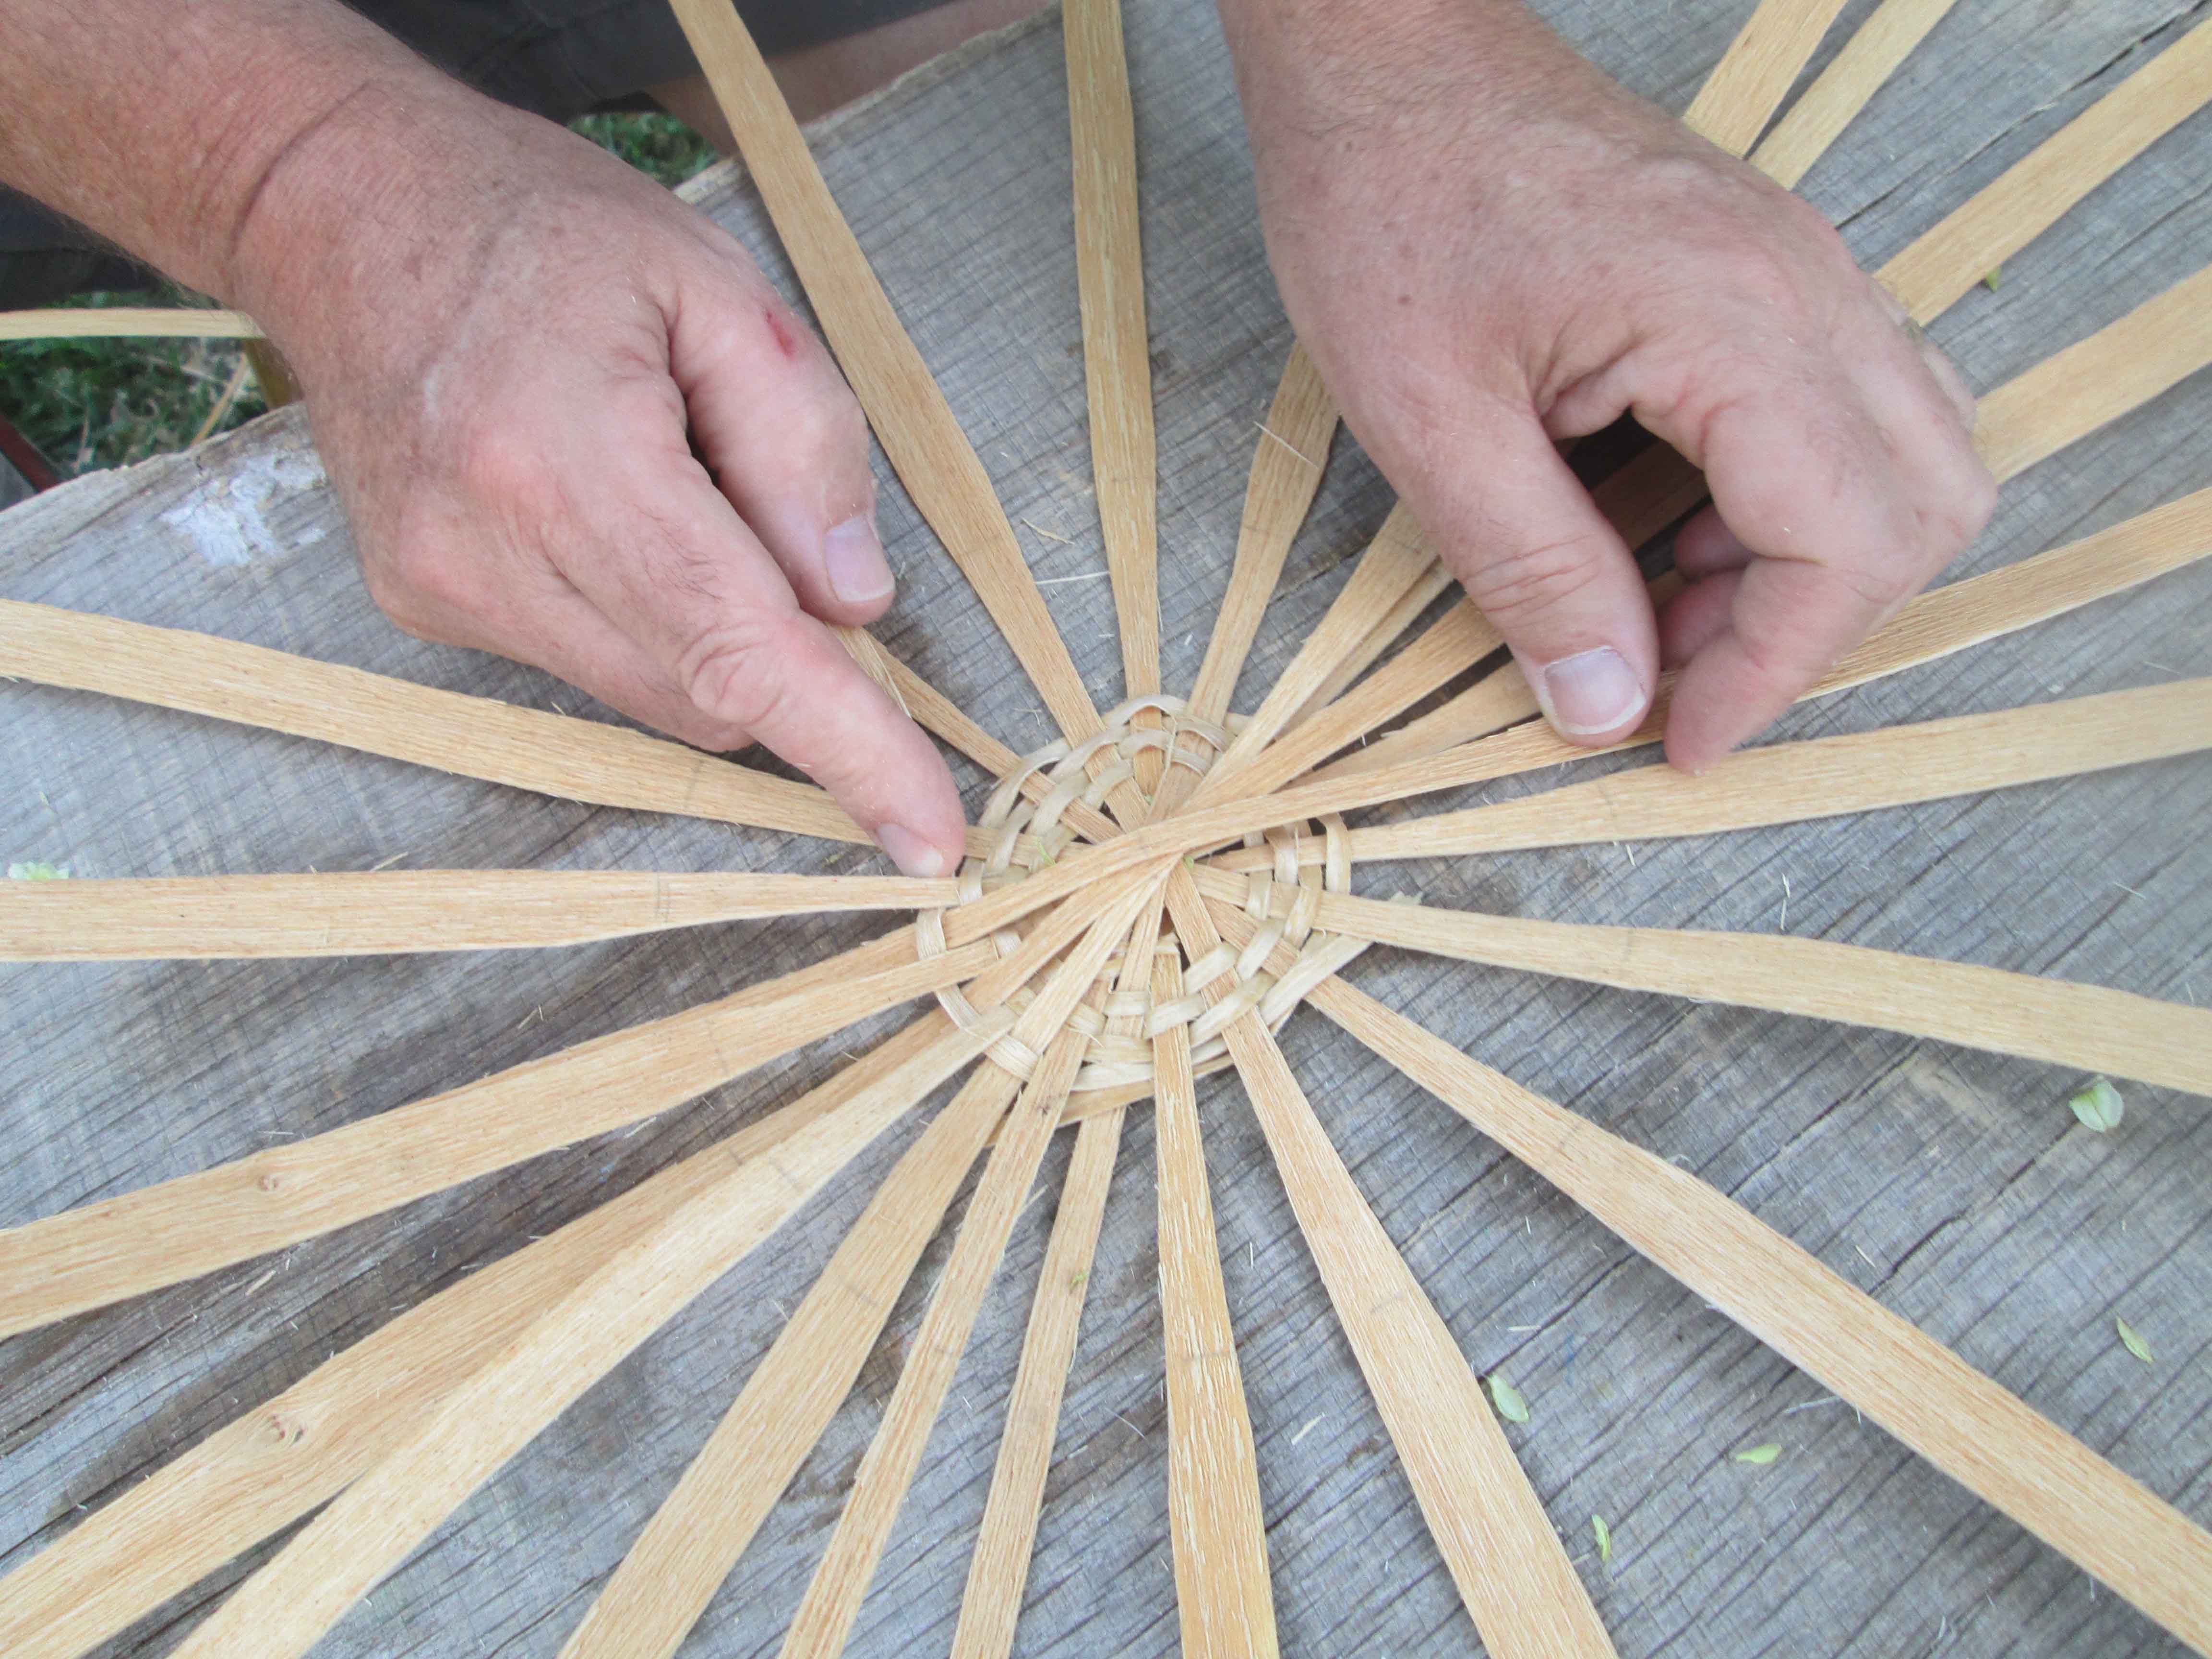
The filled bottoms of baskets are made a few different ways. One is to make a round basket, with “spokes” laid out to form the bottom and sides. I do these with 16 uprights; laid out in 2 batches of 8 spokes. Here’s the underside of our laundry basket; showing this spoke bottom from below.

ash basket detail 2

Each upright, or spoke, is cut into an hourglass shape; so its middle section is narrower than its ends. This makes it easier to weave these things all close together. One spoke is cut in 2, down to the middle. This photo shows these first 8 pieces; the one my left hand is on has been cut down the middle to make an odd number of uprights.

first 8

I then take a thin, narrow weaver and start to weave these 8 pieces (9 really…) together.

weaving


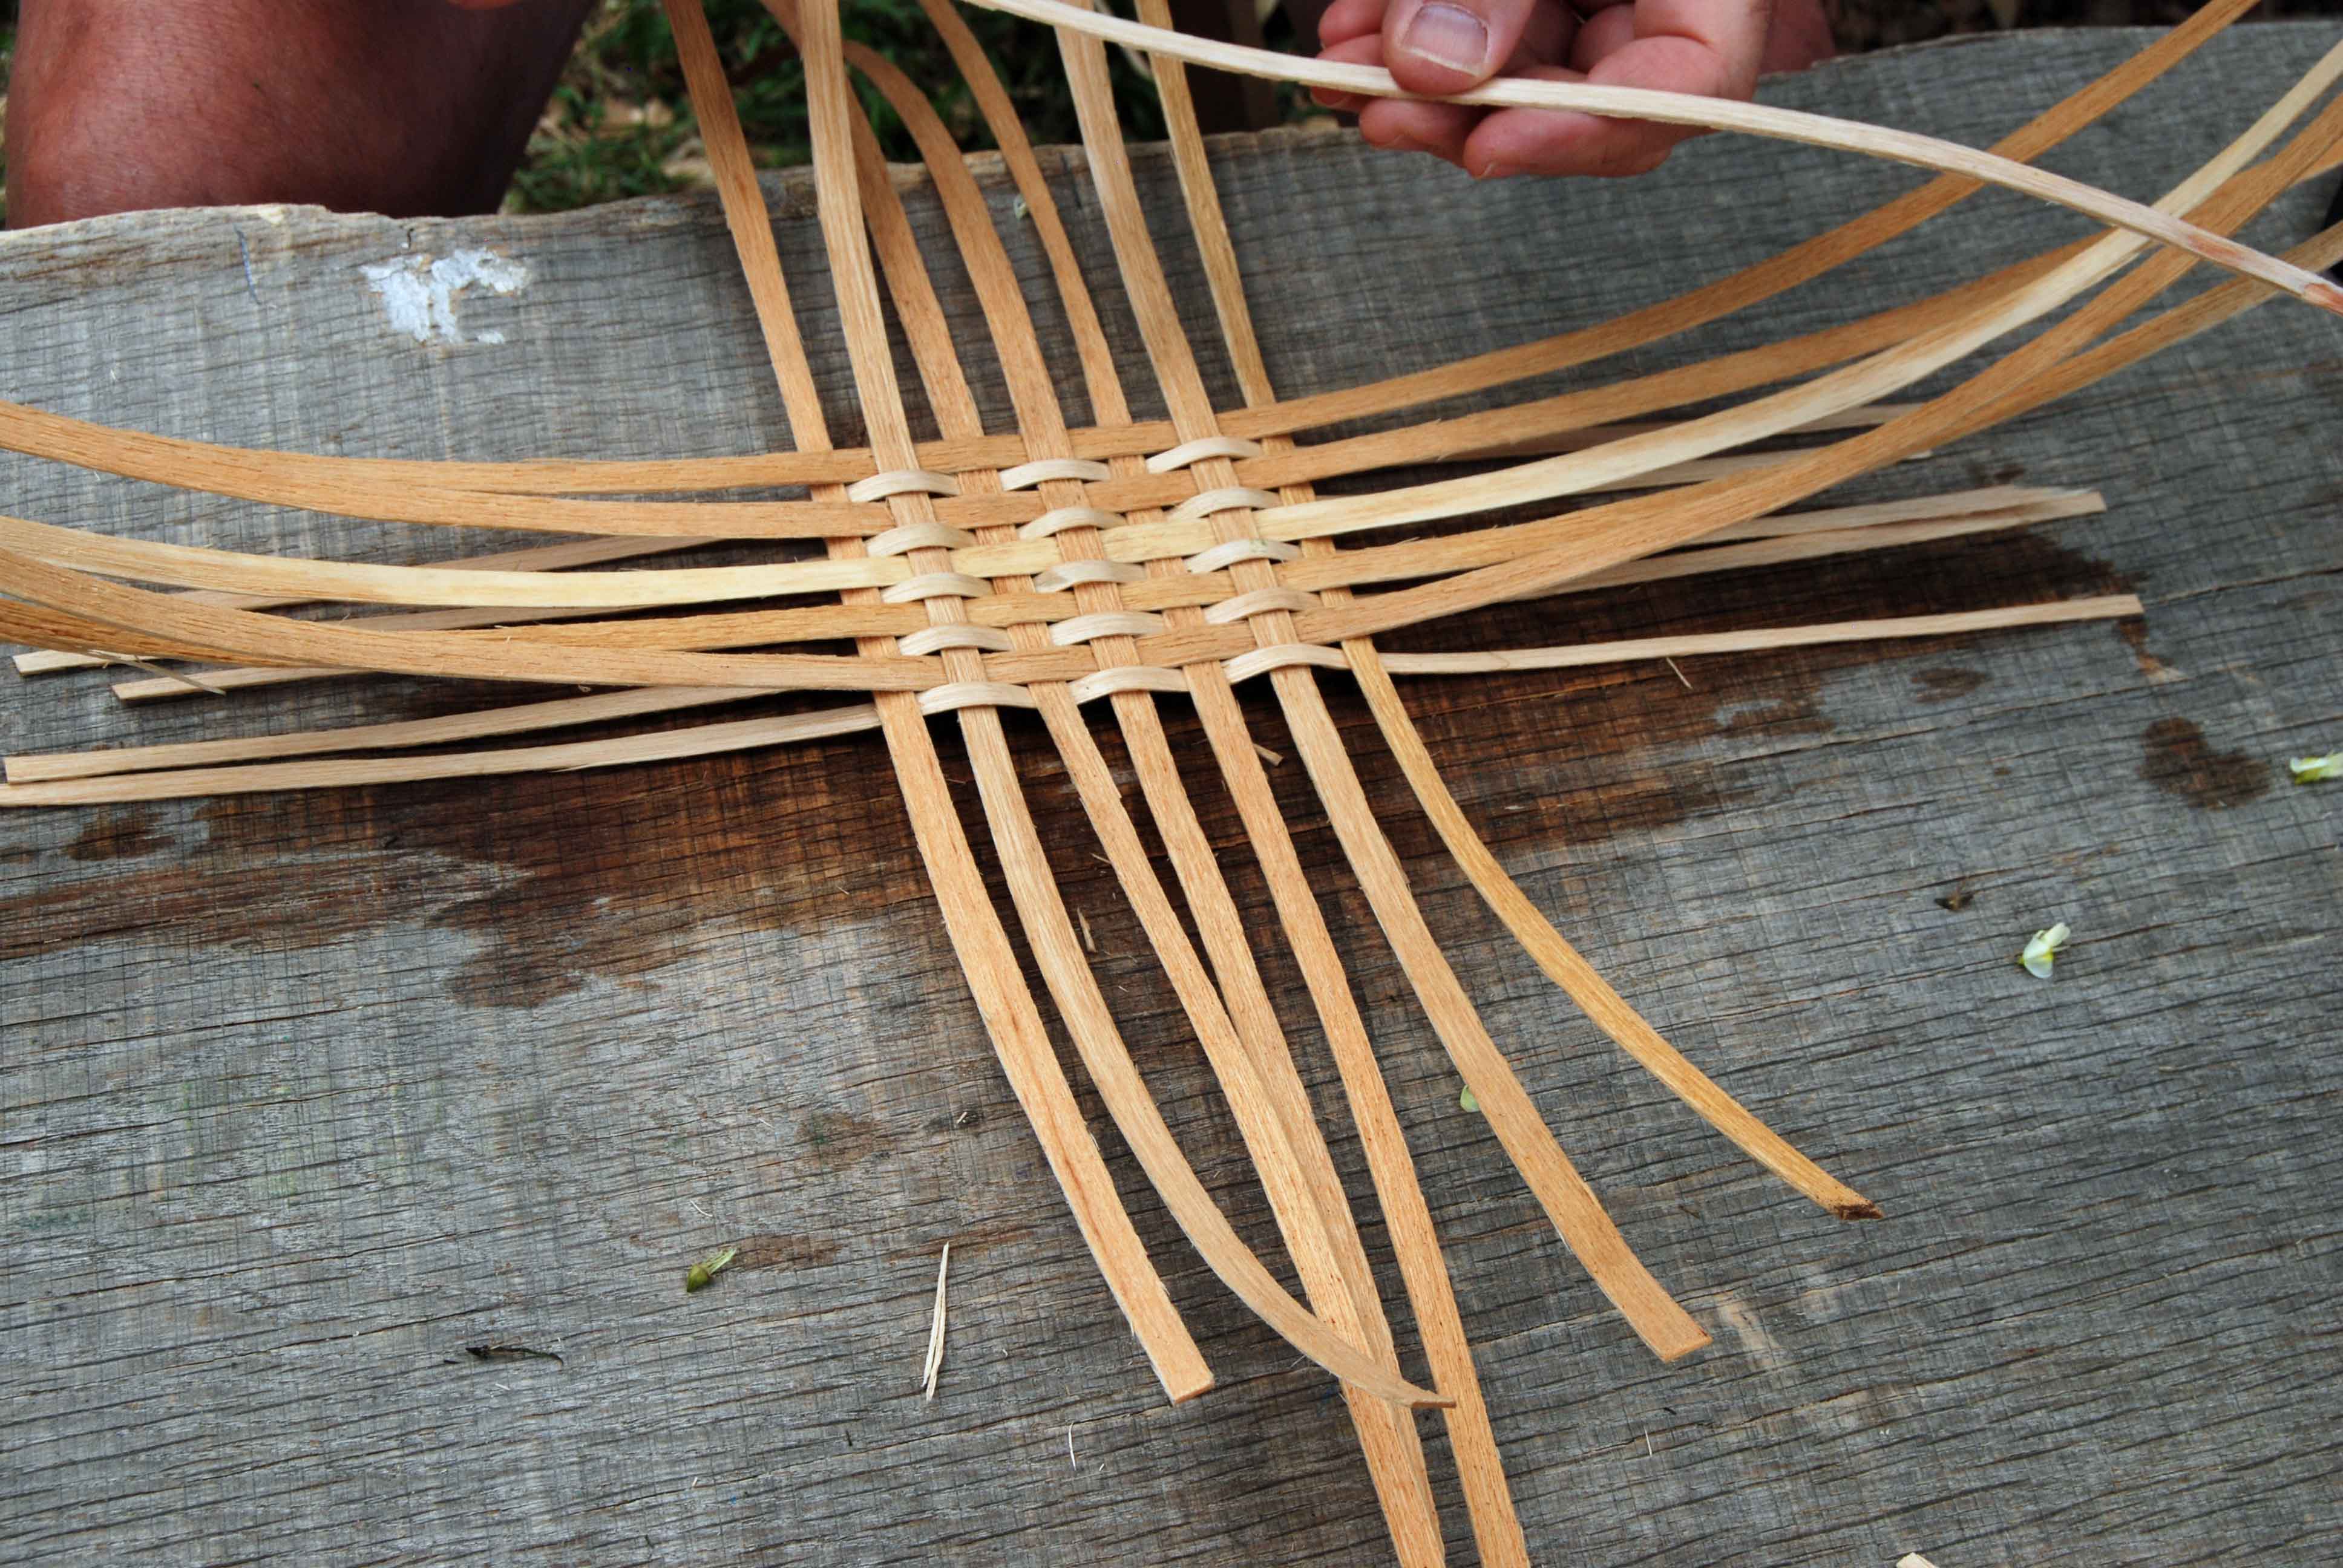
Once the weaver makes a few trips around you get out to the point at which you can add in the next 8 pieces. I add these pieces one at a time, the weaver catches each one in turn and binds it to the section already woven. No need now to split one of these; things are up & running now. Around & around this goes, and you bend things upright after a certain point, to begin to form the basket’s shape.


setting in 2nd bottom


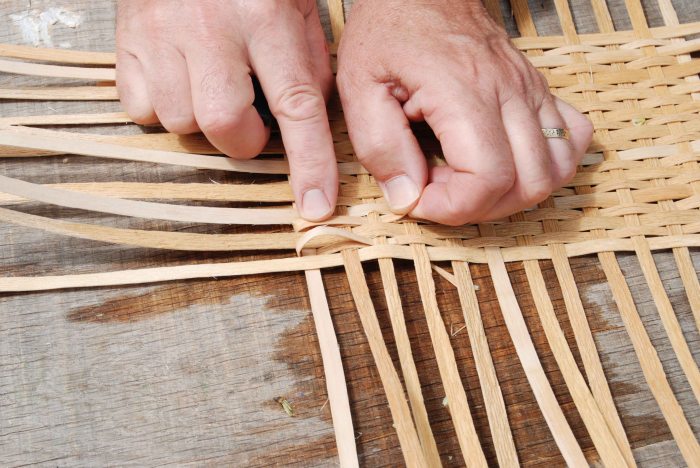
The other filled bottom is a rectangular (I guess it could be square too, but I always made then rectangles) bottom, with filler strips laid in between the uprights. In this case, there’s 3 different pieces to deal with – the short uprights, the long dittos, and the thinner filler strips. These are just a bit longer than the finished bottom of the basket. So I start with laying the long uprights down, with filler strips between them. Then alternate in the short uprights over & under the previous bits. It gets a little complictated – it’s like when I teach joinery and carving – now for 2 consecutive thoughts, and sometimes 3.

This photo shows the first 3 of each upright, with 2 narrow thin fillers between the long uprights (those that run across this photo horizontally) Then I add in each kind of splint in pairs, the longs/shorts/fillers- as the case might be. I always work out from the center. Easier to keep things even that way. Usually.


filled bottom

I’ve got the polished satin-y finish of the fillers inside the basket – they appear bright white in the photo. Remember, all this stuff is very wet as I weave it.

filled bottom 2

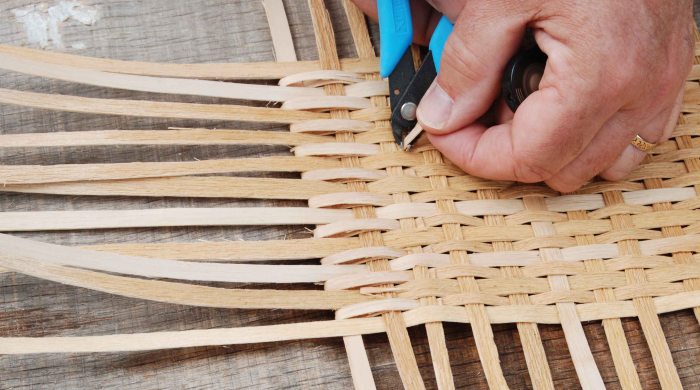
This is the finished laid-up bottom. Next is to tuck the filler strips in.

filled bottom before turning fillers up

I bend them back on themselves, and tuck them under the the 3rd upright -they have to go over the first two because of the weaving pattern. It just is. Then pull it tight, and trim it off just under the upright.

weaving fillers in

snipping fillers

I wove two bottoms like this, then piled up some weaving material; and will re-soak these and weave up the bodies next time I get the basket stuff out. Maybe tomorrow, it’s nice work for a hot day.


ready to weave filled bottom baskets

That was basket week…here’s part of it

Last week was basket week – and today I’ve started some new work, but I’ll show you what I did last week. Basket work will go on, but as a time-filler. I have enough baskets woven, or started, that I can pick them up here & there for an hour or two. Like many woodworking projects; most of the effort in basket-making is preparing the materials. I have written before about pounding the splints from an ash log   – here’s links to old posts on the subject. I have some new posts coming up about peeling the splint, but in the meantime…

https://pfollansbee.wordpress.com/2010/06/10/extra-curricula-work-baskets-spoons/

https://pfollansbee.wordpress.com/2012/12/22/peeling-ash-splints/

But right now, this post is about weaving up the basket bodies. Handles and rims are for another time. The basket itself is made up of the uprights and weavers. “Uprights”  is  something of a misnomer, because although they bend up to be the sides of the basket, they also form the bottom. 

Uprights are generally heavier (thicker, and wider most often too) and weavers thinner and narrower. So a big part of the work is sorting and sizing the material. 

If the splint is too thin to divide (or peel) then I scrape it smooth. This makes it less fuzzy, and also thins it some. Better for weaving. These pieces are uprights in the basket. To scrape it, I pull the splint across a piece of leather on my knee – then hold the knife in place to scrape it as I pull back…don’t do it w/o the leather! My them braces the knife blade so it stays stationary. 

scraping

Then you have to trim them to the desired width. The baskets I was working on last week had around 25-30 uprights. Round baskets have 16, another time. those pictures are on a different camera. 

scissors


Once you have all your uprights and weavers; you lay them out, this basket has long and short weavers; to form a rectangular bottom. I start with 3 going each way, and weave them one under the other, this way & that. Then add pieces side to side, and north & south. Here, I am weaving a single thin weaver around the perimeter of the basket’s bottom. This binds them together, keeps them from shifting around as I begin weaving the body. Some refer to this piece as a “keeper” – it keeps the uprights in place. 

keeper

Some baskets have independent weavers – each horizontal row is a separate weaver. This is easy to do, but wastes a lot of material. So there’s lots of ways to weave a continuous spiral around the basket. But to do this and keep alternating where the weaver goes under and over the uprights, you need an odd number of uprights. You can split one, or add one. (or do one of several other approaches – but I usually split or add)  – Here I added an upright, and tapered it to become the first weaver too. It’s towards the upper right hand corner of the photo – follow that bendy upright, and you see it weaves into the others. Then you just keep adding & overlapping each new weaver as one runs out. I overlap them for 2 uprights. 


added upright & wever


Then you just keep on weaving. I periodically dunk everything in the water, especially outdoors in summer. I want this stuff damp. Once I’ve gone around a bit, I gently bend things up and then cinch the weaver in tight as I go. 

weaving


basketry 3

A basket like this has an “open” bottom – there are spaces between the uprights. That’s the most common form I make. but there is one we have around the house that is closed or “filled” in the bottom. 

filled bottom before turning fillers up

Next time I’ll show you how I lay that up. 

Don’t forget – the spoons are posted and ready to go. The spoon rack I had sold, and one reader asked if I would make another – of course I will! Anytime you see something like that – if you missed it, and would like to order one, I’d be happy to oblige. https://pfollansbee.wordpress.com/spoons-more-august-2014/


right now it’s baskets; but spoons & more for sale

The spoons, a frame-and-panel and one spoon rack for sale now – the top of the blog, or this link. . https://pfollansbee.wordpress.com/spoons-more-august-2014/  If you’d like to order something, leave a comment. I can send a paypal invoice, or you can send a check. As always, I appreciate everyone’s interest in my work.


Meanwhile, but here’s today’s blog post. I have some stuff underway that I haven’t put on the blog much, because I haven’t made more than a few baskets a year in 2 decades. This is the scene these days. Baskets, and more baskets. I used to make these a lot, before there was joinery. It really is exciting to explore them again; but I’m having to re-learn stuff I used to know pretty well.  Today I had to make a slitting tool too, to slice up the narrow horizontal weavers. I’ll shoot it tomorrow when I use it again. I had one once, but it got lost in the shuffle 20 years ago I guess.


the scene

I decided to dedicate a whole week, maybe more, to making baskets. It’s been so long since I made more than one or two…and the only way it’s going to come back to me is for me to do it over & over.


basketry 1

basketry 2

basketry 3

Earlier in the week, I was shaving and bending some white oak for handles & rims. I’ll fit those on this weekend. I like the white oak even better than hickory for bending. The King of Woods, Daniel O’Hagan used to say…

riving white oak

shaving horse work


the joined chest project, part the next

back to the week that was…when we attempted to make 10 or 11 joined chests in no time at all. Knuckleheads. 

after all the riving and hewing; we hauled some of the stock into town to begin the task of planing it into boards. I’ll just bop the pictures in, then add whatever I can remember about it. Here’s Steven planing just like I showed him…


planing

Roy was astounded at the amount of shavings produced by working green wood

shavings pile up

roy & shavings


One of our un-named students works in a pointy building on the east coast, and to help him out, Roy put up surveillance cameras throughout the classroom..

woodwright cam

A broom wouldn’t do it, so Roy got out a pitchfork…

roy & shavings 2 roy & shavings 3


Elia couldn’t stand the idea of sending those shavings to the landfill, so we piled them in his truck.

off they go


We did get further along eventually; chopping mortises, over & over & over again. 

http---makeagif.com--media-8-20-2014-pYq8lu


Then plowing grooves, cutting tenons, test-fitting. 

plowing


layout


fitting

There was lots of documentation, 

it's horrible


until the last couple days, when I lost track of all – I spent 1/2 of the last 2 days with a checklist, “do you have all your muntin stock?” I never did get it all straight. it’s hard to keep track of 250 piece of oak that all look pretty much the same. 

Then one day Steven emerged from Ed’s store upstairs and everyone ran to his bench like it was Xmas morning – “whaddja get?” – so we had a show & tell…

xmas presents

Just another week at the Woodwright’s School…

——————

For those keeping track, some spoons and things for sale tomorrow…including this new piece: 


spoon rack


September is the time to make a carved oak box

This fall I’ll be teaching a class at Heartwood in making one of my carved oak boxes; and this might be the best shot yet at this class. The class size is small, about 6 students. As of right now, we are short of that number – we could use a couple more, so you could sign up and get in on a chance to delve into this subject in greater-than-usual detail. The class is Sept 22-26. The fall is my favorite time of year… 

We’ll be riving, carving and assembling boxes such as this:

carved box 2011
carved box 2011


Maybe this is the class to finally fit a till inside their box!

till
till


The setting is out of this world – I often get asked “when are you teaching in Massachusetts?” and this is my one-and-only right now. But it’s not eastern-MA with its congestion, noise, strip-mall mentality; this is bucolic western, far-western Massachusetts. It’s at the Heartwood School for the Homebuilding Crafts in Washington, Massachusetts. Those of us out in eastern MA have to look Washington up, because  we’ve never heard of it. It’s that nice. It’s all uphill for me, Washington in in the Berkshires, near the highest point of I-90 east of South Dakota. I live on the Jones River, about 15 feet above sea level.

I was a student in a timber-framing class there in 1984 – Will Beemer dug out a photo to prove it. Bottom center, head down, arms up. skinny, scruffy me. 

PF at Heartwood

Here’s more about the school – it’s quite a place.

http://www.heartwoodschool.com/index.html

Here’s the photo tour of the place: 

https://plus.google.com/photos/104180060919131710792/albums/5964402473095440321?banner=pwa

Fall in the Berkshires – I’m bringing my binoculars too. Come join us.


a debt

CW 3


I spend a lot of time thinking about connections and chronologies. If you have read my blog much, you know that most of my woodworking connections came through one place, and in that place one family; Country Workshops, and Drew & Louise Langsner. I have been made to feel a part of their family since the early-to-mid-1980s, when I became a regular student at the workshops there. In 1988, I spent several months living with them and their daughter Naomi, who was then about the age my kids are now, 8-9 years old. We’ve been connected ever since.


A big shock came through last weekend, when Drew & Louise’s new son-in-law, 32-year-old Teo Reha was killed in a logging accident in western North Carolina. It’s heartbreaking news; Naomi & Teo had just moved back to the Langsner farm last fall, and set up the old cabin there as their home. They got married on the farm in June. I saw Naomi last summer for the first time in many, many years, and we chatted about when she was a kid, how much she was looking forward to coming back home – that sort of thing.

Louise sent a couple of notes about the burial – it sounded amazing.

“Hello, Peter. We had a very beautiful burial today, up on our pasture looking out over the mountains. All of our friends have been super supportive and giving. Teo’s friends dug the grave and were here to tell stories and make us laugh. Naomi is surrounded by her women friends. Her [biological] mother Kay has been here with her constantly to give guidance and ceremony. It is an incredible feeling to know we are part of such a strong web of friendship and community. It is a terribly painful time. We all had so many dreams of how we would grow old together. It has been especially wonderful to get to know both Naomi and Teo’s friends better and to know they will continue to be part of our lives. Curtis [Buchanan] came and pulled weeds in the garden and returned to build the coffin. It meant so much to us. ..There are no words.

I have never met Teo, so again I’ll let Louise’s words do the job:

“about Teo. He loved his job and was very good at it. He and his boss Joe had a dream of helping people log sustainably and helping the forest be more healthy. He loved poetry and explosives, hunting and animals. He was dedicated to the land and forests, family, community, and most of all Naomi. We only knew the tip of the iceberg of this young man, and even that was larger than life. Our friends are carrying us through this, but it is unbelievably painful. Love to you and your dear family. Louise”

I asked the Langsners if I could write something here on the blog; and Louise said yes. They have given so much to our woodworking community over the years, if you were ever there, then you know how much of themselves they put into Country Workshops. I’m back here in Massachusetts right now, but my thoughts are with my friends back on that North Carolina mountain.

Beyond that, all of us are in debt to a logger somewhere. Every stick of wood that hits our benches, lathes, shaving horses or laps; a logger, either amatuer or professional, felled the tree. Let’s all keep them in mind, and hope for their safety as they carry out this very dangerous occupation which we all rely on so much. To us, they are all but invisible, but they have names, families and loved ones out there.

Love to Naomi, Drew & Louise, from Peter, Maureen. Rose & Daniel

I’m not even done with this year, but onto next already…


New box, July 2012

You’ll recall that I was Schwarz’d not too long ago. Also quit my day job – so I have been (thankfully) deluged with teaching offers for 2015. I’m working on sorting out the schedule now, and will know much of it pretty soon.

One that’s mostly nailed down right now is a carved box class in England – with the New English Workshop folks – Derek Jones and Paul Mayon.

http://newenglishworkshop.co.uk/

I’m not sure of the exact dates and specifics; but July is the month. They tell me there’s 5 spots taken already. Get a hold of them if you’re inclined. Me, I can’t wait. I haven’t been to England since 2005. Hope to see some oak carvings…

Here’s the details, such as they are.

http://newenglishworkshop.wordpress.com/2014/08/01/the-axeman-cometh/

You might remember Chris Schwarz writing about this new program over there – Derek and Paul are bringing several American woodworkers over there. Chris will be back..among others. Stay tuned for more.

Woodwright’s joined chest class – day 1

I once had a t-shirt I got at an Arlo Guthrie concert that read “we know it’s stupid, that’s why we’re here.” goodness only knows what it meant, but a similar notion must have run through the minds of these students -a very good-natured group of would-be joiners who came down to Roy Underhill’s school to attempt to make a joined chest in a week. 10 students means 10 chests. each chest with about 25 pieces of riven oak in it. Plus extras in case something goes wrong…

more oak 2

Roy & I dreamed up this idiotic course, “let’s make a joined chest in a week!” And we booked it & it filled up. well, it became a reality (of sorts) and on the first day, these students split, crosscut, & rived out over 200 piece of oak for said chests. That’s a lot of oak. Here’s the beginning of just one small pile of parts:

growing piles of oak


We tried to sort and count them as we went, but it was doomed.

more oak


We need over 70 panels; about 8″ wide by 12-14″ long. SEVENTY!

panels

We scurried back to the woods to get more of this amazingly straight-grained oak. what a tree!

cross cut 2

I don’t know who this is, but he was not alone.

creature

Thankfully, we found that with proper supervision, it only took Kat a short while to bust out all the oak. it’s not that hard, really.

it's not that hard really


Next, they plane all the long rails, layout the joinery, chop mortises, plow grooves & cut tenons.