slow train coming

There’s slow food, slow train coming, slowhand Clapton – and slow-grown oak. This is a concept I have covered before on the blog, but there’s many new readers these days. I  have two sections of oak I’ve been working lately that illustrate the differences between fast-grown and slow-grown oak very well.

On the left above is a piece of red oak that is about 4″ high x 1″ thick. It’s riven radially and planed green. I counted somewhere in the vicinity of 70 years of growth on this one piece.

Next to it is a stile for a joined chest – also red oak, it seems to be about 16 years’ worth of growth there, in 3 1/2″ of stock.  Technically, the fast-grown stuff is stronger than the opposite; with fewer years, there’s fewer earlywood open pores. thus a greater concentration of dense material.

The slow-grown stuff has so many bands of early wood, the porous vessels that grow in the springtime; that it is lighter in weight, and has less strength in some aspects than the fast stuff.

when every thing else is equal (straight, no knots, large diameter, etc )  I would much rather use the slow stuff. It works easier, and has a better “grain” than the fast growth.

Here are the same two sticks of wood, the slow one behind, the fast one in front. On the radial face, the slow one’s appearance is much more even, the fast one stripey-looking. When carving them, the fast one is bumpy as you cut across the transitions from early wood to late wood. Bump, bump, bump as you trip across those pores.

Both of these particular sections were very nice-splitting oaks; the fast one surprisingly good. Its radial face was dead-flat and just needed smoothing. But I have relegated it to the rear framing of an oak carved chest underway, because I don’t want to look at it.

I have seen some English furniture of the 17th century that has fast grown oak; but the New England stuff, and the better-quality English stuff is in finer-grained oak.

Here’s a detail view


With 350 years of patina, the stripey look isn’t too jarring, but when new it is distracting to me.

A New England chest, oak framing around a pine panel. pine lid above. But the oak is the slow-grown stuff I have harped about enough now.

Most of these photos should enlarge considerably, so to really see them, skip the phone & other tiny devices. Like the Rolling Stones, these should be played loud – I mean opened up big.

avoidance

I have been busy trying to finish a few projects, and a little book I’m working on…so not much time for photos, etc. I have taken some time here & there to make some small boxes that now hold miscellaneous junk that collects around the shop. The one above is made of some practice pieces I did a few years back when I was trying to learn chip carving. The box is butternut, riven & planed. the lid & bottom are white pine.

The designs are totally random in this case; I was really just trying out knives & cuts.  I had no intention of making anything from these. But after them kicking around the shop for 2 years, I decided to make a box from them, no sense just having them loose…


The hurricane that swept through New England a month or more ago left some nice spoon wood behind. I haven’t got too far on that stuff, but I have a few of them underway.

This batch of finished & unfinished spoons  has cherry, lilac, sycamore (planetree), rhododendron and maybe birch too.  The cherry, lilac & sycamore are from the storm; the others have been around a while.

so I file this stuff under “things I did when I should have been doing something else…”


I feel like Superman….

…when I plane Atlantic White Cedar.

It’s a joy to work this stuff. It’s not really a cedar, but a cypress tree. The Latin name is Chamaecyparis thyoides, here’s a website with some details about the tree http://www.na.fs.fed.us/pubs/silvics_manual/volume_1/chamaecyparis/thyoides.htm

I rarely get to handle it. Where we buy logs this timber is usually snatched up by boatbuilders. But once it a while we get some. This one was a small-diameter tree, riven out ages ago. Then I let the rough-split bolts dry outside until I needed them. The riving process is just as it is for oak or other hardwoods. Select a straight-grained log, break it into sections with wedges and a maul, then use the froe to split out the rough billets.

twisting the froe

I have seen it used on lots of 17th-centuryNew England furniture, often as chest floor boards, drawer bottoms, but sometimes panels – like the rear panels in this Plymouth Colony chest.

These panels are easily 9” wide, thus a pretty large tree. Oak framing, pine floor boards, and cedar rear panels. (photo is a scan of an old slide…hence not the best.)

Here is the same chest, this time the side of the till is cedar:

The stock I have is quite narrow, so I am using it for the moldings I need for the German chest I am making…first up is just planing the stock flat and straight. It’s like proverbial candy-from-a-baby.

It’s more fun than you can imagine. I’m near the end of this log, but I will keep my eye out for more…

who could make this up? One way to make hidden dovetails…

Back when Adam Cherubini invented nails at WIA last month; I paid little heed. I was glad he was tackling that subject; but I must have been running up & down the escalator or something. So I didn’t get to see it. Kari did http://villagecarpenter.blogspot.com/2011/10/repeat-after-me.html

There has been a lot of bandwidth lately of folks digesting what AC said, and I see people wanting to nail things together. Not a bad thing at all.

Here is a board chest, decorated to look like a joined one. I doubt it fooled anybody in its day, but it must have fit some aesthetic. It’s not unusual. (picture is from St. George’s The Wrought Covenant)

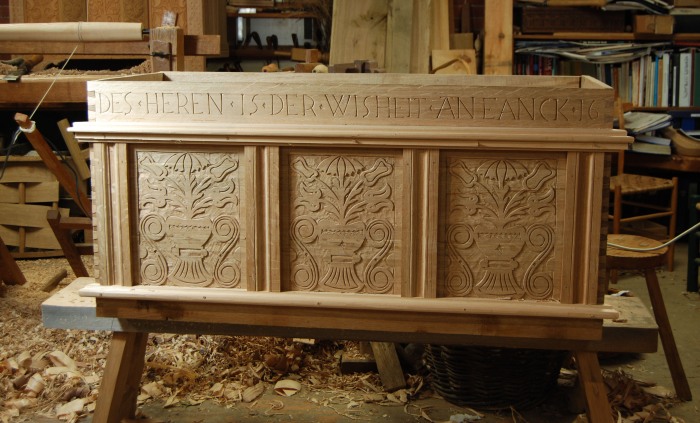
BUT how about some knucklehead (me, for instance) making a DOVETAILED chest, then nailing moldings all over the front & sides to frame carved sections that become divided as if they were panels in frames? If you are weak of stomach, look away.

I didn’t make it up. It’s a copy I am making for a client. Totally whacky. I didn’t get to see the original, but have a lousy photo of it. And honest-to-goodness, I didn’t make the construction or decorative scheme up. How could I? Who would think of such a thing?

There’s more moldings to come. Smaller frames surround the carved “panels” and then carry around the sides to form large frames there too. A heavy base molding finishes the bottom edges (after I nail in the bottom boards). Then three sides of moldings attach to the underside of the lid. Perfectly stupid. BUT, it does give me a chance to hide 90% of my dovetails. In the end, the only ones that show are those flanking the carved inscription.

For those of you heading off to faux-wrought-nail land, do yourself a favor and see if there’s a blacksmith somewhere that you could help support. The difference between a real wrought nail and the Tremont ones is like the difference between any handmade object and its assembly-line counterpart, i.e. all the difference in the world. Try them, you’ll like them. For wrought nails, Tremonts stink. They are clunky, thick and lifeless. I have no stake in cut nails. I have used tiny ones on this chest to fix the oak moldings in place, so for that, Tremont makes sense. Here’s a couple of hand-made nails. Rectangular in section. thin, tapered. Thin heads. One’s a “T-head” – in that case, the full-sized head is bashed on two opposing sides to make a nail that buries its head into the grain of the wood.

And, in use:

And finally, the T-head in use as well:

shorebirds, not oak

Now that summer is over, it’s time to go to the beach…sounds crazy, doesn’t it? I did go there in summer, but only because of the kids. Otherwise, I keep away until the hot weather & crowds are gone. Then I head over there every chance I get. I like to walk the outer end of Plymouth Beach, there’s an afternoon each week when I take the kids to school, then have a few hours to myself. That’s rare. So it’s been off to the beach for a nice 2-hr walk…

In the fall it’s a great place for migrating shorebirds. Often by the thousands… here’s a few.

Saw this sanderling today, got him with his mouth full

Among the late-comers are the dunlin, and I saw a few of them today. First batch I’ve seen this fall.

some more shots, below is one from one of the overcast days last week. There was one day so foggy I couldn’t see more than 30 feet ahead…it was great out there, no people,  just sand, fog, waves & birds.

here’s the map, showing plymouth beach extending south to north, and out further is Duxbury beach doing just the opposite. You might have to click the map to get rid of the text window laid on top of it…

New DVD on 17th-c New England carving


Funny how things work. I shot my 2nd DVD with Lie-Nielsen last winter, then in March started talking to Chris Schwarz about publishing the joint stool book.  http://lostartpress.wordpress.com/2011/09/17/coming-soon-%E2%80%98make-a-joined-stool-from-a-tree%E2%80%99/

So the book really took over my thoughts, and I almost plumb forgot about the video on carving…almost.

But it’s now out, and I hope folks will like it. In it, I concentrate on just one motif, the S-scroll. I have used this pattern so many times in a great variety of ways, that I felt it was worth exploring a whole disc with just that design.

You’ll see how I lay out the patterns, sometimes with a compass, sometimes just freehand with the gouges. Often a combination of those methods. After cutting a few variations, then I show how to combine them to make panels like those found in chests and boxes. When I was outlining this project, I counted ten variations on the S-scroll in my house!

It’s 100 minutes; and there are some things on the disc to view on a computer; finished carvings, a few period examples that I have studied closely, and some layout diagrams.

To order,  you can either go to Lie-Nielsen https://www.lie-nielsen.com/index.php or order it from me. For now, I haven’t updated my website, so no Paypal at this point. If I keep on selling them, then I’ll fix up the website. Thus, I plan on doing this the old-fashioned way. If you’d like to order from me, put a check in the mail.

Here’s the details:

$25 & $5 for packaging/shipping in US.  So $30 made out to

Peter Follansbee

3 Landing Rd

Kingston MA 02364

email me with any questions. Peter.Follansbee (at) verizon.net

another benefit of a simple workbench

Give me ten years or so & I catch on all right. I was for some reason last week using my old German workbench, with its end vise and steel dogs. I forget why, and it doesn’t matter. I was planing some short-ish stock, under 2 feet long. And what I found was the shavings piled up in the midst of the bench’s length, and then got swept onto the floor right in front of the bench. In other words, in the way…

I built what I call my joiners’ bench just about 9 years ago, and within a year or so really settled into it.


planing at the bench

You can see in Moxon’s lousy engraving that the bench hook, (the planing stop w iron teeth) is set way back near the end of the bench.


Moxon's bench hook

(here is a recent re-take on the bench hook, with a link to an earlier post too https://pfollansbee.wordpress.com/2011/08/16/17th-century-bench-hook-again/ )


In part this is so you can work the longest stock without any special arrangement, but also I think it’s so the shavings fly off the end of the bench, out of your way. And that is another benefit of the joiners’ style bench – less frequent sweeping.

Urban Woodwright

One thing I have learned over the past ten years or so is if you see this fellow around, don’t go away. something interesting might happen.

it’s tricky riving in a place like this; you have to keep your eyes open…

then, it’s right back where you started from…

Hickory is a great wood for riving; and now there’s more space & light up here

and just to show that we weren’t just going willy-nilly, we had checked that the sign said nothing about hickory, riving tools. etc.  We are, after all, professionals.

Next year, it’s pitsawing.