I shot a few photos today, a desk box going out to a customer and a new brettstuhl. I have updated the “furniture for sale” page – there’s not much there, 2 brettstuhls and one carved box. I was shooting the photos today because it was overcast – but the sun poked through for a dramatic effect for a minute when the new brettstuhl was in place…
A couple of dis-connected things. Most important is first – I’m not wild about holidays, but they’re hard to avoid to some degree. One that I think about in some ways is tomorrow, American Thanksgiving. Like many people, I have lots to be thankful for. One thing that’s been on my mind this morning as I wait for the fire to warm the shop up is all the people who make hospitals run. I had a chance to be a visitor at a hospital not too long ago and was amazed at how hard these people work and how they have adapted to all the pandemic concerns. Truly inspiring. I know there’s lots & lots of front-line workers all around the world who’ve kept things together while I’ve been tucked safely inside my shop. My hat’s off (not literally, this morning’s the coldest day this season…) to them, but the hospital crews are especially on my mind this Thanksgiving.
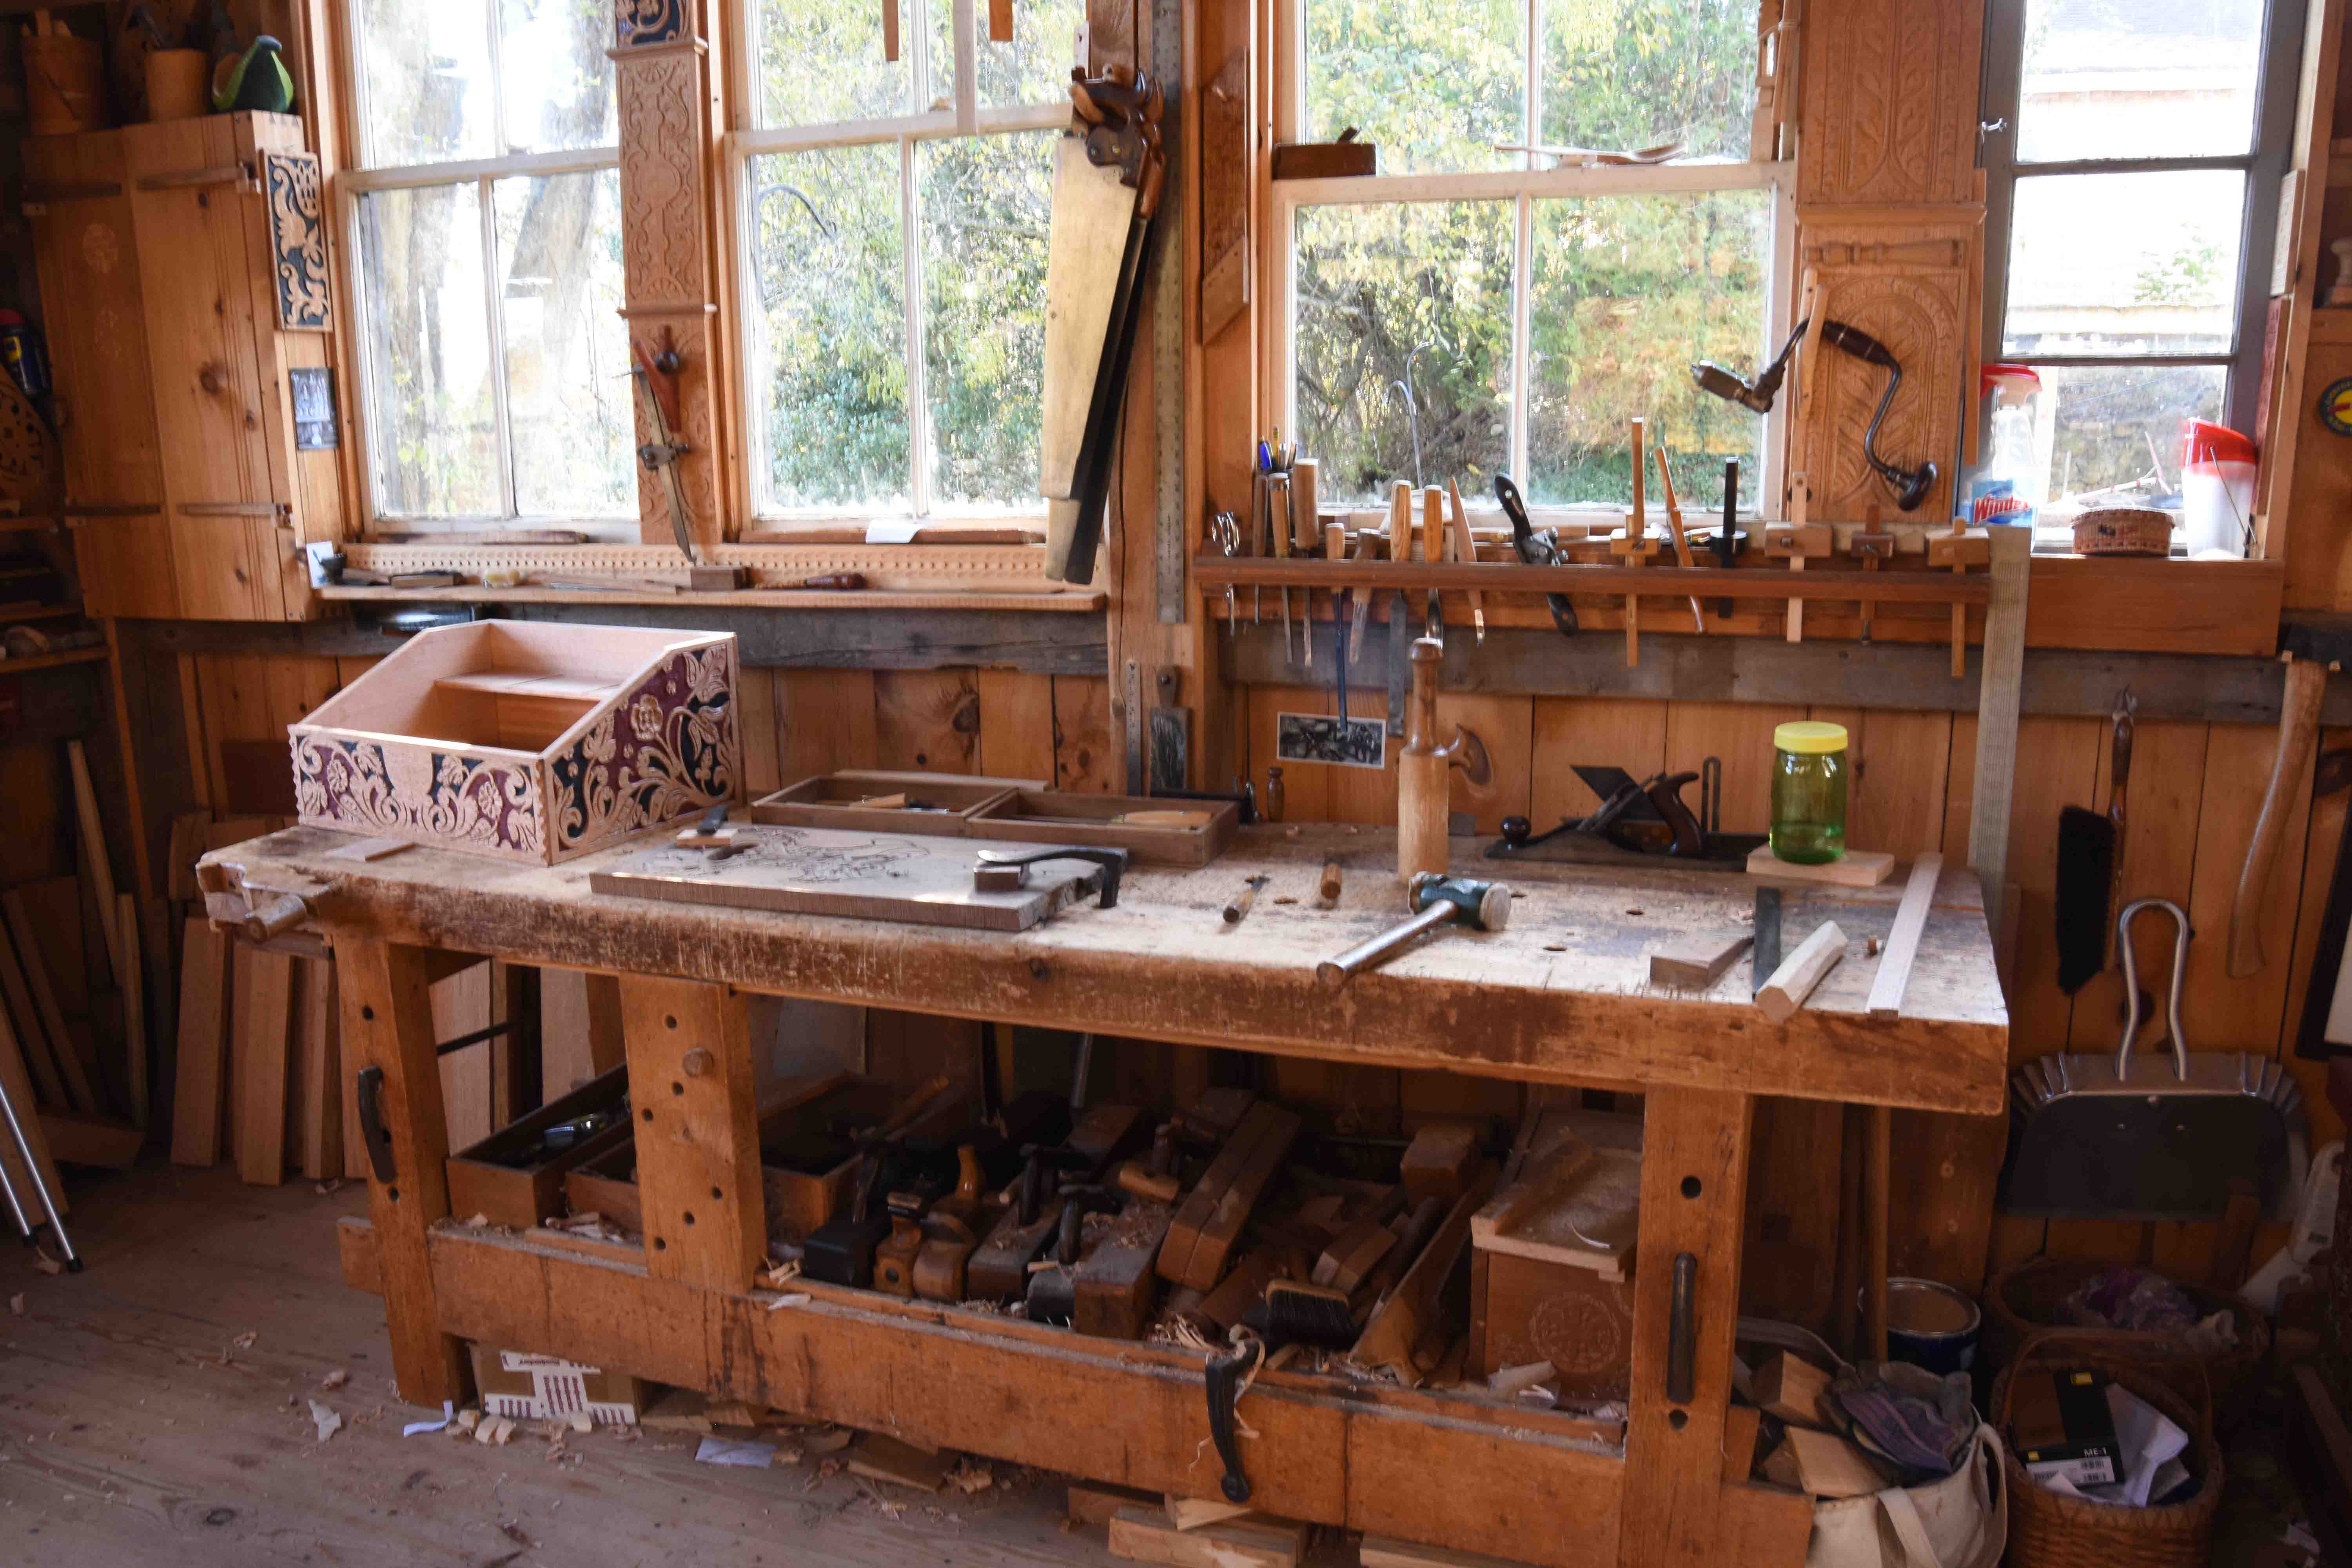
OK – the pictures today are a recent shop tour. I read a week or two ago about a “small shop” that was somewhere in the vicinity of 25′ x 40′! So I thought an updated shop tour might be timely. Plus there’s new readers each week. Mine’s 12′ x 16′. No electricity, so no lights other than windows. No machines – the motives for that approach are entirely personal. It’s not about some high-handed notion of this way being better than machine work. It’s better for me. That’s all.
my main workbench
The picture above is my main workbench. Most of my work happens here. Pine top, oak base. I’ve worked at it for 20 years. Saws above, various tools in racks and on the shelf below. And the photo below is the bench behind that one – an Ulmia workbench I bought in the early 1980s. A huge expenditure at that time. Right now, it’s just where I stick that cupboard base while I work on parts for it. And pile boards underneath, etc.
Looking back toward the door, to my right when I’m at the bench is a tool chest I built when Chris Schwarz’ book was new. https://lostartpress.com/products/the-anarchists-tool-chest That book convinced me that a chest was a good idea for me. In my old job, my tools hung on the walls. An ocean view from that shop was great, except for the tools. Rust never sleeps. Above this half of the shop is a loft, and tucked under it are chair parts and other odds and ends of dedicated wood.
tool chest & chair parts & more
At the other end of the shop, it’s open to the 16′ peak. In this view below you can see the cord from my pole lathe coming down on our left. The pole is just out of sight. Pattern sticks for chairs, tables and stools hang all over this part of the shop. But some then get covered up by other bits also hanging.
looking up
The lathe is simple. I only used it part-time these days. That means it collects junk on it until I need to do some turning. This bed is short, (about 3 feet) there’s a 4 1/2′ bed that I used to use. Now stashed until I really need that length.
turning a pillar for the cupboard
The rest is details, mostly of where to put stuff when you have so many windows there’s barely walls. I did manage a couple of small cupboards – this one for axes. A similar one across it for turning tools.
axes or hatchets it doesn’t matter
That’s about it inside. There’s a riving brake and various wood piles outside. Another time for those. The view below is the door (thanks @gerrishisland ) and the shaving horse. It doesn’t stay outside. I stick it out there when I’m not using it, then put it back at night. I hate that notion that they are destined to weather & decay and be replaced.
I get a lot of questions about when and where I’m teaching in the near future. I find it very hard to plan stuff these days. All I’ve committed to so far are two small classes – one at Lost Art Press and one at Pete Galbert’s. I’m not planning on many classes, there might be a couple more in 2022. It all depends on how things go as things move along. Or don’t.
carved oak box class at Lost Art Press
Lost Art Press – I’m looking forward to going back to LAP – it’s the carved box class. Making the parts, doing a whole slew of carving and then assembly. An interior till adds to the fun. 5 days, Mar 28-Apr 1, the Feast of Fools. What could go wrong? Tickets go on sale Mon Nov 29th at 10am.
I taught a JA chair class at Pete’s in October and we had such fun that I said yes to doing it again. April 18-23, he just posted it on his website. Tickets go on sale Wednesday Nov 24 at 8am. Here’s the link:
I can save you some trouble beyond those two listings – I don’t know where or when any other classes I might teach will be. The only other one I have in mind right now is un-scheduled and it’s at Roy Underhill’s. He & I need to get together and suss out the timing. But it won’t be before these two. That’s all I know right now.
The lower case pillars. This section is getting close to assembly. Today I bored the blocks for the pillars’s tenons and wrestled the whole thing together. First thing I did was slightly undercut the ends of the pillars.
cutting the ends
Then some layout and boring the holes in the ends of the blocks for the tenons. They aren’t a tight fit, but I still don’t want them too loose. My tenons were only 7/8″ long, I’d have liked them longer, but the stock was real close to the finished size.
aligning the bit
But they came out alright – this is how they should look.
If they all looked like that…
So some wrestling with an unwieldy assembly.
the top drawer’s frame going onto the tops of the pillars
Because the tenons were so short, I couldn’t pick this whole thing up as one. The bottom tenons barely make it through that shelf. So the next time I get to make a cupboard like this…
I stuck the top drawer frame, pillars & shelf onto the side frame’s tenons.
just about manageable
Then knocked the bottom drawer-frame in place.
Looks like it’ll work
Some pulling here, knocking there and it came together. For now…
lower case tested again
It’s been through so many test-fits I’m sick of it. Next up is coloring the lower case parts. So I’ll knock it back apart to a degree, color it and then actual assembly.
After that last video I did, the 2-hour seat weaving one, I wanted to tackle something shorter. One afternoon I got out some oak to carve one of the new patterns I have available – I set up at about 3pm, knowing I had to work quickly before it got too dark to see..
The result is this short (for me) 26 minute carving video. Warts n’ all. When I set up the camera for a closer view, it was too close & I kept stepping in front of it. Time for more video practice, I’ve not been at it much. But you’ll get the gist of how to carve this pattern. Here it is on the top rail of a chest –
I resisted as long as I could, but I finally caved & took a couple days for some chairmaking. I’ve had the parts for this brettstuhl hanging around since mid-summer, almost all made. Just needed to finish the carving, cut out the back, trim the seat board, cut the housings for the battens, chop the mortises for the back & wedges then put it together.
half a brettstuhl
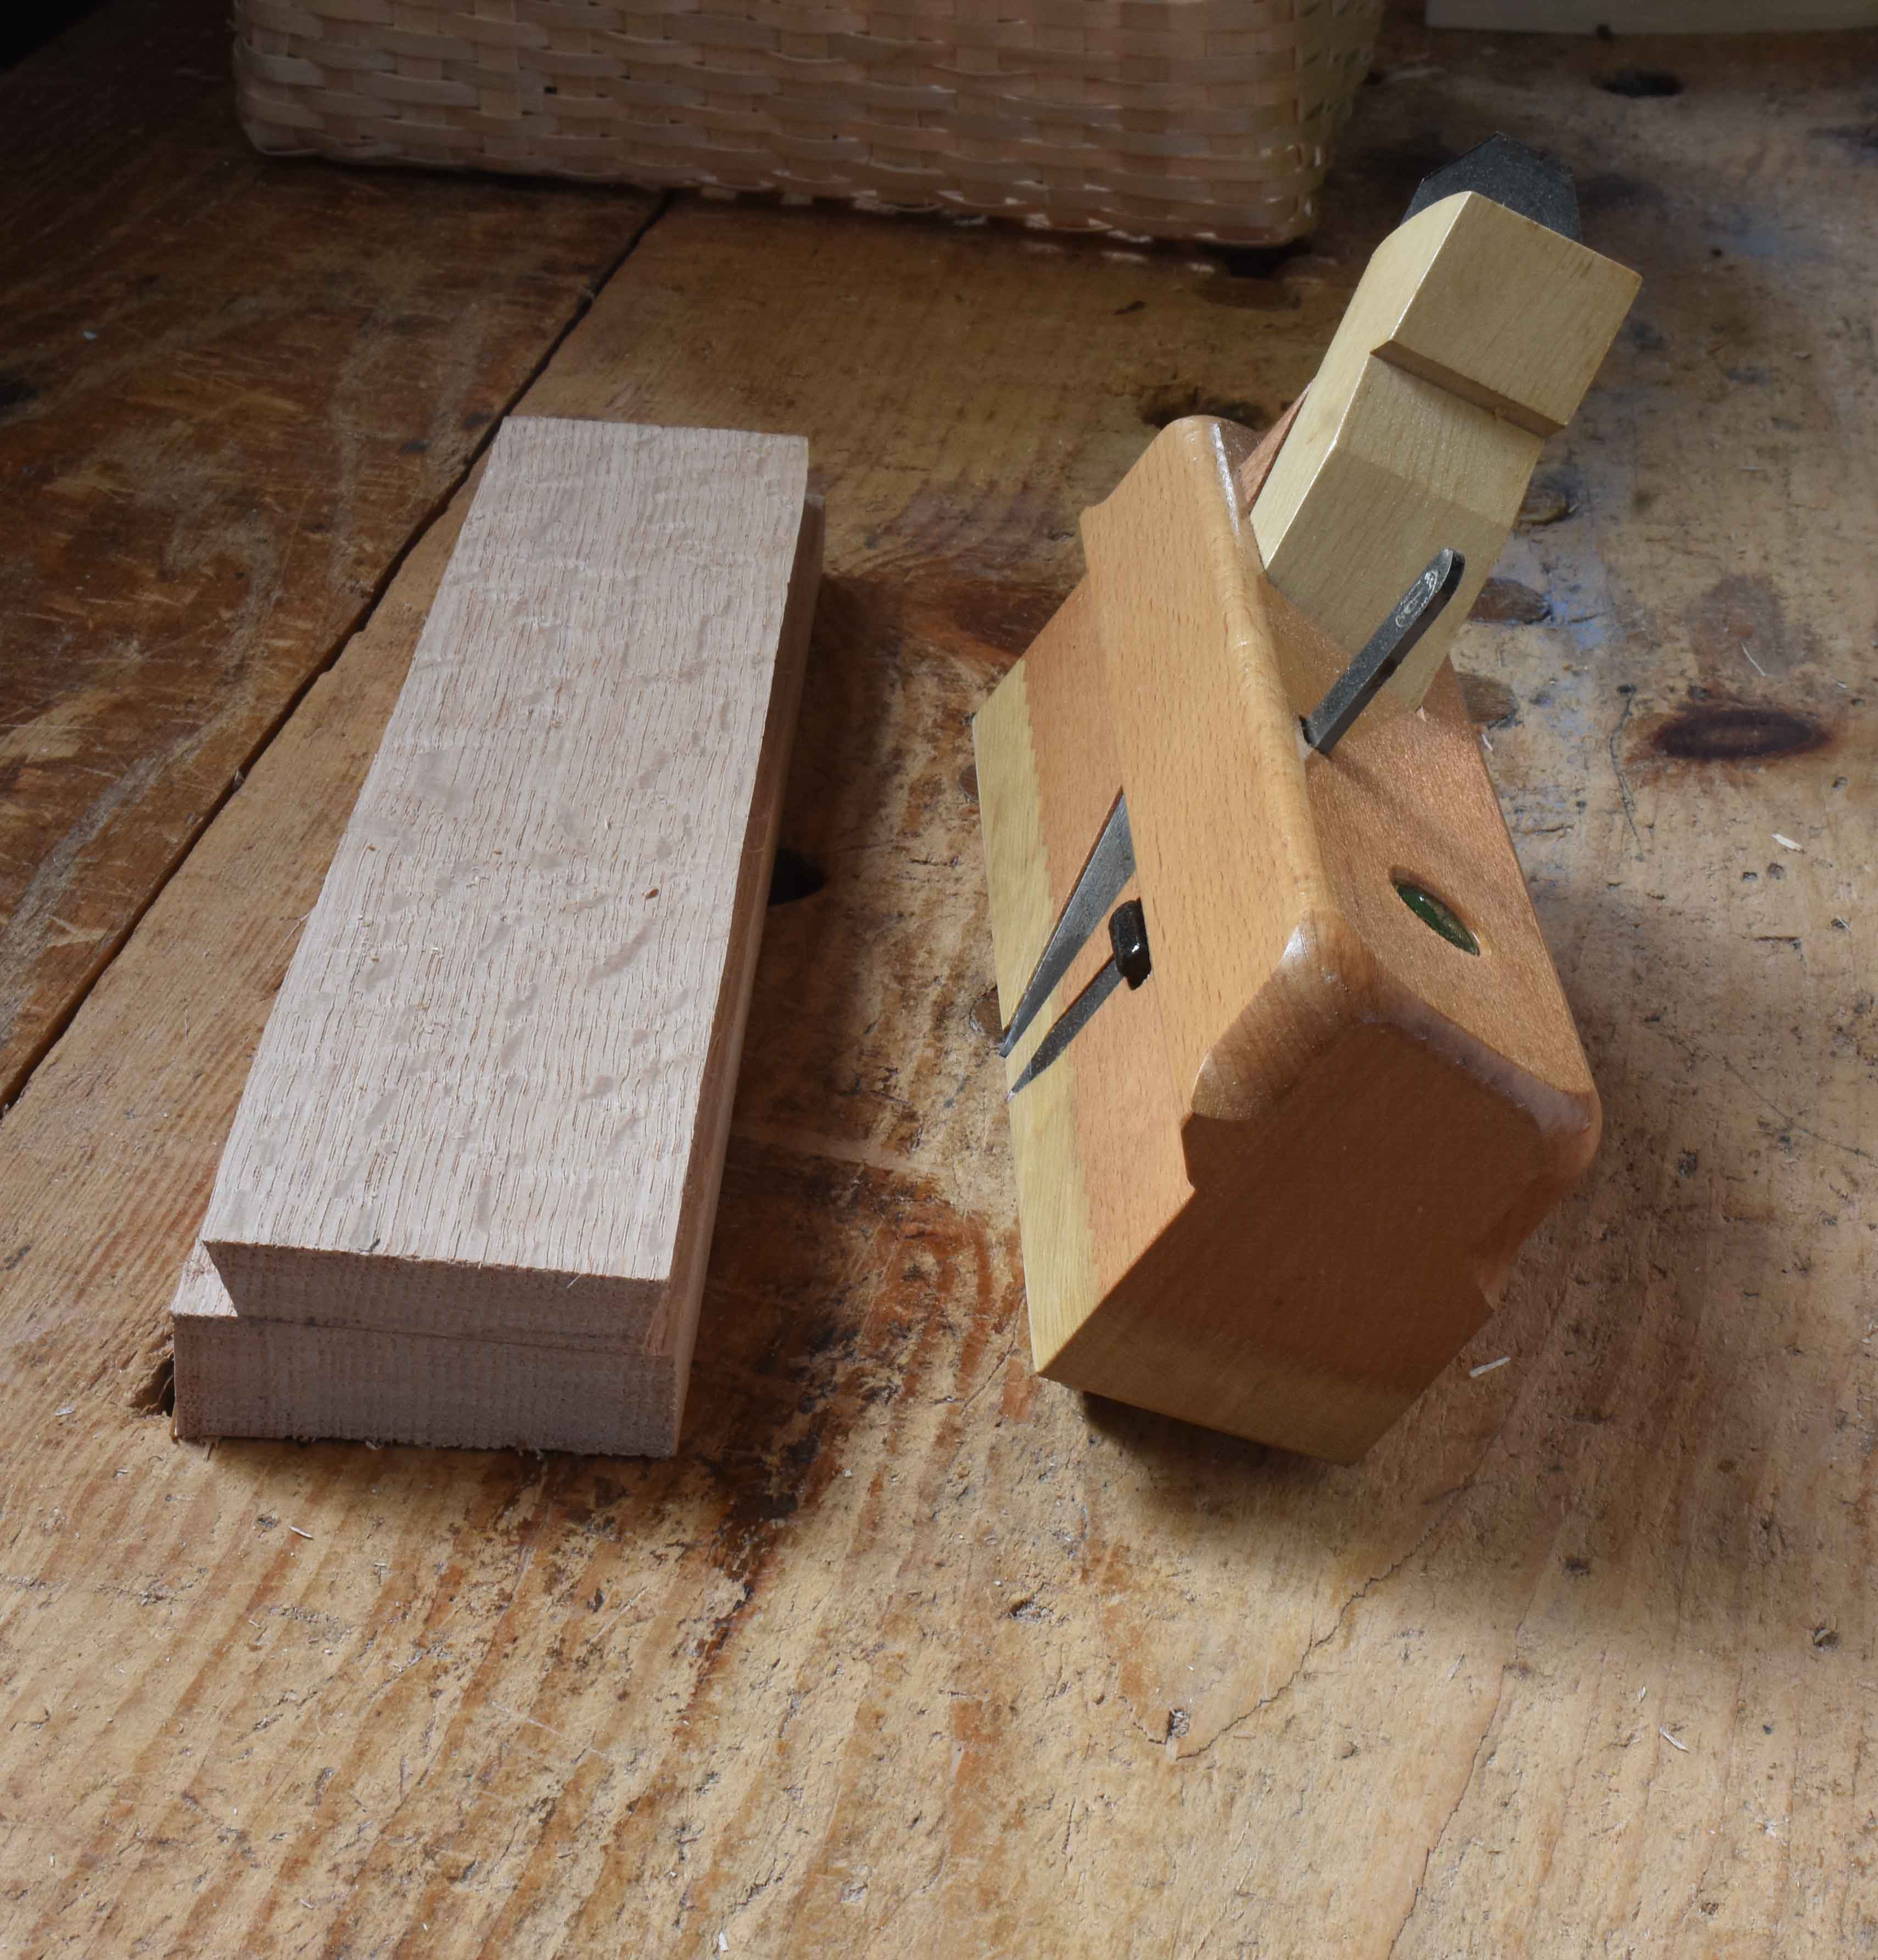
It started back in the summer, when I got it into my head to get a grathobel. Some help from some friends in Germany and I got one on the German ebay. An indulgence, but not a terrible one.
grathobel -in English a dovetail plane
So back in July or so I made the legs, battens and started carving the back. Then let it sit. I finished the carving yesterday and cut out the shape of the back. Then started in on the housings under the seat for the battens. Sawn & chiseled, then got out a router plane to bring things down to a finished depth.
router plane
The battens are tapered in width – so the best way I found to fit them is to make them extra long and then test them, and make a mark where the front of the batten stops.
first test fit
marking the progress
Then I take it out, and shave it some. Two or three shavings for a timid approach. Last thing I want is it to be loose.
trimming the edge
Then it goes back and I knock it forward & make a new mark. And repeat until it drives all the way to the end. I crept up on it.
four or five attempts
Then mortising for the back.
boring the waste for mortises
This time I cut the mortises in two steps. I had them in the walnut seat to begin with – it helped me locate where I wanted the battens. Now I’m boring through the battens – then follow this with chisels to finish the mortises for the back. It took a good bit of test-fitting & fussing. That’s what happens when months & months go by between chairs. For me, anyway.
fitting the back
I want to have to force the back through the seat, but not drive it with a mallet. I found out the hard way once that knocking that on its top end can connect the dots & split the whole back apart. I don’t want to learn that lesson again.
mortising for wedges
Then more boring & chiseling for the wedge mortises. Seems some old chairs use pegs instead of wedges. I decided I like the wedges. Might not make a difference.
back & seat wedged together
The battens I’ll trim after assembly, might need to trim the wedges too. But by the time I got to this point, it was too late for the next step – boring the leg mortises. Tomorrow.
well, the verdict is that I will try to run that video series I asked about last time, building a carved chest with a drawer. Lots of stuff to figure out before then, none of which is woodworking. But today I started riving and planing a few pieces for the chest.
riven stile
I have a desk box underway, ordered as a present. Time for the guts and then the top & bottom.
desk box, red oak
This is “made-up” – not a copy of an existing desk box. The size and proportion are derived from one I studied. The carvings – the front is based on one I saw on Marhamchurch Antiques’s site, or his Instagram page.
front carving
The ends I made up based on some New England work, as well as the Devon work that so often appears on Marhamchurch’s site.
The cupboard is still on-going. I’ve been making moldings and doing test-samples for coloring it. I don’t remember what it looked like last time I posted it -but here it is today.
From the sounds of it, looks like I’ll tackle this project. Thanks for all the encouraging support. A few things to wrap up first. but I’ll look into getting this started early in the new year. I’ll try to address many of the suggestions here, and more to come. PF
——
If you read this blog much, you’ve seen some posts about the carving drawing sets I’ve developed with Jeff Lefkowitz. I’m planning a new project for Jeff & I to work up early in 2022 – a set of detailed drawings about a particular chest that I have studied since 1990.
chest with drawer made in Braintree Massachusetts 1660-1680
When I shot a “make a chest” video with Lie-Nielsen some years ago, I worked on two different chests, each of which might be considered a “typical” 17th-century English/New England chest. That video is still available from them, and is still valid. I probably do things much the same way I did in that video. https://www.lie-nielsen.com/products/joined-chest-stream?path=home-education-videos&node=4243
But the chests made in Braintree, Massachusetts from about 1640-1700 are different enough to warrant a separate look at them. First, most of them have one drawer under the chest (a few have two drawers, one above the other). The construction details have some nice features and in particular the floor and back of the chest are unlike most others in New England. There’s molding details, an interior till, iron “snipebill” hinges.
I have studied them as a group since about 1990. Back then I was working on an article about them with Jennie Alexander. At that time, we’d seen maybe 12 of them – all by one family, William Savell and his sons John and William. Since our article came out in 1996, there have been about 6 more chests with drawers that have shown up at auctions (a few I’ve found because people just sent me photos of chests in their families.)
Back in 2005 I even got to buy one for our house. A rather poorly-restored example, I re-restored it and now our off-season clothing is in it. (It wasn’t expensive for something 350 years old – about the same as I charge for my versions. You can see I’ve never colored the new bits. Some day…)
Braintree chest w drawer, restored by PF c. 2006
So my plan is to send Jeff the details he needs to do the drawings, then I’ll draw the carving patterns and their layout.
If you’re not familiar with Pete’s project, it’s a video-on-demand series of about 15 hours of chairmaking. I subscribed as soon as he announced it and I’ve watched the whole thing. He has released it in about 11 videos so far, each around an hour to an hour & 1/2 in length.
I’ve posted over 30 “warts n’ all” videos on youtube since the spring of 2020. Those are free and will continue to be so – I still have some carving videos to come, that are based on the 2nd set of my drawings that I’ve worked with Jeff Lefkowitiz on.
But as I’m coming to the end of my cupboard project, I’m looking to tackle something for this winter. I’d like to try the video-on-demand idea. I thought the Braintree chest with a drawer would be an excellent project to take on for that format. The Lie-Nielsen video is about 3 1/2 hours long – the idea I have now would not be restricted by time, I’d be able to delve into more detail about the wood, the chests, tools, techniques, etc. I’d be able to include much more detail about how and why the chest is formatted the way it is. We could look at different planes and where to use this or that one, discussions about moisture content of the stock and where it matters and where it does not. Even some history if people want it!
muntin to upper rail joint
In the woodpile and shop, I’d show how I split up an oak and sort the pieces as I hew and plane the stock. There’s more attention to detail in the stock prep in these chests than most. Working through the steps, I’d show how I make a scratch stock for the molding on some of the framing parts, layout & cutting the joinery.
And the carving. I can show you the layout and details of how to carve the designs – the top rail’s lunette I have carved (in my carved box video with Lie-Nielsen) but I’ve never carved the panels on video before. I can show you the two different “hands” involved in the original chests, how I see which one is which – (through still photos interspersed in the video) – there’s a lot of nuance in these carvings. Only a few patterns but great detail.
chest panel, attributed to John Savell
The point of this blog post is to see if there’s interest in something like this. A joined and carved chest is a very different project from Pete’s Windsor chairs. The chest with a drawer involves about 40-50 pieces of wood, Pete’s stool is 6! (His chair is way more, 15.) And it takes up a lot of space. Finished size is 54” wide by about 32” high by 22” deep. The Lie-Nielsen video about making a chest is $40 – Pete’s Foundation of Chairmaking is $99 (the introductory price was $79) – so – the question is, anyone game? Because it’s such a large undertaking, I’m putting out this feeler to see if it’s feasible.