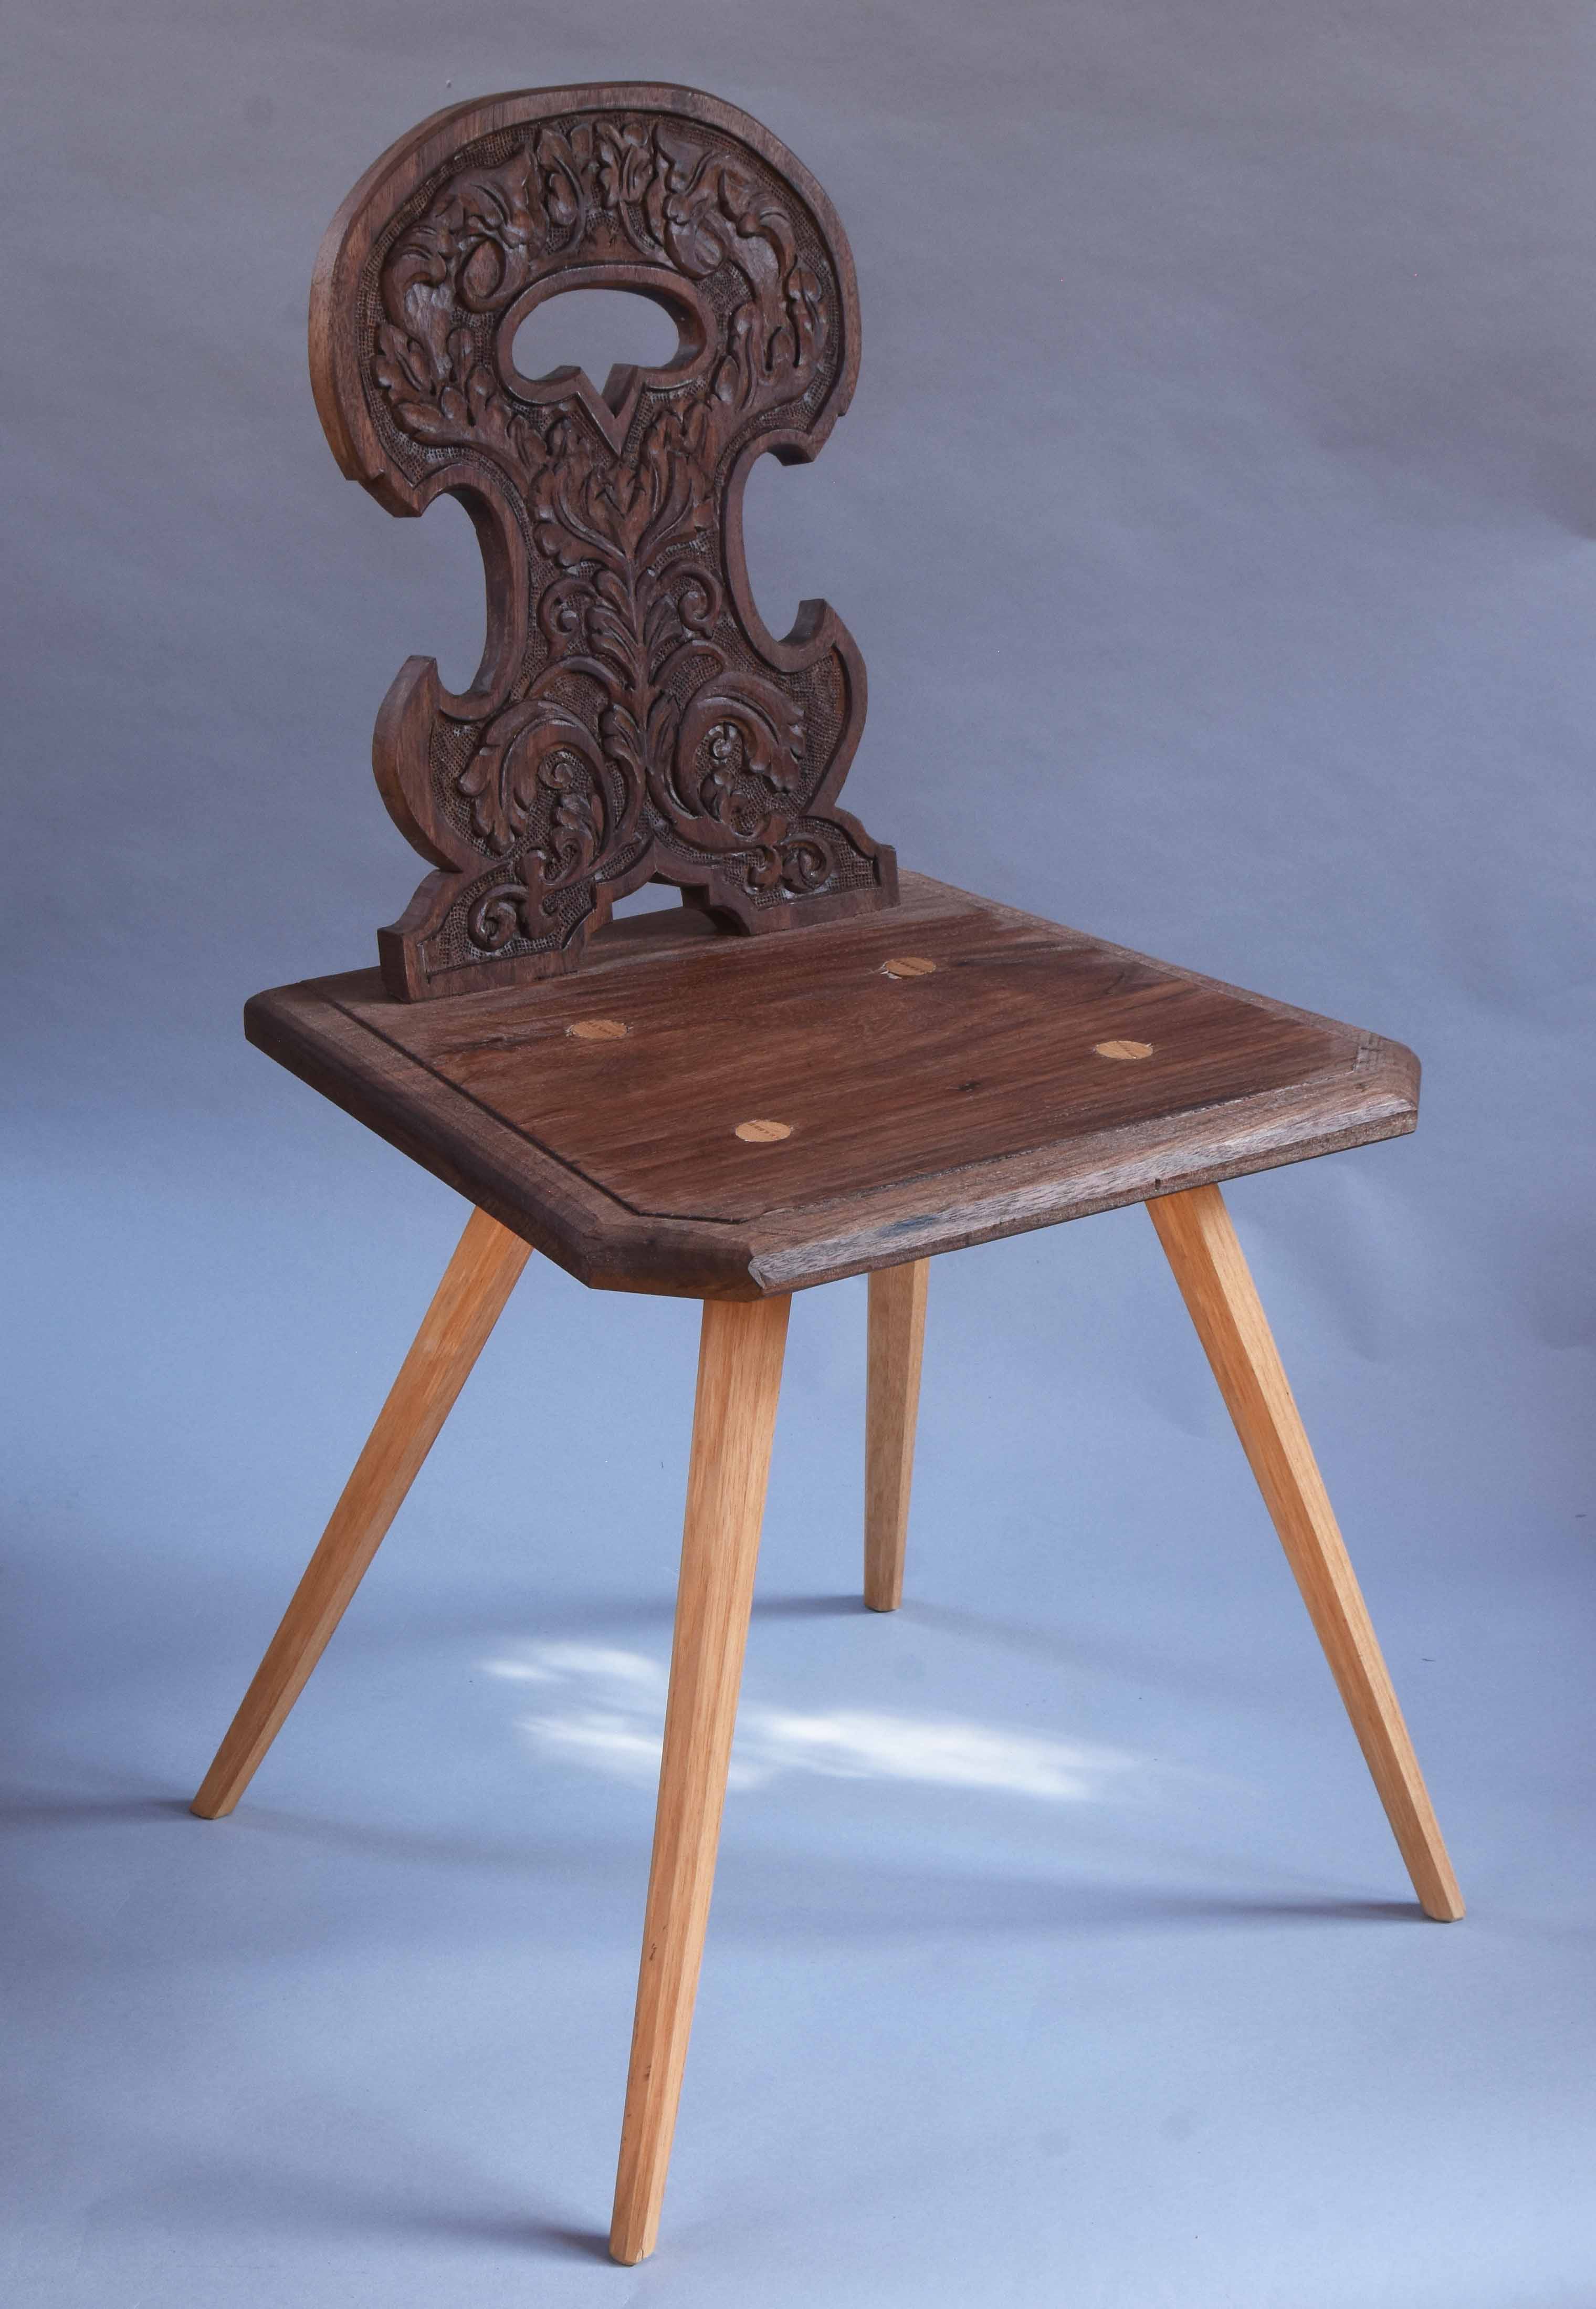
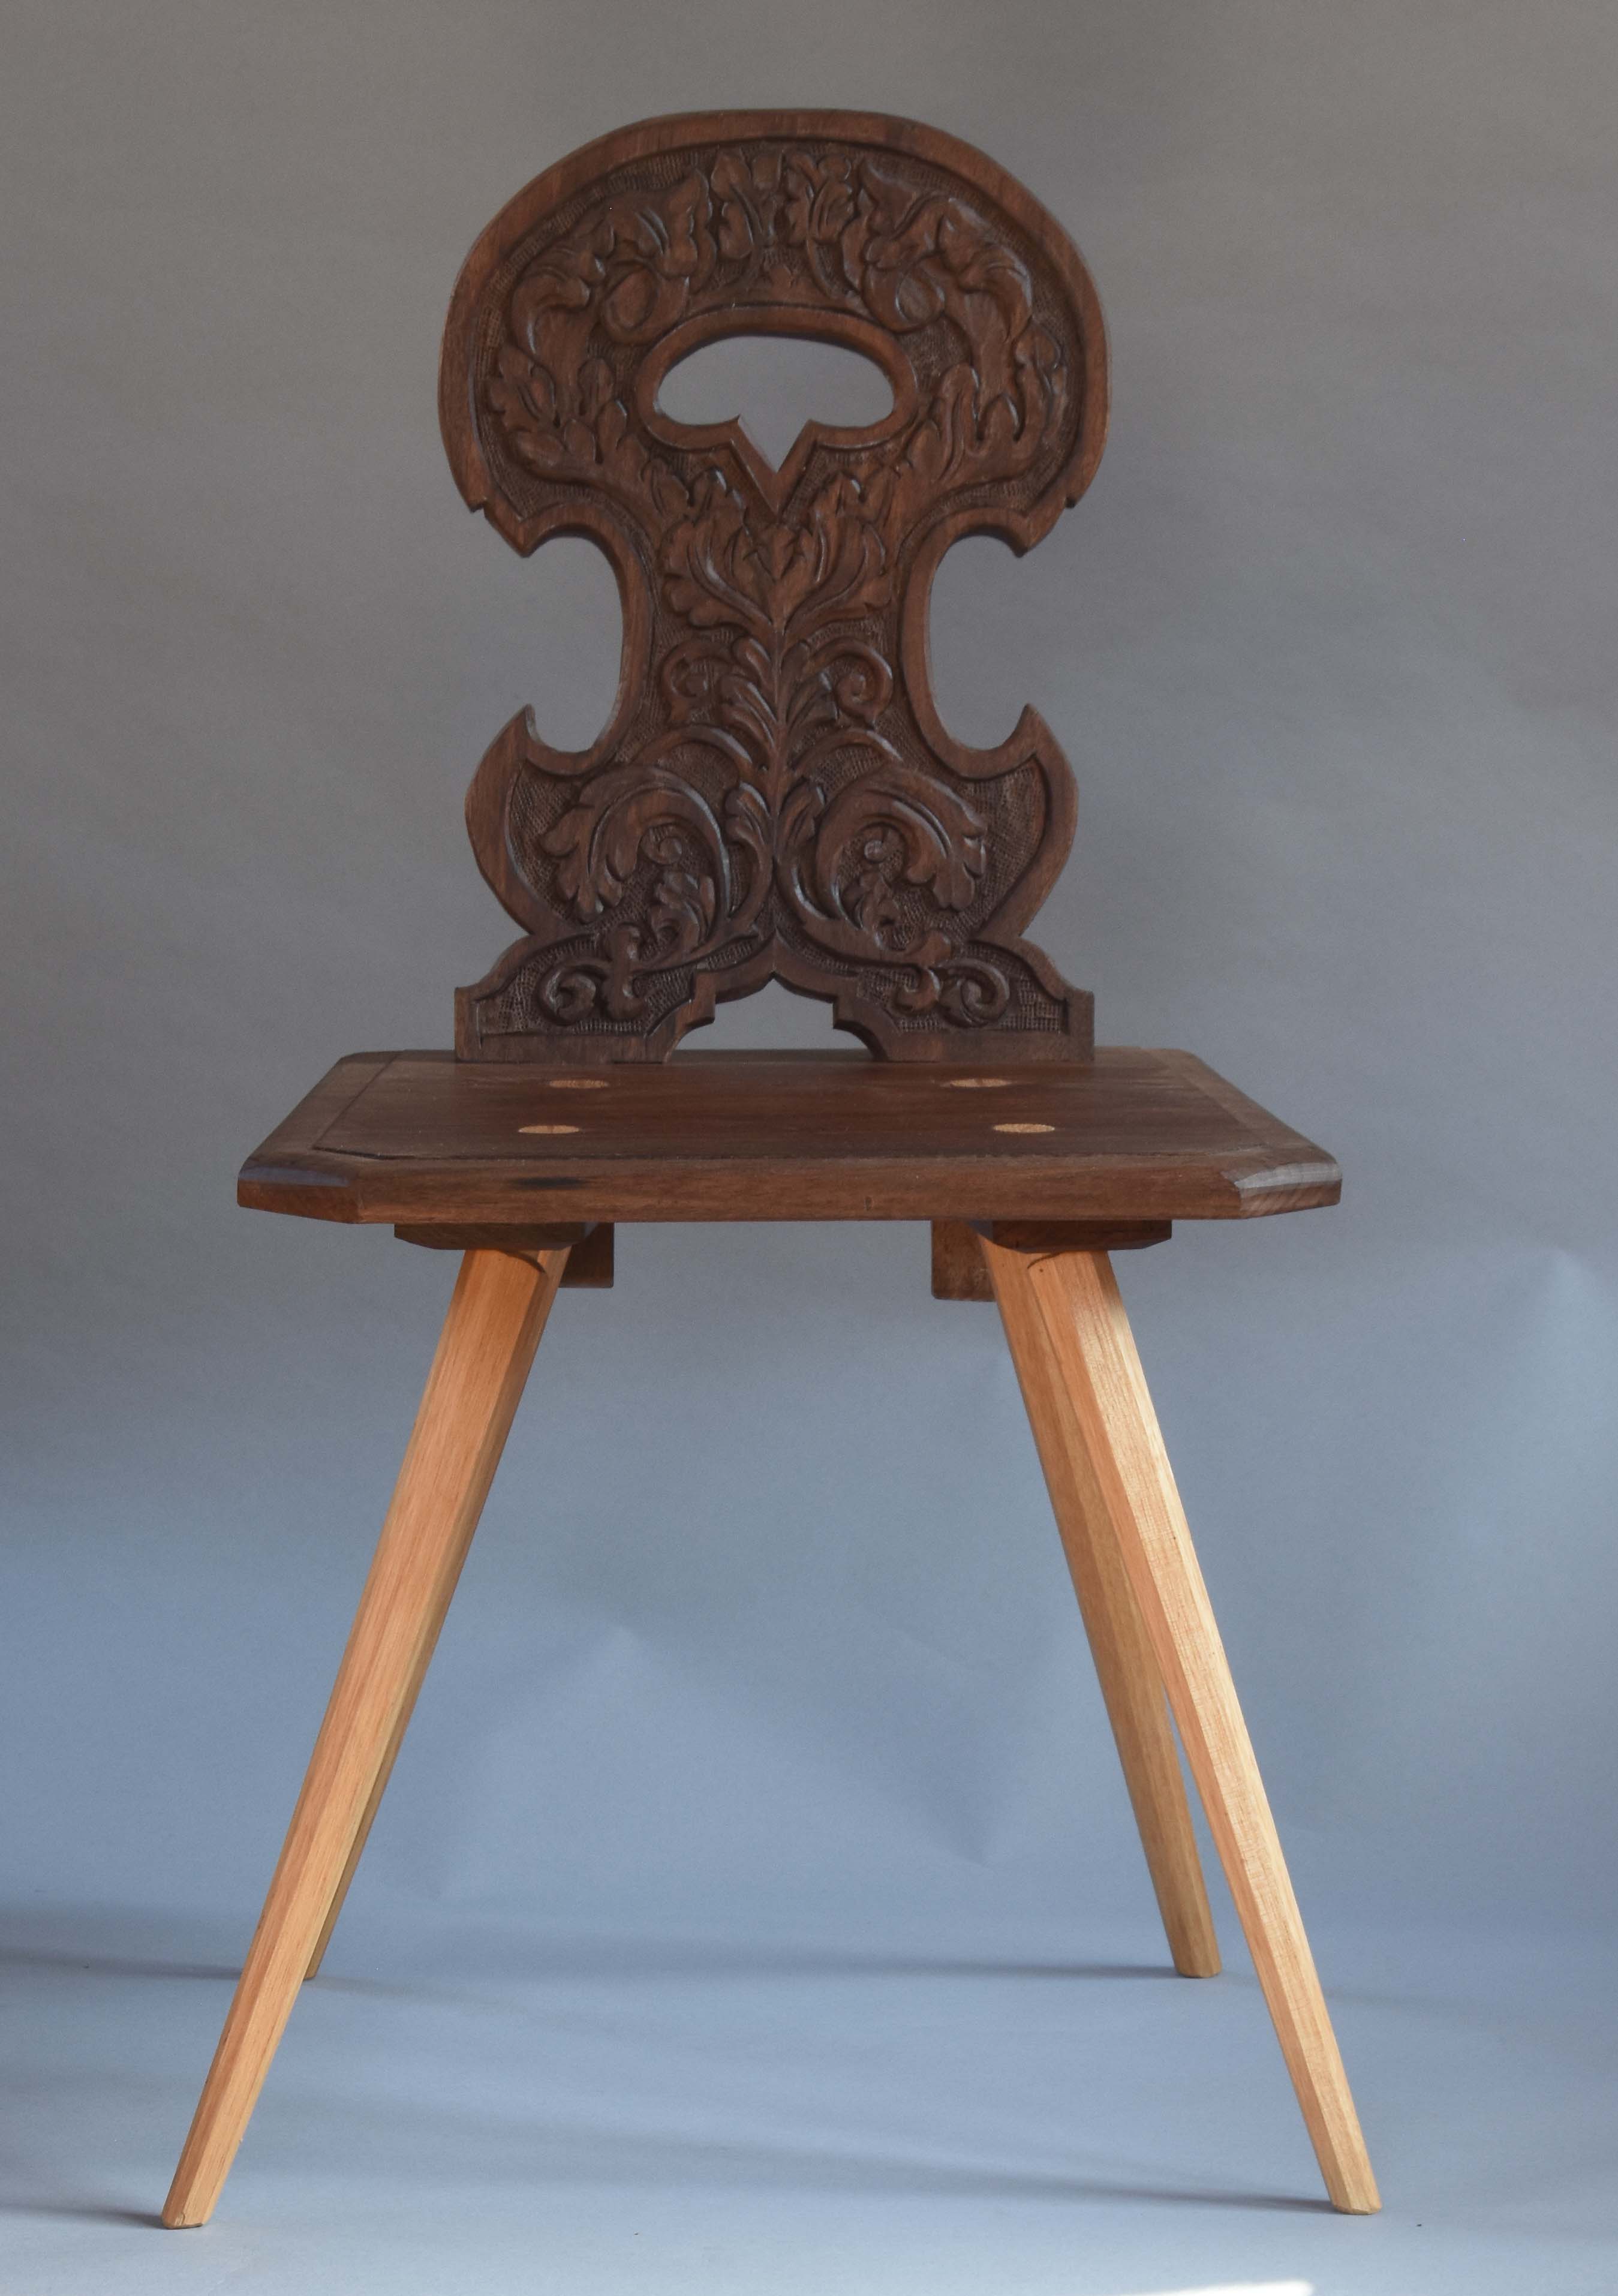
The other chair item for today is one I have for sale – not a JA chair (I’m starting some of those this coming week) – but one of my German/Swiss-style brettstuhls – I finished this one last week and am on the finishing touches of the video showing how I made it –
PF brettstuhl, Feb 2024. Walnut & hickory
Height overall is 32 3/4” and seat height is 17 1/4”. The width across the front of the seat is 17 3/4”, overall seat depth is 15 1/2” and the part you actually sit on is 13 1/4”. Price is $1,800 including shipping in US. I’ll box it up with the back removed – so some simple assembly required. Put the back in its mortises, and tap in two wedges. Photo/video instructions included. You must be able to count to two. If you’re interested in purchasing the chair email me at Peterfollansbee7@gmail.com
Making chairs in Galbert’s shop is out of this world – an immersion experience if ever there was one. All chairs all week. This is about the 4th time I’ve been there for this class and each time we learn more & more.
We’ll start by riving out the stock, shaving all the parts and steam-bending the posts. At that point, we’ll switch over to stock prepped before hand and chop slat mortises and begin boring and assembly. I’ll have one of my chairs as well as one of the last ones Jennie made. There will be a seat weaving demo – but I don’t have materials for students’ seats. Anyone who has either hickory bark or Shaker tape can bring it & weave their seat on the last day of class.
my first version of an Essex County (Massachusetts) cupboard
I’m past the half-way point on my 2nd version of this cupboard and it will pick up speed now. It should, anyway. I wrote so much about the project when I made the first version in 2021/22 that I have ignored this one pretty much. I haven’t been shooting many photos lately, so today I thought I’d have a look at other New England cupboards so you can see how this one is similar and how it’s different.
First – what is it? A press cupboard, a wainscot cupboard, a joined cupboard, a court cupboard – those terms all can refer to something like these. Below is a 17th century one from Plymouth Colony – the area where I live – for most of the 17th century it was separate from Massachusetts Bay to the north. (photo from Metropolitan Museum of Art, NYC)
Plymouth Colony cupboard
There’s a number of these Plymouth cupboards (and related chests with drawers) – the common format for the Plymouth ones is a lower case with four drawers (2 in the top row and singles below) and a cupboard with doors in the upper case. It has a flat recessed front behind two large turned pillars that support the overhanging cornice. Some of the moldings are integral, others applied. Applied turnings also. To me, the most notable feature of these pieces is the large integral moldings in the lower cases. These are roughly 2” x 2” square and feature what we call a “lipped” tenon – a section in front of the tenon that is molded. (my repro of this joint below)
unassembled view of “lipped” tenon
At least one of the Plymouth cupboards is open below – a common feature in period cupboards of this type. A lower shelf for displaying “plate” – i.e. pewter, ceramics or better – silver. A drawer in the middle section for linens, and a cupboard above. (also the Metropolitan Museum of Art).
Plymouth Colony cupboard open below
New Haven Colony along what is now the Connecticut coast had some very distinctive large cupboards. Flat fronted – no overhang, no pillars. Carved decoration in addition to the applied geometric stuff. (Yale University Art Gallery)
Guilford or New Haven cupboard – Yale University Art Gallery
They also had the more typical format – a trapezoidal cupboard, pillars, overhanging cornice – etc. (Metropolitan Museum of Art)
From Wethersfield along the Connecticut River comes a large group of chests with drawers and cupboards – carved and applied decorations. Doors below, flat-fronted but with an overhanging cornice. To me, the most distinctive feature of these is they are built in a single, full-height case. Makes them trickier to move than the others, all of which are built in two sections so they can break down for moving. (this one from Yale University Art Gallery)
Wethersfield CT cupboard
The cupboard I’m copying is one of 12 or 13 from northern Essex County, Massachusetts – most likely Newbury. But in Salem, Massachusetts comes this cupboard – now at the Peabody Essex Museum there – similar decoration – elaborate molded decoration, lots of turned bits – arches on the upper panels. Three deep drawers in the lower case. The only overhang is the cornice. An excellent cupboard.
Salem cupboard, Peabody Essex Museum
But the joiners and turners who made the group of cupboards that I’ve been working from went further than any other New England joiners. First off, there’s a lot of their cupboards left for us to study. And each one is something different from the others – some are similar, but most are quite singular. The overhanging sections are one feature unique to this group. Remember this one at Winterthur Museum – Jennie Alexander used to call it the “lunar lander.”
Essex Co cupboard, Winterthur Museum
One more for today – don’t be fooled by this. Irving P. Lyon, writing in the 1930s called it a “cabinet in the court cupboard style” –
Perkins family “cupboard”
I don’t know what to call it – it only has drawers, so I’m inclined to call it a chest of drawers. But it no more looks like a chest than I do. The black & white photo is pre-restoration. Here it is now, part of the Chipstone collection.
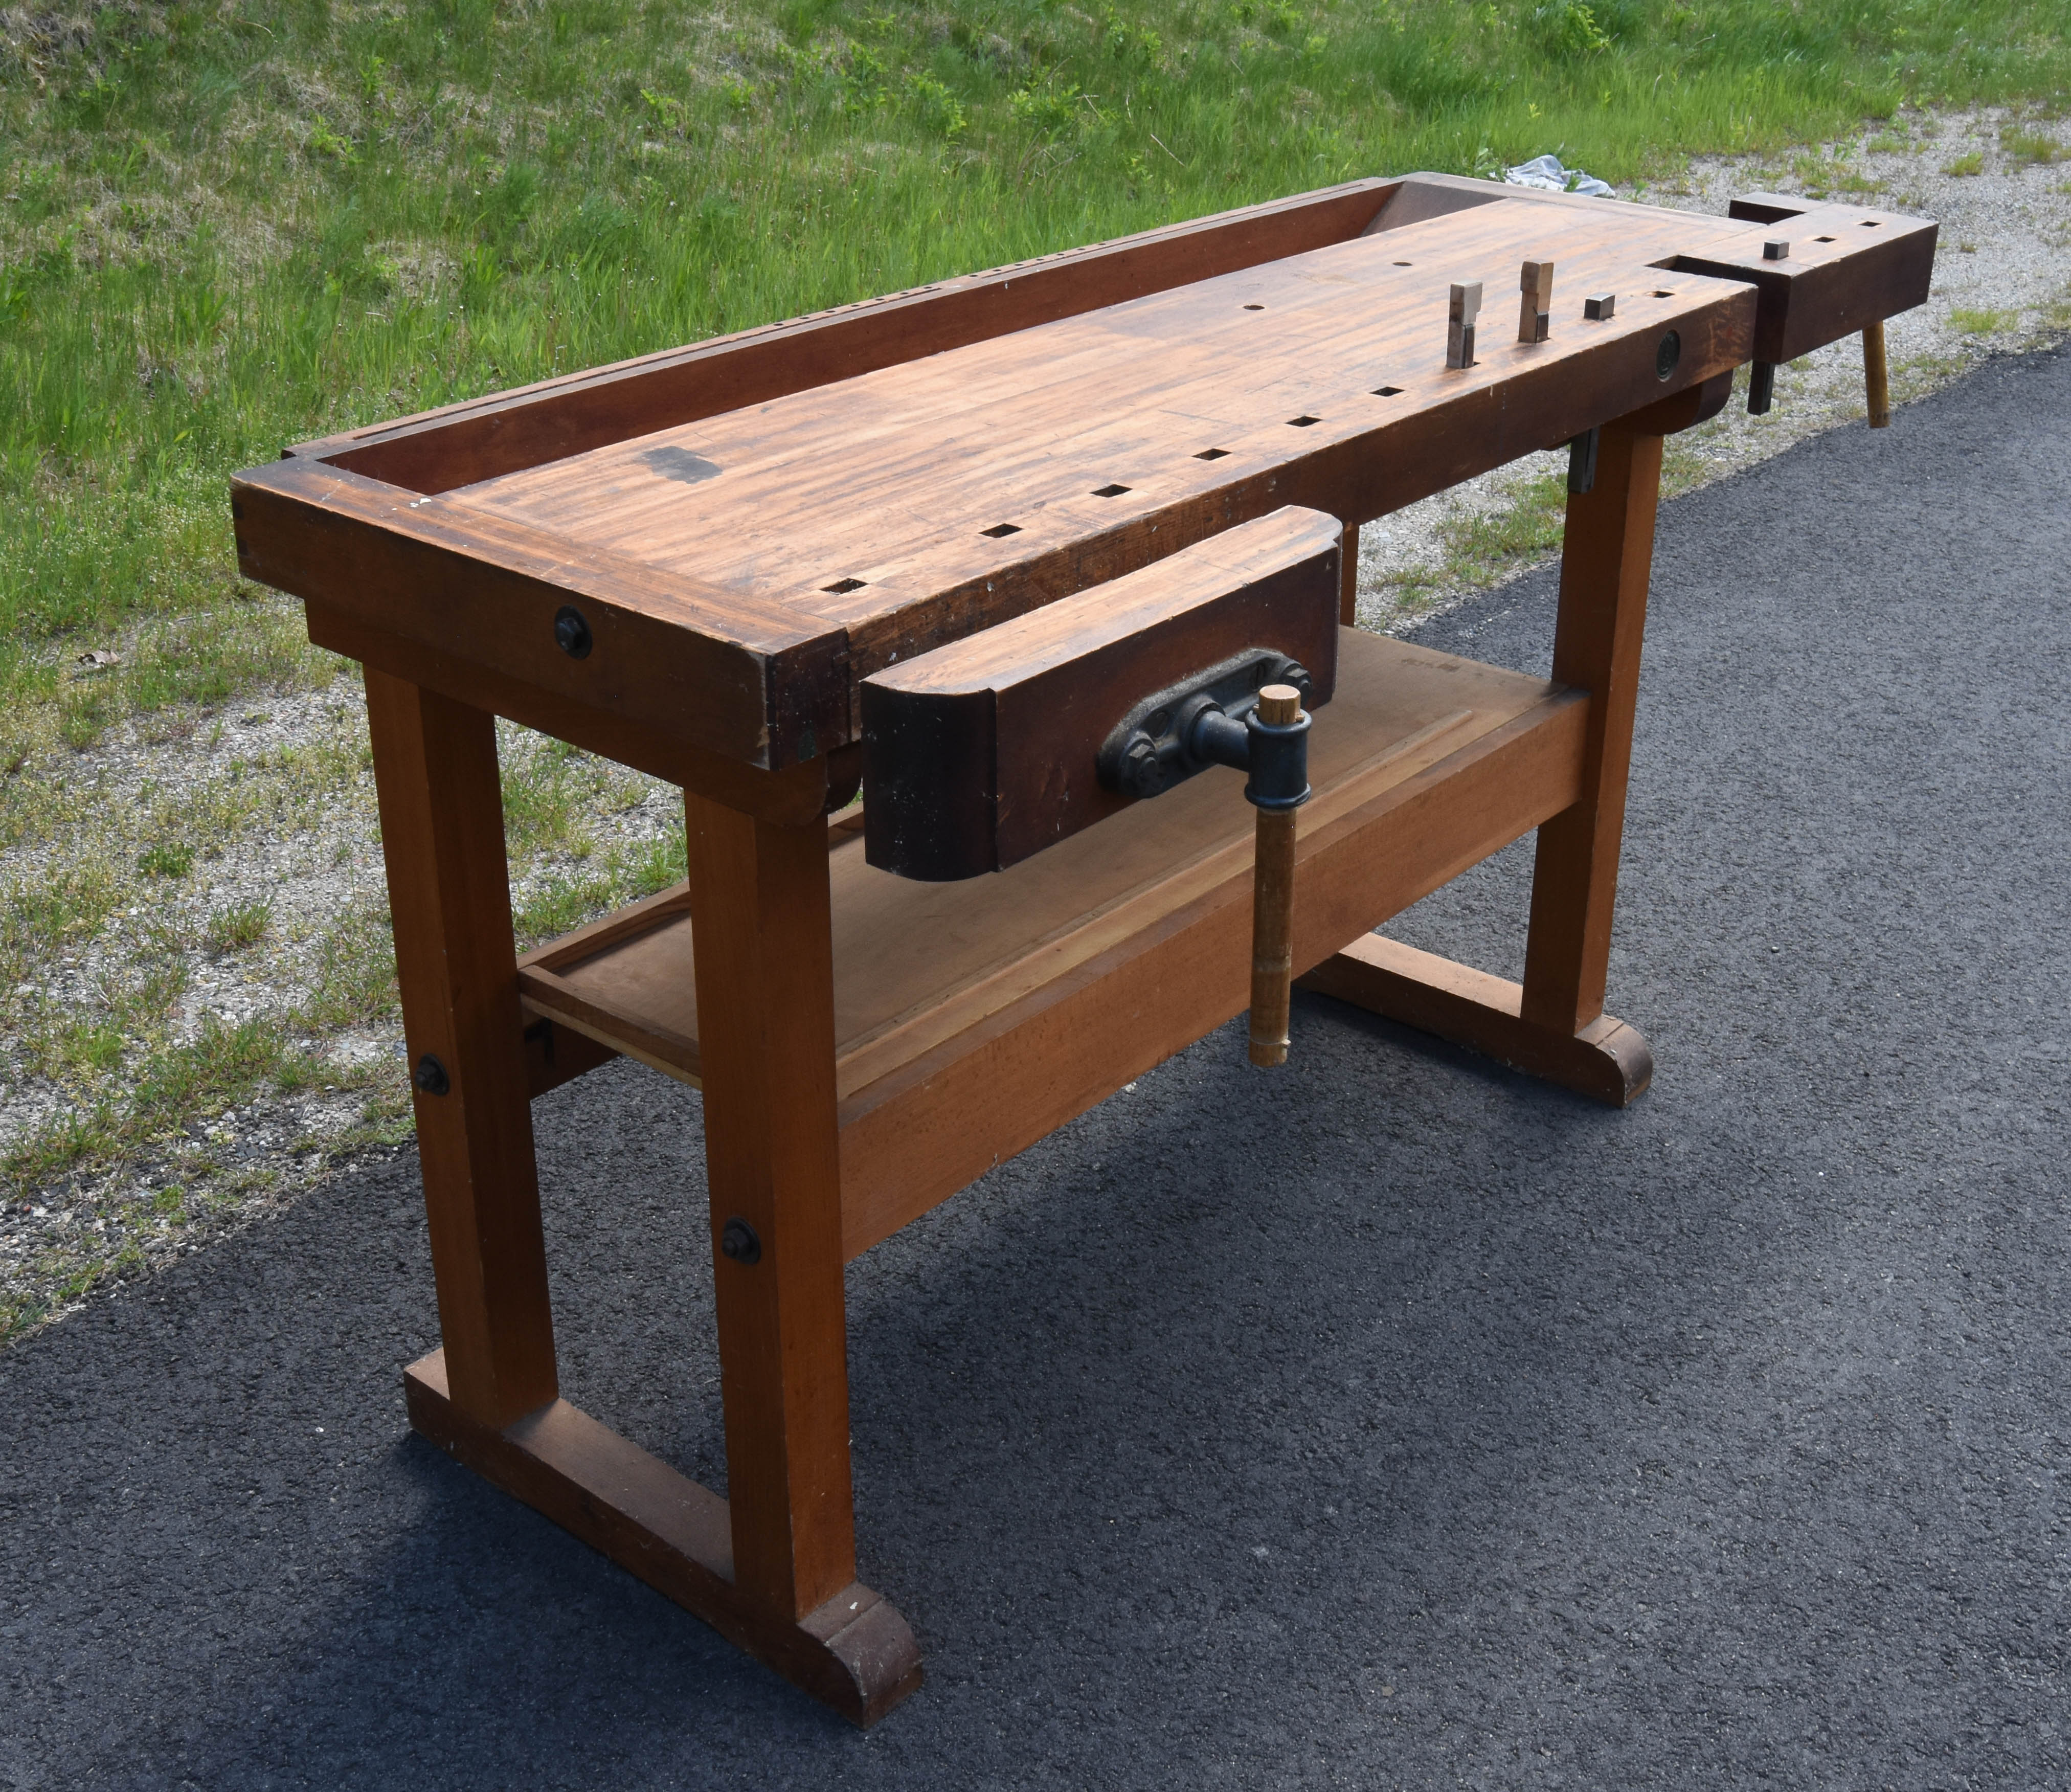
No birds today – some shots of an Ulmia workbench, one of 3, that I have stored for nearly 5 years now – time to move them on. These came from Jennie Alexander’s shop – she got them when she retired from her law practice and was teaching classes in her shop, so maybe 25-30 years ago.
L: 63″ W: 22″ overall, incl tool well. Bench surface is 16″ wide. Height – 34 1/2″. All European beech.
There’s three of them – and I have no idea how to price them. I’ll consider any reasonable offers, mostly I’d like to get them into someone’s hands who can use them. They’re stored in Plymouth Massachusetts. If you’re interested, leave a comment or send me an email Peterfollansbee7@gmail.com
tool well, face & end vise
JA added a narrow strip behind the bench for storing small saws, squares, awls, etc. I use something similar on my bench.
JA added tool rack
end vise
Two steel dogs and some wooden ones made by JA –
bench dogs
And a thin shelf tucked underneath – with a strip to rest planes on that keeps the irons off the shelf. I installed it backwards here, but it just drops in – so easy enough to turn it around…
The prices are $1,400 for any one of these three items – includes shipping in US. I usually ship this stuff through UPS, sometimes the post office. If you come pick them up, we’ll adjust the price accordingly.
This is one of the chairs – white oak & hickory with a hickory bark seat.
white oak & hickory chair
If you’re interested in ordering any of these, or some other furniture, send an email to me Peterfollansbee7@gmail.com
I have to go pick the lint off that carved box now – didn’t see it until I looked at the photos!
I’ve been pretty immersed in JA chairs lately, having just finished teaching it for 6 days. And talking about chairs most every moment of those 6 days. Above is a chair I just assembled back here at home. I had made part of it before the class, intending to use it for all the demos – but eventually I bailed on it – there was enough going on, I didn’t need to be making a chair too. But I had it all bored and tenoned – so just assembled it, then made slats yesterday. Today I began weaving the hickory bark seat.
I have two chairs for sale – both made leading up to the class. The white oak one I took with me, to serve as an example (I also brought one of JA’s last chairs for the same purpose.) Both of these chairs use a mixed bag of wood – oak, hickory & ash. Linseed oil finish. Over time all the different woods mute to a nearly single color – it happens pretty quickly.
If anyone wants to claim one of these chairs, leave a comment or send an email. I can send a paypal invoice (plus their fee) or you can mail a check – the old-fashioned way. Questions? – fire away. Peterfollansbee7@gmail.com
Ladderback chair White oak posts & slats, hickory rungs, hickory bark seat. $1,400 includes shipping in US
white oak chair, hickory rungs. hickory bark seat
it looks like red oak in the photo, but it’s white oak – a little browner than this reddish cast. The rungs are a mish-mash of hickory sapwood (the white ones) and heartwood (the cinnamon-colored ones) Here’s the bark seat on this one – my favorite, the inside half of a split strip of bark.
Ladderback chair – Ash posts, red oak slats, hickory rungs, hickory bark seat $1,400 includes shipping in US
ash ladderback
The bark on this chair is the top half of the split – a different look, still a great seat. the more you sit, the better it looks.
hickory bark seat
Another view of the ash chair – there will be more of these, I have an ash log I have to open up before it goes bad…one of my favorite woods.
ash chair
Meanwhile I’m writing up some notes about the boring method we used in the class – developed by Charlie Ryland. Those will show up here soon. I’m updating the chair-making video too – so people who signed on for that will get a notice when that’s posted. Then today I decided to re-shoot the seat weaving video section of that project. I made a few small tweaks to how I do that – one simple one being standing upright instead of hunched over. A world of difference. Below is today’s seat, now set to dry and shrink before I weave in the last bits.
I just recently came back from a 6-day class teaching the JA chair at Pete Galbert’s shop in Rollinsford, N.H. Assisted again by Charlie Ryland – it went swimmingly. And of course, the teacher learns as much as anyone, maybe more. So now I am itching to make some more chairs – but can’t get to them just yet.
Charlie (r) helping Brett assemble his chair.
There were 8 students whaling away at some red oak and a little bit of ash – splitting & shaving for a couple of days, then boring mortises & shaving tenons. All the chairs went together fine and were really well-done. The slats in particular went off without a hitch. Always a relief.
the brace & bit
I told “iron man” Russ he was my favorite student because he used the brace & bit – most others used a cordless electric drill. (actually used the brace & bit too – but I still called Russ Iron Man.)
Pete’s shop is in a huge mill in Rollinsford, right on the NH/Maine border. Upstairs is a semi-new tenant, but an old friend – Dan Faia. We took an early lunch break to go see Dan’s new setup there – he’ll be in the mill full-time starting later this spring, offering small classes and even one-on-one instruction.
Dan Faia
For decades, Dan has been teaching at Nort Bennet Street School in Boston – and running the furniture program there for a long time. Now he’s going to be closer to home and avoiding all that traffic that he endured so long. His shop in the mill is spectacular –
patterns galore
Everywhere you look is inspiration.
legs
We spent a bit of time learning about this chair he’s been building as a Fine Woodworking video – they’re just about done shooting it I think. It looks like Dan just waves his hand and there’s a walnut chair…
FWW video chair
So if you are looking for first-class instruction in fine furniture work, take a trip to Dan’s shop – here’s his website, etc
Well, a day or two turned into a week later. But I finished the bark seat I started a week or so ago. I have always woven these in two sessions, letting the first weaving dry & shrink before finishing the seat by adding more strips. I have no idea how other people do them, this method is what I learned & it works for me.
hickory bark seat
First thing is to let the first round of weaving dry. As the strips dry, they shrink in width. So then you pack them tight again, filling in the spaces that opened up between them. Below is the seat in the middle of this process – I was moving the side-to-side strips toward the back of the seat. You can see the rear-most 6 rows have less space between them than those toward the front. Notice how much space is opened – enough for another full strip. So I finished knocking these toward the rear, then the warp (front to back strips) moved over to our left.
packing the strips tighter toward each other
I’ve always called this “packing” the weave. It might be a basket-making term, I’m not sure. The seat is dry at this point and those strips are tough. So you can’t just slide them, I knock them with a short block of white pine. Top & bottom. It’s tough going.
packing the weave
The result is below – so there’s a good bit of space to fill. One full strip & two partial strips on the side. One full in front.
spaces to fill
Re-wet it. I don’t wet the whole seat again, just the areas where I’m going to work. Top & bottom.
re-wetting just the spaces to fill
And then weave in the new strips, tucking them into the weave below as well.
weaving in the filler strips
Then snip off the last ends under the seat.
the end
Then I wove the next one.
next one
This bark had been split in half when we took it off the tree, but it was still too thick. So I thinned it with a spokeshave after soaking it. A little frustrating – but every time I try to use a drawknife when the bark is in strips, I slice through it. So spokeshave it is. I didn’t shoot any photos of that process – but here’s one from a few years ago. It’s a slow process, the bark gums up the spokeshave a lot. Sharpening helps.
thinning bark w a spokeshave
The bark has a very different look from the first seat here. This is the top half of the split bark – the other is the inner-inner bark, if that makes sense. This is the part directly below the outer bark. Very stripey. Here’s the seat when I finished weaving it, as it dries it won’t be so bright. We’ll see it again when I finish that seat – next week I hope.
I’ve said it before, ‘ll say it again. I have great friends. Rick gave me an ash log last week – 8’ long. Straight & clear. One of my favorite woods, especially for chairmaking. I’ve spent parts of the last few days beginning to work up the sections into chair parts. Splitting and shaving, then more splitting and shaving. Here’s some sections waiting their turn. They don’t look it here, but the ash bolts are more than 5 feet long. (on the left side of this photo)
ash on the left, some red oak behind
I split and shaved and then bent three sets of rear posts for ladderback chairs (two in this photo). There’s more of that to come.
JA chairs-to-be
I also roughed out a set of turnings for a Windsor chair – 4 legs, 3 stretchers and 2 arm posts. Those I rived, shaved, then turned just in a general way to get them drying a bit. Then I picked through the remnants from those two jobs – to shave what’s left into ladderback rungs and Windsor spindles.
roughed out chair parts
These were all essentially leftovers – after I split out the other chair parts – so today I shaved them into 3/4″ square-sections. Random lengths. The longer stuff will be Windsor spindles. Any that already taper along their length – ditto. The stuff between 14 1/2″- 18″ will mostly be ladderback rungs. Some will be spindles. The shortest stuff there is 11″ – each Windsor arm chair has 4 short spindles. There’s more than a year’s worth for me! And the top of that heap are roughed-out stretchers for one of Curtis Buchanan’s democratic side chairs. I have the seat & legs made – but needed the stretchers. Now – big problem is where to put all this (& more right behind it). Today I committed a hideous sin – stuck them in a temporary place. On the lathe bed.
chairs & chairs
There was very little waste – a few handfuls of firewood so far. These two pieces (below) I rejected because they grew so slowly – there must be more like them, but I haven’t run into it yet. The green arrows show how the most recent growth was slower still. Weak as a kitten – if that’s really an expression.
slow growth & slower still
At the end of the afternoon, I went outside and found one more off-cut. Stupidly, I cut whatever I needed & left this piece at 14″ – 14 1/4″. If it was even 1/2″ longer it would have been perfect for ladderback rungs. As it is, some will make it, but half will be too short. But it split like a dream. I got 14 blanks from it – didn’t lose one. One piece of firewood.
perfect, but short by 1/4″
The picture below shows me splitting off the pointed inner bit. But I got one blank from that pointed side – the wood was so straight it split perfectly. (that’s how I ended up with 14, even though only 13 were marked out.)
2nd split
I’ll shave those next time. Some will make it for ladderbacks – others will be good for something.
next time
My next ladderback is going to have ash posts & hickory rungs. These posts were made long ago – the rungs are in the kiln. But I have to sort out the shop & clean it up before I can make this chair…
next ladderback
Ash – what a wonderful wood, but using it always makes me sad – millions of the trees have been killed off by the invasive Emerald ash borer – (this tree I’m working was dying from other causes if I remember correctly what Rick told me) – I don’t keep on top of that situation – but just now I found some encouraging efforts about identifying resistant ash trees – let’s hope they make it – https://www.monitoringash.org/lingering-ash-surveys/
Sometimes I’m a slow learner. When I made the chair-making video this winter, I wove the bark seat as I sat on a stool – pinned between 2 cameras-on-tripods; and up against the workbench. I flipped the chair up & down in my lap as I wove the top and bottom of the seat. It all worked – but today I did another seat, mostly without a camera and it went swimmingly.
I set a board so it hung off the front of the bench – and sat the chair on that. This time I wove the seat before putting the slats in – that makes winding the first strips (the warp) easier because I didn’t have to fish them under the bottom slat. Also easier to flip the chair around without the slats. I’m more comfortable working while standing for the most part, so this was an improvement in that regard as well.
pulling the long strips through the warp
In the “I thought you were supposed to be good at this department” I had to twice pull some weaving out because I messed up the pattern. In both cases I didn’t see it until I went to weave the next row.
asleep at the wheel
A butterknife helps fish the weaver through the warp when things get tight. Don’t use one from the kitchen, get one from a yard sale or somewhere like that. Your family will be glad you did.
it gets tight near the end
This seat, done for now, took 2 strips of bark, each over 30 feet long. There’s one joint under the seat. When the strips dry in a day or two, all these strips will shrink in width. I’ll then pack them tighter again and weave in some filler strips to finish the seat. I put one of these filler strips in already, on our left here. There will be one at the front, and one or more on the right side. Then I’ll make the slats.