late 17th-c drawings of tradesmen

One of the readers of the blog, James Rayner, sent me a link to a book of trades by Jan Luyken (1694). http://www.janluyken.com/index-en.htm

I know these engravings and the related drawings from a very nice exhibition catalog some years back called “The Butcher, the Baker, the Candlestick Maker: Jan Luyken’s Mirrors of 17th-Century Dutch Daily Life” by Donna Barnes (Hempstead, NY: Hofstra University, 1995). I think there’s 100 trades represented, maybe even a few more than that.

What I like about the catalog versus the website is that the drawings are featured in the book, versus the engravings on the site. The date of these works, 1694, means they coincide with the general transition between joiners and cabinetmakers as the prominent furniture tradesmen. The illustration of cabinetmakers in the set is so void of detail as to be next-to-worthless. The other woodworking trades fare better. Here’s the drawing for the chairmakers:

Luken's drawing of chairmakers


Way back when, my (then-not-yet) wife was in the Netherlands on vacation & I got this engraving upon her return:

chairmaker engraving


Here’s a separate drawing for the turners:

Luyken's drawing of turner's shop


It’s rare to find depictions of drawknife work, and here is a boom or mast-maker. Nice setup he has for holding long, whippy stuff for shaving.

Luyken's mast maker


I especially like the posture of the men in the carpenters’ illustration. The man in the background planing is quite convincing. Compare it to Jan Van Vliet from 60 years earlier.

Luyken's drawing of carpenters


van Vliet's carpenters, 1635


But, the van Vliet engravings are worth having regardless. The Early American Industries Association published them in 1981. Harry Bober wrote a short piece on the engravings and van Vliet, and the prints were not bound, but issued in a portfolio. Worth hunting for if you collect images of tradesmen. But then you’ll need the Luyken book too. I looked tonight & it ranges from $37 to $600. I’d say skip it at $600, but get it for 50 or under.

There’s more of this sort of thing in an earlier post, https://pfollansbee.wordpress.com/2009/05/12/new-old-lathe/ as well as scattered throughout the blog…

some birds, some woodworking

Took a few days off at Christmas…hung around the house most of the time. Here on the Jones River, December is a great time for birds. We see more ducks in winter than in summer by far. This week there’s been a flock of about 10 or 12 hooded mergansers, but they are quite skittish. I had to go back to a few years to find a decent photo of one, I had more time then to chase them down for pictures:

hooded merganser


We saw lots of hawks and herons too, this cooper’s hawk sat right up for its picture:

cooper's hawk


But today I got back to the shop today for a bit. I decided to repair the riving brake I have been using for a few years. It was built just a little different from what I wanted; so today I tore off the cross-pieces and re-did them. I like the upper piece to sit behind the leg on my left, and in front of the leg on my right. I think this arrangement provides a greater range of holding possibilities.

repaired riving brake


Once I got the brake straightened out, I split a section of red oak, just to make sure that it was tight enough. In the photo above you see I have a 45″ bolt of oak standing up with its upper end jutting out between the rails of the brake. I drive the froe into the end grain, then lift the oak up and wedge it between the rails, but lying just about horizontally. This allows great leverage when you are trying to direct the split this way or that…

driving froe to start split


froe & riving brake


While I was working out in the woodpile to fix this brake, a red-tailed hawk showed up & stayed for about half an hour. Dove at a squirrel, but missed. He stayed quite low in the trees, and was not at all bothered by me with a camera. So, I tried to get some woodworking in this post, but it’s mostly birds. Maybe next time.

juvenile red-tailed hawk

Xmas chairs, done

got 'em done

I finished the chairs today. Did the second hickory-bark seat, a few pins for slats, and some general scraping & smoothing.  It was funny making this style of chair again after many years. This type of chair was the first woodworking I really did, and I made quite a few of them over the years. As many of you know, I first heard of this chair when Taunton Press published John Alexander’s Make a Chair from a Tree in 1978. In 1980 I met Alexander when he taught his 2nd class at Country Workshops. Years later, when Alexander did an afterward for the 2nd edition of Make a Chair from a Tree, (Astragal Press, 1994) I was fortunate enough to be able to help a bit. At that time, the point of the afterward was to cull the un-necessary parts out of the original text, and in a sense simplify the task. I make a long-haired cameo in the afterward.

 Ultimately, Alexander went even further when it came time to make the DVD that is now the record of that process. The DVD is quite detailed, and really nails the chair. Jennie still sells it through the website: www.greenwoodworking.com – there are clips there as well: http://www.greenwoodworking.com/MACFATVideo

Alexander's post-and-rung chair


By the time the DVD was made I was somewhat removed from making Alexander-style chairs. For the past 20 years I have mostly concentrated on the seventeenth century stuff, including some turned chairs, like this:

turned chair, ash w rush seat


Another sort that I have made is what we call “plain” chairs, i.e. those with shaved parts instead of turned. We latched onto the term “plain” chair for these shaved period examples from a record I found from the Worshipful Company of Turners of London:

“20th February 1615 It was directed that the makers of chairs about the City, who were strangers and foreigners, were to bring them to the Hall to be searched according to the ordinances. When they were thus brought and searched, they were to be bought by the Master and Wardens at a price fixed by them, which was 6s per dozen for plain matted chairs and 7s per dozen for turned matted chairs.”  [from A.C. Stanley-Stone, The Worshipful Company of Turners of London – Its Origin and History (London: Lindley-Jones & Brother, 1925) p. 121.]

 This chair is in essence related to Alexander’s; but done in the simplest manner…

plain matted chair, PF

Typically a turner using riven stock would hew or shave the stuff prior to turning it on the lathe. This is how Alexander started making chairs ages ago, then just dropped the turning part. Some chairs (the plain matted ones) just omit the turning, presumably making a slightly cheaper product. The few surviving oldies are still quick heavy & thick…

plain chair, MFA Boston

As I was making these chairs this week, I kept thinking about how this or that step would be easier/quicker on the lathe, something I never imagined thirty years ago. I still use techniques I learned from Alexander when making the turned chairs, but certainly the most distinct difference is the bulk of the parts. In general the rungs on the turned chair above are about 1” in diameter, with ¾” tenons. I think Alexander’s rungs are just a hair over the 5/8” tenon. Even my kids’ chairs from this week are beefier than Alexander’s adult chairs!  

 In the end, I think of the shaved chair designed by Alexander as a modern chair, with its origins in the many traditional examples made down the ages. Alexander engineered a construction principle that is probably more meticulous than most early chairmakers bothered with. But it works great…makes a very strong, extremely light chair.

Antique shaved chairs are rare survivors. Last year Jennie & I worked with our friend Robert Trent on an article for American Furniture 2008 called Early American Shaved Post-and-Rung Chairs. There’s a slew of chairs in it, worth seeing if you like this sort of chair.

snow day, no woodsy-bits to speak of…

Apologies to my woodworking readers, but with 2 four-year-olds, five days til Christmas, and nearly 20″ of snow, there’s no time for woodworking today.

snowmen


Jones River snow


I always like the snow, the more the better for my purposes. It seems that it’s something for folks to complain about when shovelling it, but I like the way it quiets things down…today I got to work for a good while out front, and took regular breaks to watch the birds in the back yard and on the river. Give me winter & snow anyday over summer with its motorcycles and lawn mowers around here.  So I was quite happy with today’s total. Even got a new yard bird, a ring-necked duck in the river, # 93 or so.

The robin flocks have descended on the holly trees here, and they are working their way through the whole crop of berries…a winter tradition. We think of these birds as spring birds, but they winter here in large flocks.

robin in holly tree


It took some preparation; but we managed to get the kids outside in it for a while.

hip-high


First off, though, was the tree. Went perfectly.

now I don't have to do it


But I still do have a little woodworking before the big day. Ysterday I carved the kids’ names in the slats, and finished a hickory-bark seat on one of the chairs, and will do the other tomorrow. A few pins, a little oil here & there & they will be done. I got no photos yesterday, so this is the previous day’s output…I’ll shoot ’em tomorrow.

chair frame w test-slat

Stray bits; chest & stool

I’ve been sorting through some photos lately…so this post has no focus, other than some odds and ends.  Once the shop got cleaned a bit, I took a few photos. Here’s a joined stool and joined chest I finished this fall. The chest has been here before, in pieces, now it’s done. It was for the museum. The stool is one of several I have been making. I’ll not lack for a place to sit. 

joined chest, white oak & white pine
joined stool, red oak

People often ask about the layout for my carvings, do I draw the pattern on the wood, is there a template, etc. The answer is no and no. But here is a detail of the beginnings of a design, and a similar pattern from a finished box side. I scribe the centerlines, and use the tools to define the pattern. I strike the gouge very firmly, with a mallet. Full depth, one false move, and that’s it.

defining the pattern w gouge
box detail

Here’s the non-woodsy parts. I have been traipsing around a bit in the car lately, in which case I have seen a lot of skies…and I’m reminded how much I enjoy the low-angle sun & winter light. It’s great stuff. For a little while, I was getting out early in the morning for a quick walk. Here’s a sunrise in the Kingston Bay, looking out past Rocky Nook towards the end of Plymouth Beach.

sunrise past Rocky Nook

And last for tonight, I saw this sight one day this fall while having lunch at Plymouth Beach. I wonder if Michelle saw it too…  

plimoth beach banner

modern (for me) woodworking

Everything is relative of course, but for me, I traveled a lot this past year. Had great times in various locations, but one of the best parts is that several trips took me near enough to the Conewago Creek that I/we got to visit with our great friends Heather & Pat. These days Heather is living a dream, working as a full-time artist.  (see web http://www.heatherneill.com/ & blog http://hnartisan.wordpress.com/) – But back when the world was younger, in Cambridge, she learned chairmaking by watching me make a few. She went on to make way more ladderback chairs than I ever did; here’s the kids monkeying around in some of her oldies.

last spring in Conewago

I have often made Alexander-style ladderback chairs for kids in my life, but much like the proverbial shoemaker’s kids, mine have no home-made chairs. I started to fix that not too long ago, and worked on one of them today. This is modern-woodworking for me; a power-bore bit, held in a Stanley universal brace – I even used a pencil today on wood.

horizontal boring for chair frame

It’s been over 8 years I think since I have made one of these chairs.  Jennie still sells the DVD for those who want to take on these chairs. You could also take a class at Country Workshops, which is where I met Alexander & Drew Langsner back in 1980.  I simplify the methods I learned from them;  just because I am only making two of these, and barely have room & time for those. Before we really got entirely involved in joiners’ work, I was working pretty closely with Alexander; but my ladderbacks were always just serviceable, they didn’t really click like many other chairmakers that went through Alexander & Langsner. Thankfully joinery came along with my name on it…

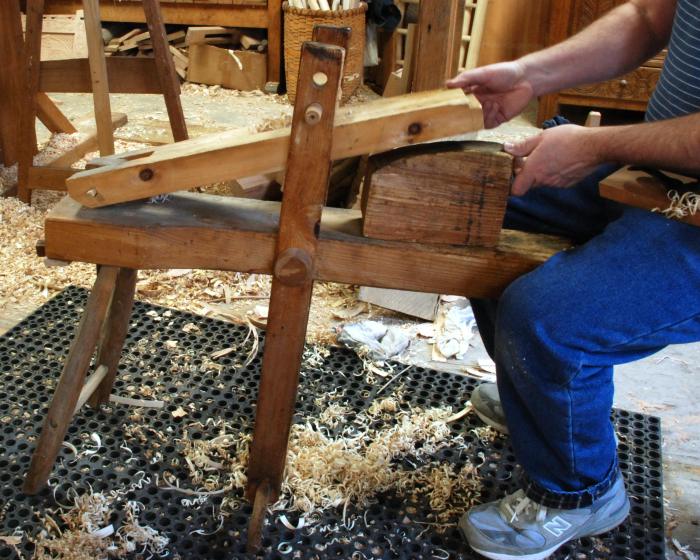
 A few quickly-taken shots of the shaving horse. I recently saw some folks saying they need a work surface higher than the “bodger’s horse” – but the one developed by Alexander has a hinged work surface…problem solved.

at the shaving horse
hinged work surface on shaving horse

I’ve been sick this week, so I only lasted a half-day today…so I got one chair partially assembled. Then I inserted a scrap of matboard to test for the slat curvature. It’ll work, but I’m no threat to the modern-chairmakers…

for those inclined, see www.greenwoodworking.com and

http://www.greenwoodworking.com/MACFATVideo

For Drew’s place, see  www.countryworkshops.org particularly http://countryworkshops.org/Ladderbacks.html

part-way there

partial assembly of MFA cupboard

Assembly of the upper case for the MFA cupboard began this week. It started with plowing the grooves for the soffit that will seal part of the upper case. The cornice hangs down past the top edge of the trapezoidal section; so positioning this groove has to be determined by a test-fit of the two sections of the case.

Plowing groove for soffit

It was also time to bore the peg holes to assemble the cornice frame. The stiles are maple, which produced a standard-shaped hole from the reaming action of a piercer bit. (This bit is something like the slightly-more familiar spoon bit.) As this bit comes around to the transition from cutting along the fibers to cutting across the end-grain of the stock, it tears things up a bit as it digs in. This results in the pointed, somewhat oval hole. Some woods, some bits, result in greater or lesser exaggeration of this shape.

piercer bit & its characteristic hole

Then I pegged the cornice to the rear frame; and test-fitted this section to the trapezoidal part. And then simply nailed the two sections together.

nailing sections of upper case together

Once I had the nails started, I laid the piece on its back, so I could drive the nails home.

detail of nailing sections of upper case

Here is a detail of the existing cupboard in New York, showing the toe-nailed rear stiles of the trapezoidal section meeting the rear frame’s stiles.

nailed rear stiles of original cupboard

Now my cupboard has gone to the musuem for a test-fit in the installation. I hope to goodness it’s the right size. If it is, then when I get it back, it’s time for the soffit, moldings and painting.

I forgot (birds, not wood)

sharp-shinned hawk

The biggest kick yesterday was the great views we got of this sharp-shinned hawk (Accipiter striatus). He decided that the best angle to snatch a bird from the feeder was directly above (he was wrong).

I’ve never been able to get this close to an accipiter before; the kids got to see him quite clearly as well. Finally, I spooked him enough so that the other birds could come & eat…as I was photographing him, I could hear a great blue heron, croaking his way up the river at low tide…not a bad start to the day.

MFA cupboard project: the door panel for JA

evidence for door frame on MFA cupboard project

Jenny Alexander asked the other day about the door I have made for the MFA cupboard project. This photo is the best evidence we have for what the door MIGHT look like. So, the frame is straight-forward enough. S-scrolls carved throughout.

I first made a frame just like this one, but then I didn’t like the length of the scrolls. The MFA lower case has some half-circles between its scrolls that I decided looks better. So I made a new frame.

S-scroll MFA cupboard

As far as the panel goes; it is all conjecture of course. The one at the Metropolitan Museum of Art in New York was re-done in the early 20th century with painted decoration on its panel. I decided against a painted panel, so that left either a carved one, or one done with applied moldings forming geometric patterns, like the middle drawer front:

drawer front, MFA

So I flipped a coin, and it came up carving. Then I had to work out a pattern based on the size of the panel, and the various designs used by this joiner/carver. I tried this S-scroll pattern, but decided it was too repetitous with the door frame.

first door panel design

So I settled on something seen on the Winterthur box and the chest at the Concord Museum, a lunette shape, that will have dots & background paint as well. Here’s a detail from the box:

carving detail
new door installed

There is a strip of pine that gets mounted on the panel, above the lower rail. It will have a angled striped pattern painted on it…this is seen on the Concord Museum chest:

pine stip added to panel

In the end, the panel is entirely conjecture. But plausible. There are lots of versions I could have done, none more right than another, really.

So, JA, that’s what the door panel is about. Happy 79th.

PF

painting for the MFA cupboard project

scribing oval

I got out some painting gear yesterday, to make yet another sample for the painted work on the MFA cupboard. I started by scribing the design, an oval and 4 quarter-circles.

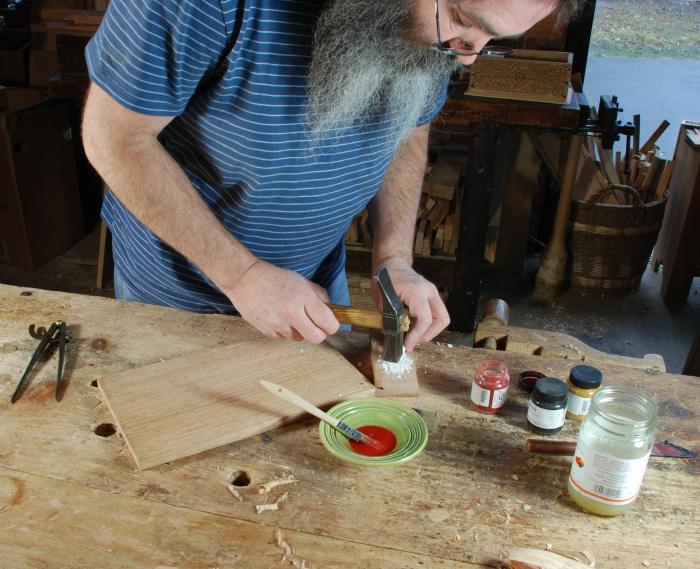
This time I wanted the paint to be somewhat gritty; the original shows chunks in the paint. So instead of a muller & glass, I just mixed the pigments with the brush right into the vehicle; in this case, hide glue. The tests have shown there was chalk mixed in the pigments as well, so in a pinch I just crushed some blackboard chalk & threw it in.

crushing some chalk for the paint
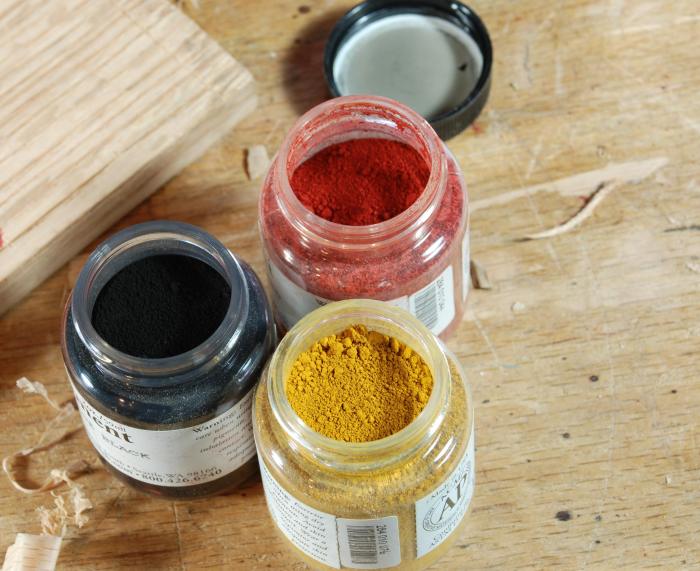
pigments: iron oxide, bone black & yellow ochre

I did the red color first, just tossed some pigment into a dish, with the watery glue. Stirred a bit with the brush, & painted it on the bare oak.

iron oxide background

then the black, then the white.

black corners

The white is the hardest to imagine. Today the section on the original that has tested white shows up as dull grey/black.

MFA cupboard base; painted decoration
white oval

The oval & quarter-circles get a thin border painted around them, then the whole thing gets a tinted varnish.

Now I want to do another, because I think the borders come first, essentially as an outline. At least I’d like to try it that way.