thoughts while working outdoors

ladderback chairAges ago I was principally a chairmaker and poked around in various bits of green woodworking like basketry, spoon carving and other things centered around riven green wood. Because green wood has always been my starting point, there has always been an outdoors component to my woodworking. Making ladderback chairs, I could pull the shaving horse and a low bench outside, and make the whole chair out there. The notion is the same as this view of me making a garden hurdle:

boring

But as I got more involved in furniture making, much of my work centered around the workbench and shop tools. I still did the initial work outside, splitting and riving the stock, some initial hewing – things like that. But once I was to the bench work, it was indoors with me.

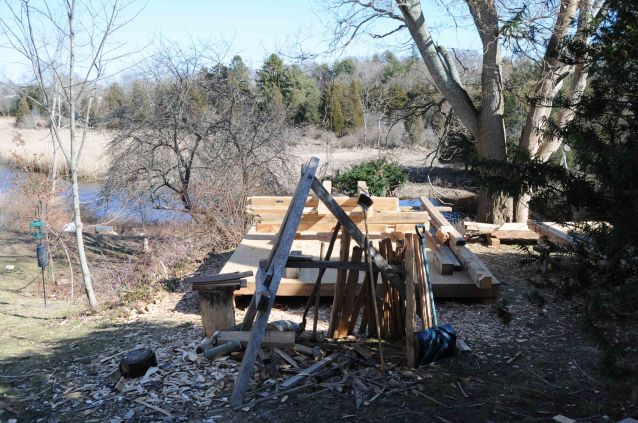
This winter as I’ve been cutting the frame for the workshop, it’s almost all outdoors work. I carved the designs on the timbers inside, and cut some joinery on smaller parts inside while the weather was bad. But as long as it’s been warm enough (a relative term, generally over 25-degrees Farenheit) 99% of the work is outside. We started in December and those days were pretty short…I know some places have less daylight than us as the winter solstice approaches, but here we got about four or five hours of work in on those late-December days. Not all the shortage was due to daylight issues, some of it was simply a case of fitting this work in around general life issues. Working part-time, we got started in December, quit for the holidays, the picked up again in January…

paring

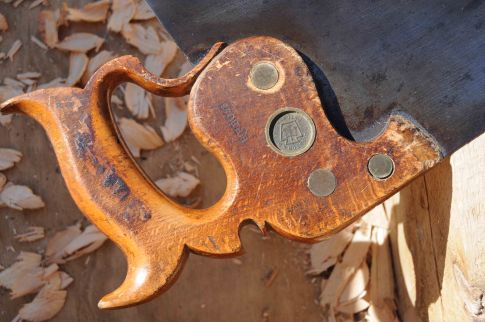
This winter has been a remarkably easy one, especially after last year’s over-100 inches of snow. So we got lots of good-enough weather to layout and cut the joinery. I think since the holiday break, there’s only been one week, maybe two, where there was no chance for cutting joinery. Now we’re closing in on the last couple of weeks of joint-cutting…and I’m noticing the weather, the light, and the landscape changing. It’s easy to be more aware of this being outside all day. Here’s some newly-brighter light on an old saw handle:

stronger sunlight


Today I worked about fours hours out there. These days as I’m chopping brace mortises, I’m trimming and fitting the brace’s tenons, then marking them to their dedicated positions. This is the beginning of test-fitting the frame.

brace tenon


brace test fit detail

When I first starting working at home 1 1/2 years ago, I had some low work-benches scattered around part of the yard, tucked in front of my riving brake. I couldn’t make joined furniture there, but wove baskets, hewed bowls, and carved spoons at various spots in the U-shaped tangle of benches. It became a favorite spot to gather and make stuff, the kids used it too.

weaving

When it came time to choose the site for the shop, that was the natural choice. The riving brake will have to move before raising day.

riving brake

So that’s where I’ve been much of this winter, when time allows, cutting mortises and tenons, watching the river flow, and keeping tabs on the yardbirds.

river view

accipiter

The shop could have been all framed & sheathed by now had we gone with a nailed-together, 2×4 format. But the way we approached this project was for the long haul. I knew I’m not building another workshop; so I wanted this one to really have a personal touch. As I had written before, it has long been a dream of mine to make my own hand-made building. And with some great help & guidance, it’s coming together. Slowly, but once it’s done, it’ll be  done a long time. And it’s great fun, being out there, working on it.

Meanwhile, the kids have set up a cafe with the off-cuts. Not sure I’d eat or drink there…

off cuts

Weather permitting, I think the frame will go up in March, just as the first flowers will be poking through the leaf-litter. Then we’ll begin closing in the shop, so I’ll be back to working inside just as the nice weather is getting here! I’ll make up for it with windows.
wainscot chairs, front stiles & side rails

Lincoln chair, red oak, walnut & maple

In between working on the shop frame, I’ve been slowly working on 2 wainscot chairs. It’s been a while since I have made any of these, (the one above is now in the Hingham Massachusetts public library, so I’m told) – a long hiatus means they are again worth a look. The aspect to cover today is the shape of the front stiles, and the resulting configuration of the side rail’s tenon shoulders.

Wainscot chair’s seats are wider at the front than at the rear, so the side rails are angled. So – do you cut angled mortises? Tenons? Or what?

Some have front stiles with a square cross-section. In cutting the front rails’ tenons, it means nothing. 90-degree shoulders, and away you go. On the side rails – what to do? The ones I’ve studied closely have angled tenon shoulders, but the tenon itself is in line with the rail. This keeps the long fibers intact, making a strong tenon. Requires some geometry to get the angles right on those shoulders, I just scribe the whole chair seat full-scale on either the bench top, some clear wide piece of wood, or any other handy surface. Then take the angles from there with an adjustable bevel.

The real challenge is cutting the mortise at an angle. I’m spoiled by cutting most of my joinery in perfect straight grained wood, in which case mortising is easy. In this case, I have to chop the mortise at an angle, so across the fibers. Like those with ordinary wood. Aggghhh.

Back when I made the DVD with Lie-Nielsen on making these chairs, I made two sample joints. Here’s the square stile version, closed and opened.

sq stile angled rail

sq stile angled shoulder open

One hazard with the square stiles and angled mortises is the chance to bust your mortise out the side face of the stile. I’ve done it, and seen it on old chairs. Another way to do it is to plane the front stile to a weird cr0ss-section, and then your rails have 90-degree shoulders no matter whether they are front rails or side rails. And your mortises are parallel to the face they are struck from. Like this:

shaped stile

shaped stile joint open

Sorry that side rail is not quite in focus, but it’s not worth setting it up again! You get the gist of it, the shoulders on that rail are cut at 90-degrees. It’s a weird piece to plane, two corners are 90-degrees, and the others are not. The chairs I’m making now use this kind of front stile. I promptly forgot that & cut one side rail with angled shoulders! Out of practice, but now I’m getting more…

Here’s a somewhat poor shot from the chair I’m now copying, showing the side rail on our right, and the front rail across the top of the photo. You get an idea of the front stile’s cross-section, and the applied molding shows the general angle too.

seat angle

At the side-rail-to-rear-stile joint, it’s immaterial. You have to use an angled shoulder there, because the flat front face of the rear stiles is parallel to the flat front face of the front stiles. too confusing? When I make the rear stiles I’ll show some of that geometry .

The DVD on making wainscot chairs is available from Lie-Nielsen, and I have some copies for sale as well. It’s long, but in it I make parts for 2 chairs, showing both these arrangements. https://www.lie-nielsen.com/product/home-education-videos/17th-century-wainscot-chair-with-peter-follansbee?node=4243

day off to clean up & sort stuff

Mostly this winter has looked like this in our neighborhood.


before the snow

Then the other day, it looked like this:

upriver

Most winters I like it like that…but this winter I’ve been framing the workshop, so trying to get every outdoor day’s work I can. But it looks like for the next week, the shop will be covered up, thus:

shop w tarps

After this storm the other day, I was able to uncover the work-site, and finished cutting the rafters we had laid out. But tonight I’ll cover it again, the prediction is for more snow for the next couple of days. I can’t complain, I’ve got pretty far, considering the season. And I love the look of the snow, and the quiet.

A couple of days ago, one of the many emails from Popular Woodworking was one I was waiting for – April Stone Dahl’s new video about her black ash basketry is available for download, or for ordering the physical disc.   http://www.shopwoodworking.com/traditional-basket-weaving-dvd

I got the download and have been watching it. April did a great job – I kept watching for the cuts – and there are several long shots, where she makes much of the basket in “real” time and talks us through the whole thing. It’s a great job –  here’s the intro:

—————-

Last fall, Heather Neill was kind enough to hand-me-down her Nikon D300, so my D80 became a dedicated bird-shooting camera…(now I don’t switch lenses, which always led to dust on the sensor..) – but that means I hardly ever load the photos from that camera to the machine here. today, I got a backlog of pictures sifted & sorted. Here’s some from the past month:


we don’t really have a plan/drawing

A few people have asked about the timber frame we have underway here, specifically about the design. First thing to know, if you want to tackle a project like this, find someone who knows how. That could be a class/workshop sort of thing, or an individual who has experience at it. I took a class way back when at Heartwood School out in Washington, Massachusetts; http://www.heartwoodschool.com/ then worked on timber frames at three other classes at Country Workshops. But all of those were long ago…so long ago it was in black & white. 

PF at Heartwood

There are also several books on the subject of course. Jack Sobon’s book’s Timber Frame Construction and Building a Classic Timber Framed House are both excellent. http://www.storey.com/author.php?ID=501199  The first one includes as a framing project a garden shed 12’ x 16′. Exactly the size building I can have here at home, due to watershed conservation and zoning issues. But also a size building that works fine for what I need; a hand-tool workshop.

But….my friend Pret Woodburn has built many timber frames, and that experience is worth more than money. Jack’s plan in his book calls for 8”x 8” timbers, but we scored a nice collection of 6”x 6” white pine timbers. So that’s what we’re using. That size is plenty strong enough for these spans…but it takes some adjusting here and there.

We don’t really have a drawing. We’re starting with Jack Sobon’s plan, and then changing it here & there. Our rafters are mostly 3” x 6” – so too thin for joints at the peak. So we’re adding a ridge beam, in this case a full-dimension 2” x 8” sixteen-foot plank. The rafters will be nailed to it. The two pairs of end rafters are 4”x6” – so these have enough thickness for some joinery for a collar tie across them. This collar tie is mostly a nailer for the siding on the gable ends.

There are also girts, horizontal timbers running around the whole building somewhere around waist height. These are also nailers, for board-and batten siding. There’s two braces at each corner post, one heading each way. In one direction the brace connects the post to the tie-beam, in the other, it connects the post to the higher plate.

We’re skipping the braces on the middle posts, I don’t want them to interfere with any window placement on the long walls where there will be workbenches.

One end of the shop will have a loft for storage. So we’ re going to cut in pockets in two tie-beams for joists to lay this loft on. The other end will be open to the rafters, one benefit – there is space for the lathe’s springpole. And perhaps some room for shelving or who knows what…

My blog is not the place for a bibliography about framed houses, but there are a couple other books not necessarily about how to build a timber frame, but about old houses that I have always enjoyed. I’m from New England, specifically Massachusetts, so if I can only have one it’s Abbott Lowell Cummings’ Framed Houses of Massachusetts Bay 1625-1725.

timber 003

timber 004

I was many times lucky enough to tag along when Pret and several of our old co-workers used to tour through and study old buildings with Abbott. It was priceless.

There’s a little English book that I like because it’s so handy, and has nice detailed drawings. Its size is both a plus & a minus, my eyes are not getting younger. Richard Harris’ Discovering Timber-Framed Buildings…

timber 001

Here’s a spread from it, nice details.

timber 002

Little by little I’m getting the hang of some of it. I’m no carpenter, so it’s a new venue for me. It’s a long-held dream of mine to build my own building. Once, it was going to be a house, but this is better. No electricity, no plumbing. All woodworking. Something I can understand, after some practice.

more chisel work

rafter pocket

And geometry.

I started in cutting the rafter pockets/seats in the frame’s plates (the long upper timbers that connect the three posts on each long wall, and upon which sit the rafters). Most of these are 3″ wide, the ones at each end are reduced a bit, to 2″ to leave some wood at the end of the plate. Those outside rafters will be notched to fit the smaller pocket.

First, the simple bit, sawing down the 45-degree bits. This is the outside corner of the plate, where the rafter will sail past, overhanging the side of the building.

easy part first

Then you knock that bit out with the mallet & 2″ chisel. Easy if there’s no knots.

mallet work

Then pare that surface either flat or slightly hollow. Making sure the straightedge will connect the top & bottom limit of this flat.

paring

The next bit is the one that takes some time & finesse. I didn’t shoot it all – I was busy enough trying to cut it right. I got plenty of practice – there’s 9 pairs of rafters I think.

It’s a notch cut right behind the first angled bit, one plane parallel to the first, the other 90-degrees to each. And an inch &  3/4″ deep at its mid-point. Which moves around if your angles get sloppy. Here I’m paring the end grain of this section.

peak inside

Here’s one plate with its rafter pockets underway. I’m almost done with them now. I have one real devil, with a big knot, to go. And one of the end ones, which are reduced in width.

Pret laid out & cut the outer rafters today, 4×6 timbers, the others will be 3x6s. Here’s his first rafter sitting on the drawing of the plate’s cross-section.

we’re getting there, but there’s still a long list of stuff between us & raising. But each day it gets closer.