Spoons, bowls & more for sale – November 2014

hewn bowl 14-05 carving


When Chris Schwarz left his job some time ago, I remember him writing later that he never knew what day it was. That’s the boat I’m in lately…and I got around to photographing and posting the spoons & bowls I have for sale, then realized everyone’s on the road in America – it’s Thanksgiving tomorrow. Oh well…this stuff will be here. Here’s the link, https://pfollansbee.wordpress.com/late-november-spoons-bowls-for-sale/  or the top of the page on the blog will get you there too. 

Let me know if you’d like to order any of these items; just leave a comment. Paypal is easiest, but I can accept checks too. Just let me know. Any questions, speak up. 

Happy thanksgiving to those who celebrate it…

——————–

I also have some DVDs of the wainscot chair project left – let me know if you’d like that…

The newest DVD I’ve done with Lie-Nielsen Toolworks is available now. “17th Century Wainscot Chair”

wainscot chair videp

Over 200 minutes, it shows how to make a full-blown wainscot chair based on a 17th-century example. The chair is carved, but that work is covered in earlier videos I did with Lie-Nielsen. I have one batch for sale, or you can order them from Lie-Nielsen if you need other stuff too…

here’s the blurb:

17th Century Wainscot Chair

with Peter Follansbee

The Wainscot Chair is one of the hallmarks of 17th century joinery. In this DVD, Peter demonstrates how to prepare material from a section of oak, shape the chair pieces using bench tools and a pole lathe, and join them together with drawbored mortise and tenon joints. He also offers two traditional approaches for making the angled joints of this chair.

Peter Follansbee specializes in 17th century period joinery and green woodworking. He spent over 20 years making reproduction furniture at Plimoth Plantation, the living history museum in Plymouth, Massachusetts. In addition to teaching the craft at schools around the USA, Peter co-authored the book, Make a Joint Stool from a Tree: An Introduction to 17th Century Joinery, with Jennie Alexander. He is also featured in three other Lie-Nielsen DVDs: 17th c. New England Carving (2010); 17th c. New England Carving: Carving the S-Scroll (2011); and 17th c. Joined Chest (2012).

218 minutes (2 discs), Lie-Nielsen Toolworks Productions, 2014.

—————–

The new video, 17th Century Wainscot Chair  – is now available. $40 plus $2 shipping in US. Email me if you’d rather send a check; but the paypal button is right here…

Buy Now Button


what could be worse?

I sent this picture to Bob Van Dyke last night,

smily face


with the question 

“what’s worse than seeing faces in the carvings?”

Answer – seeing smiley faces in the carvings! 

For the record, Bob also replied – “and the smiley face is really kind of an evil wise ass smiley face- sort of reminds me of some sort of Tahitian or south pacific smiley face carving…why is that?”

my kids complain when we draw

My kids complain when we draw together, they say all I draw is patterns & designs. (Here’s them painting; I can’t find them drawing right now…)

kids painting


I’ve been doing some drawings lately. It’s somewhat new for me to draw before I build something, usually I make it first, then I draw it… 

I’m finishing up a few projects, which means it’s time to start the next ones…I’m real good at starting them…it’s easy. I always have more ideas than time. A further challenge is when one thing leads to another, and a project comes up out of nowhere, and jumps the queue. I’m right now struggling to keep that from happening. I’m losing that struggle. But that’s OK.

brittany

I had a visit from Chris Pinnell from Montreal recently, and we were talking about joinery in New France. I had remembered some photos sent to me from a reader, and dug out pictures of joined work from Brittany. [It was Maurice Pommier, author of Grandpa’s Workshop – here’s my original post from a few years back –   https://pfollansbee.wordpress.com/2010/03/27/bretagne-joinery-an-english-book-stand/ and the book is here http://lostartpress.com/products/grandpas-workshop  ]


Afterwards, I went back & started drawing this carving over & over. I’ve probably drawn five versions of it since yesterday. I plan on carving it just to get it out of my system, so I can get on with the other stuff I really should be doing.

bowdoin chair panel

One of the projects I have to do next is a wainscot chair. For this project, I’ll be using some of that really wide riven oak I just got in. The panel is 14” wide x 16 3/4” high. I decided I’d draw this design a few times before picking up the tools, that way I know the shapes I’m after. Those size panels don’t grow on trees, you know. This is slightly different from my usual approach. Typically, with this Ipswich/Devon stuff I carve my own versions of the panels…it’s easy enough to make them up using various elements from existing patterns. This time, I’m trying to copy the existing chair …)

dennis wainscot panel no grid

Dennis wainscot panel


I’ve drawn it about 3 times, including one that’s half the panel, full size. I won’t lay out a grid on the panel, but I will work from the scaled full size drawing. I want it to have irregularities in it, and those are easy to get. 


One last drawing – this thing jumped in front others, should be done this week. A bretstuhl – in walnut. Here’s the carving design I made up for the shaped back board to this chair. the chair is based on one Drew Langsner wrote about in Fine Woodworking in the early 1980s, from Switzerland. The carving designs I adapted from Dutch work of the 17th century. 

bretstuhl stabelle

I finally finished a couple of things

things finished – the box w drawer (mostly, just needs one more board in the drawer bottom.) and a birch bowl.

done

drawer open

sliding DT

side


This birch bowl has been around a while, but I just finished carving it yesterday, then chipcarved some of the rim last night. It’s big – maybe 20″ long or more. Great fun. It’ll be for sale soon, no paint – don’t worry. 

bowl side

bowl end

 I added a link on the sidebar to Plymouth CRAFT – where you can sign up for spoon carving, card weaving, lace making & more. http://plymouthcraft.org/

Maureen tells me there’s new felt stuff on her site too. So that’s what she’s doing while I’m here doing this…  https://www.etsy.com/shop/MaureensFiberArts

Spoon class, January 2015 at Plymouth CRAFT

spoon hook knife

I’m still working out the details of my teaching schedule for 2015 – there’ll be some new places. I think I mentioned before; Alaska, England, Indiana…and most of the usual spots; Roy’s place, Lie-Nielsen, Bob Van Dyke’s. I’ll have it nailed pretty soon. 

One exciting new venue is right here in Massachusetts – local or semi-local people have always asked me where do I teach near home, and til now the answer was “I don’t.” Now I do. We’re in the midst of setting up the classes, workshops, etc that will be Plymouth CRAFT. And along with some food & textiles offerings, we’re ready to cut some spoons. January 17th & 18th; 2 days of green wood; hatchets, knives, spoons – what could be more fun? I’ll have hook knives, students will need their own straight “sloyd” knife and small sharp hatchet. I’ll send a list of possible suppliers..

tools

Below is a link to sign up for classes; mine and others. If you’re from elsewhere, we can send you details about lodging and more…

Hope to see a full class of spoon-carvers! 

UPDATE – WE HAD SOME WEBSITE PROBLEMS; AS FAR AS I CAN TELL, IT SEEMS FIXED NOW. THESE LINKS WORKED WHEN I CHECKED THEM MOMENTS AGO –

http://plymouthcraft.org/events/

http://plymouthcraft.org/event/carving-wooden-spoons-with-peter-follansbee/

who knows what they’re called? Not me…

glyphs

It becomes a funny diversion; what are these called – both today & in the 17th century. The old name is easy – we have no idea what the joiners who made ’em called ’em. Furniture historians often call them “glyphs” – but most architectural definitions call a glyph a vertical groove or channel. 

whatever they’re called, here’s how I made some today for the carved box with drawer. This batch is walnut. Essentially I make a run of molding that is peaked, then cut it up. I took a scrap about 15″ long, by about 9″ wide. Planed a straight edge, then marked the middle of it, (this board is just over 1″ thick.) also marked the thickness of my glyph – 3/8″. Then planed two bevels down almost to the scribed lines. I needed about 4 feet of this stuff; so I did this to both edges of the board, a couple of times. I made extra so if something went wrong in trimming I wouldn’t need to start over. 

planing edge

Here’s a close up view of the planed result. 

more detail

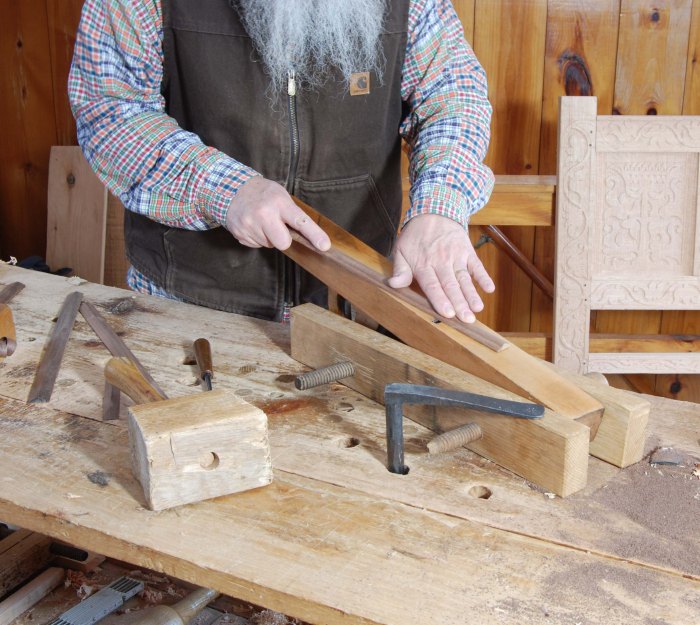
here’s how I held the board – the single screw is next to useless – it just pinches the board while I get a mallet to whack the holdfast. Then I sawed down both edges, I sawed in the waste area, leaving stock for planing the backs of this molding. 

holdfastSawing. simple enough. 

sawing

This is one of those rare instances when I will say to you – be careful if you do it this way. It’s hard to tell from this photo, but I’m pulling the molding to plane off the saw marks – much like a cooper will plane the edges of his staves. Need a sharp plane, set fine. And focus. One slip…and you feel real stupid. 

planing upside down

Then saw the pieces to length, and use a chisel, bevel down at first, to shave each end of the glyph. Or whatever it’s called. 

chisel


Here’s some from a chest with drawers made in Plymouth Colony, c. 1680s or so

molding detail, Plymouth Colony chest

I have mine cut and glued onto the box with drawer. so that’s the first piece built for the next joinery book. Next week I’ll apply a finish & photograph it. 

want to see something funny?

This ain’t wainscot by any stretch of the imagination.

PF settee 1992

We saw this windsor settee when we were at Michael Burrey’s a couple of weeks ago. https://pfollansbee.wordpress.com/2014/10/30/plymouth-craft/ He bought it from a fellow who was downsizing, moving – life-changing somehow. 

I made it in about 1992. Had forgotten all about it. I think I made a couple something like it; all under the guidance of Curtis Buchanan. https://pfollansbee.wordpress.com/2014/03/19/go-see-curtis-stuff/ I have two or three of the chairs here at the house. We still use them all the time. Much lighter than a wainscot chair, but no carving…so where’s the fun in that? 

preview of Wainscot chair video

No sooner did I mention making a wainscot chair, than I got an email from Lie-Nielsen’s youtube channel – they’ve posted a preview of the new DVD, (as well as a couple of others)

here’s the chair one – you can order it from them, or I have a few left as well. But from them, you can get the disc and all that other good stuff too.

https://www.lie-nielsen.com/

https://pfollansbee.wordpress.com/book-dvds/

a good problem to have…

I needed some oak today for the drawer bottom for my box.

drawer w bottom half done


Something in the range of 7″ wide, 22″ long. So I went out to the collection of oak bolts in the yard to get something to work with.

DSC_0016

I picked out a few panels; and brought them in to rough-plane them. These had split so well they needed little hewing. Here’s some…

a good problem to have


But the problem? Most of the stuff I had on hand was too wide! That almost never happens – it’s usually quite the opposite. The narrow one in the photo above is almost 10″ wide at the bottom end…

narrow one

the wide ones are over 15″ wide and flat – great stock. (thanks, MD for setting me up with it…) –

wide one

I’ll save these for the rear panels to a wainscot chair I have to make. Like this:


TD chair overall

Most of the time, I don’t have such wide stock; the one above was similar width, but quartersawn, not riven. You can make a wainscot chair w 2 panels & a muntin too –

PF design three quarters

to make such a chair, see https://pfollansbee.wordpress.com/book-dvds/

Now I have to go find some narrower oak.

to answer some questions about hatchets

I’ve had some more questions from readers about axes recently, so time to delve into this subject again. There’s lots of tools you can use; some better, some less-so. But don’t despair – the magic is not in the tools, it comes with practice. You can learn to hew with a crap hatchet, if you can make it sharp.

Here’s an earlier take on the subject – https://pfollansbee.wordpress.com/2012/12/13/the-endless-look-at-hewing-hatchets/ 


First off, for joiner’s work, my mainstay – I have shown several times that I like a hatchet that is large, heavy, single-bevel, and curved cutting edge. This one weighs 3 lbs 7 oz. and is about 7 ¾” along its cutting edge.  Hard to find. Really hard. 

best fuchs hatchet

Fuchs hatchet
Fuchs hatchet


Take note of the relationship of the eye to the cutting edge – for hewing flat stuff, this is the best scenario. Others will work; but this is the best. 

What do I use it for? Taking rough split stock and preparing it for planing; 

hewing
hewing

The Kent pattern (below) is one of the most common old ones you will find in both the US and the UK. Elsewhere, there are other similar tools. Nice thing about the Kent design is it’s symmetrical, so lefties can remove the handle, make a new one & insert it from the other side of the head. 

Kent hatchet

Before anyone tells me that Gransfors Bruks makes a carving axe available as leftie or rightie – let me save you some trouble. They offer some of their hatchets right-handed or left-handed; but the eyes on these tools are centered on the head, not shifted over to one side. Their tools’ bevels might be asymmetrical; but these aren’t single-bevel tools with a properly placed eye. I have used one of the Gransfors Bruks Broad Axes – it’s a nice tool, but a double-bevel. 

And for some reason, their axes and hatchets have convex bevels; for hewing, I like a flat bevel. That’s the principal complaint about the GB carving hatchet…Drew Langsner writes on the Country Workshops axe page how to fix a GB carving axe’s bevels; (file them flat) too bad they don’t just make it right 

http://countryworkshops.org/Axes.html

I also have a large Wetterlings axe, it’s nice. (called at LN the “broad axe, short handle”) A bit heavier than the GB broad axes; but good at removing a lot of stock… Lie-Nielsen sells a line of their axes in the US; we use some for spoon work when I’m up there. https://www.lie-nielsen.com/nodes/4085/wetterlings-axes

Some have shown me the Oxhead hatchet, from Austria. It’s a bit clunky; it will work. I would hacksaw off the nail puller/claw. It could be better; but for the money, it’s not terrible. 

For the spoon work, my favorite is a Hans Karlsson hatchet I got from Country Workshops years ago. They have a new one now, I have one of these too, and it’s excellent. 

https://pfollansbee.wordpress.com/2012/12/04/new-to-me-hans-karlsson-hatchet/

I just ordered 2 new hatchets for spoon work; one from Drew and one from Robin Wood. I’ll let you know when they get here. Some readers have reported success at the German ebay site for old hatchets. A gamble if you’re shipping to another country, but they go for reasonable prices. I like to see old tools before I buy them, but that’s getting harder to do. So I wouldn’t want to pay a lot for a hatchet that way…

Here’s more, some of which is repeats. 

https://pfollansbee.wordpress.com/?s=hatchet

https://pfollansbee.wordpress.com/2011/08/27/the-hatchet/