I assembled my 2nd shaved windsor chair of this century last week. I first wrote about it here – https://pfollansbee.wordpress.com/2020/10/09/shaved-windsor-chair-take-2/ (all that nonsense I blathered about grain direction, ray plane, post & rung compromise is out the window. Drew Langsner set me straight after that post.)
This chair survived assembly, barely. I remember reading a Dave Sawyer quote “If a chair survives assembly, it should last __ years.” Something to that effect anyway.
But it was not without its excitement, all driven by my haste and being decades out of practice. One post was “windswept” – it leans out further than its mate – which is a reaming mistake. Galbert’s book has a good discussion of all the ways the posts on a chair like this can be wrong and how to avoid them. (chapter 17: Reaming in Chairmaker’s Notebook https://lostartpress.com/products/chairmakers-notebook )
The other mistake I made was using yellow glue. Never again, it’s hide glue for me from here on in with chairs. The joints seized and it took a lot of effort to get things together. I should have marked a line on the spindle tenons where they join the seat. One or two of them might not be all the way home.
But it’s all wedged and is now a shop-chair I don’t need. But I’m determined to make a few chairs like this in succession – the first one I assembled in January, and this one here in late October. Better to not have 10 months between attempts.
The live class is 2 hours on Saturday afternoons, then it gets posted where you can re-watch it later if you happen to be a poor note-taker like me. And there’s a suggested price, but they want anyone to be able to take this class regardless of money, so you can pay what you will as well. Hard to beat a deal like that. And already it’s paying off – Curtis pointed out that he’s been building these chairs for a few years now, and since he made the videos about it, he’s changed a few minor things here & there…so this is the “updated” video series on making this chair.
I haven’t looked in my cameras lately; so today I downloaded what’s on them. Here goes. Some go back a good ways, here’s the last osprey (Pandion haliaetus) I saw this season, in the locust tree outside the shop. Sept 13th.
There’s some dead branches in that tree that hang right outside the shop windows. An excellent perch for bird portraits, when I’m quick enough to react. Here’s a blue jay (Cyanocitta cristata) – to me, an overlooked bird. Common, maybe even a nuisance, but a beautiful bird nonetheless.
the great blue herons (Ardea herodias) stick around all year.
Maureen’s garden is winding down; these are celosia she tells me.
So now the colors are coming from the trees, here’s the sassafrass leaves.
And the light in the shop is changing; I noticed some late afternoon reflected light hitting some chip carving that’s usually buried in the corner. It’s like Stonehenge or something, only gets lit up a couple times a year.
This box finally got done. It’s butternut, with various secondary woods.
It has a sliding lid and the front panel lifts up & out to access a drawer.
I’ve done similar boxes a few times; they’re fun. They’re not based on anything in particular; but inspired by a few boxes I’ve seen here & there. One from Pennsylvania, some from Sweden. I’ve made up some of the construction, not having studied the old ones in any detail. This one’s about 22″ long.
Daniel & I worked out editing the first video of panel carving to accompany the sets of drawings. This panel is one I have never carved on video before, nor have I covered it in print.
When I shoot these, I’m the camera-person as well as the carver. That means I get to ruin things two different ways. I shot these in late July, and here two-plus months later, I found out that for one section the camera was not in focus. So when I get to the free-hand stuff outside the diamond, there’s not much detail about what I’m doing. But I think you can see it pretty well. I was very happy with raking light across this one. So much so that we only used the views from one camera. It’s long, like most of my videos so far. If you make it to the end, or scoot through to the end, there’s a gallery of about 4 variations on the pattern.
the combination of dark walnut & light birch is too confusing for my camera today
I just today turned the page on my calendar in the shop. That’s how ignorant I am of time this year. And I’m just getting to my first spoons of the year. I wrote about some of these the other day, the walnut ones in particular were carved from dry wood. The birch and rhododendron were carved in the more typical green wood. Not that it matters in the finished product. These are for sale, if you’d like one, leave a comment and I’ll set up a paypal invoice for you. Prices include shipping in the US. Flax oil finish.
UPDATE: THESE SOLD OUT, THERE WILL BE MORE TO COME. THANKS FOR THE INTEREST AND SUPPORT OF MY WORK. PF
Spoon # 1 – black walnut – SOLD L: 11″ W: 2 3/4″ $100
This & the other two walnut spoons here were leftover furniture stock, radially-riven black walnut hanging around in a corner of the shop.
spoon # 1 overall
spoon # 1 side view
spoon # 1 carved handle
————–
Spoon # 2, black walnut SOLD L: 11″ W: 2 3/4″ $100
spoon # 2, carved handle
—————–
Spoon #3, black birch – SOLD L: 10 5/8″ W: 2″ $90
I found this black birch while I was sorting next year’s firewood. It was still sound, and when I split it open, still fairly green. Some nice radially-split spoon stock came out of it instead of firewood.
Spoon # 3 overall
spoon # 3 side view
—————–
Spoon # 4, SOLD L: 9 5/8″ W: 2″ $90
As soon as I started carving this recent batch of spoons, my wife brought home some rhododendron branches a gardener friend of hers had just cut…my favorite wood for spoons. And this is my favorite spoon of this batch.
Most every batch of spoons I carve has one (or more) of these – a weirdly impractical spoon shape. From the side view, this could pass as a normal spoon. But it had both a crook and a bend. I just followed it.
For my first Windsor-style chair in decades, I was happy enough with that one. Which is different from “I was happy with it.” One problem I had was the legs splitting at the joints.
splits in rear leg & side stretcher
I suspected my tenons were too large. I talked to Curtis about it, and if I remember right, he said because of the steep angle (say where the side stretcher meets the leg) you can get splitting. Suggested yes, make the tenons a bit smaller than I might in a ladderback chair. I was using white ash. I think another factor was the auger bit I used. It has a thick lead screw that might have contributed to the splitting.
For me, one of the most glaring problems was boring the mortises directly in the tangential plane of the legs. And the orientation of the leg is dictated by the orientation of the seat. In this case:
the long fibers (the “grain”) of the seat run front-to-back.
The growth rings in the legs’ tenons (the whole leg actually) are therefore oriented so they run perpendicular to the fibers in the seat.
The leg is split so the wedge is also perpendicular to the fibers of the seat.
This makes the front view of the front legs (and back legs) the tangential plane. And it means when boring the mortises for the side stretchers you’re boring directly into the growth ring plane. Where ring porous woods split very easily.
BUT – I hate looking at the tangential plane of ring porous hardwoods like oak, ash, etc. And on my first democratic chair, the front of the front legs (and back of the back legs) is this plane.
front leg shaved chair, Jan 2020
I thought about switching the leg orientation 90 degrees to the “usual” format. Then you wedge it just the same. This puts the leg’s radial plane, which changes less than the tangential plane, running in the direction in which the seat moves the most from one season to the next. So in a worst-case scenario the seat could split I guess, if it shrank a lot versus the leg tenon which wouldn’t shrink much. I think if you use a softwood seat like white pine, and hardwood legs, the seat will compress before it will split from the legs. I bet any problem would be at assembly, not afterwards. I could, of course, be wrong. It’s been a long time since I was really a chairmaker of this sort.
In the usual orientation, the leg’s radial plane lines up with the long fibers of the seat. The seat does not shrink in this direction at all; maybe the tiniest fraction of an inch. If you were to make the change I was thinking about, the radial face would now be the front view of the legs. Better visually for me, but now you’d still be boring into the radial face./growth ring plane, where ring porous hardwoods also split very easily.
In the ladderbacks I learned from John Alexander and Drew Langsner, we positioned the posts’ growth rings at an angle to the rungs…they coined the phrase “post and rung compromise.” They didn’t make up the concept, it came from studying old chairs. The reason for it is to reduce the chance of splitting the legs when driving the rungs in – the mortises are bored between the growth ring plane and the radial plane. Below is one of Chester Cornett’s chairs, showing the front post oriented with this post & rung compromise. The radial crack bisects the angle between the front & side rungs. But you see how neither of those mortises are in the radial or growth ring plane. Some of Chester’s chairs that I saw used sassafrass posts, this one was white oak, very slowly grown.
I decided to try something this on my democratic chair #2. I was moderately successful. The legs & stretchers on this chair are also white ash, and had grown a bit too slow for this application. Too many growth rings make them a bit weak. I oriented the stretchers in the usual way – their hardwood-to-hardwood mortise & tenon joints seemed more critical to me than the hardwood/softwood leg-to-seat joints. So the growth rings on the side stretchers are parallel to the floor – those on the center stretcher are perpendicular to the floor. This means the mortises for the center stretcher are bored into the radial face, directly in the growth ring plane.
boring the mortise for the center stretcher
One side stretcher cracked slightly like on the first chair. I keep learning.
But it was the legs that I moved around. I re-positioned them just a bit, turning them in their tapered mortises so the growth rings were angled to the fibers in the seat. The wedge, and the wedging action, are still perpendicular to the long fibers in the seat.
rear leg in the seat
This way I was boring the mortises for the side stretchers one facet off from the growth ring or radial plane.
It worked pretty well, one leg has a small split, but that might be more due to the slow growth rings than anything else. Next time, I’d choose a faster-growing log, and I might turn the tenons rather than spoke-shaving them. It’s better than first time out, almost to where I’m happy with it.
Quite some time ago, my friend Rick DeWolf posted a window he’d made for his barn. I was astounded, wondering “How did he do that?” So I wrote to him & asked “How did you do that?” and he told me he watched Roy Underhill make one.
I have several windows that have seen better days, long ago. I wanted to tackle making new ones, but never thought I could do it. I have a vague memory of working on some with Michael Burrey – way back in 1994. My tools, and my skills, were not sharp enough for softwood. I dropped it for decades. It seemed so complicated. Roy offered to show me how, but we never found the time…
But 2020 seems to offer me lots of time with nothing to do. So I decided this is it – time to learn how to make these things. I watched Roy’s episode, read Lost Art Press’ reprint of Doormaking & Windowmaking. I even browsed some on the web – there I found a nice video of Ted Ingraham making sash. I used to run into Ted here & there in the tool/museum world.
So here goes. Lots of pictures again. I can chop mortises – that’s easy. These are 3/8″ wide – the longest is under 2″. For these, a typical mortise chisel seemed like overkill, so I just used a bench chisel. I have a “sash mortise” chisel that I dislike for my oak joinery. Too light. They’d be great here. I don’t have a 3/8″ one…
One thing that Roy did is to intentionally overcut the front cheek of the tenons. This helps when you cope it to meet the molded edge.
I added one step to Roy’s sequence. I scribed a line on the end grain of that front shoulder, that’s where the coping cuts begins. Or ends, depends on how you look at it. But I keep that narrow shoulder square. Roy didn’t need that step because he used a coping plane, I used a gouge. The block on our left is to keep the stock from blasting apart as I pare across it.
And here is the gouge, starting to cut that coped shoulder. It’s more forgiving than I thought…
After coping the shoulders, I ran the molding & rabbet – but didn’t shoot any photos of it. Here is the plane cutting both edges – in this case, after mortising the stiles.
The plane is by J & L Denison, brothers who worked in Saybrook, Connecticut circa 1830s.
After chopping mortises, cutting tenons, running moldings, it’s time for some test-fitting. Once I had the stiles and horizontal rails tested together, I scribed the length of the vertical muntins. Or are they mullions? Whichever they are, I made them more stout than many – decided I didn’t need the extra challenge of thin muntins on my first go-round.
Knocking it together here & there. Some test-fit, some adjustments. Nothing major.
I checked it. Flat & square & 1/8″ oversized. I got right out of there before I messed anything up.
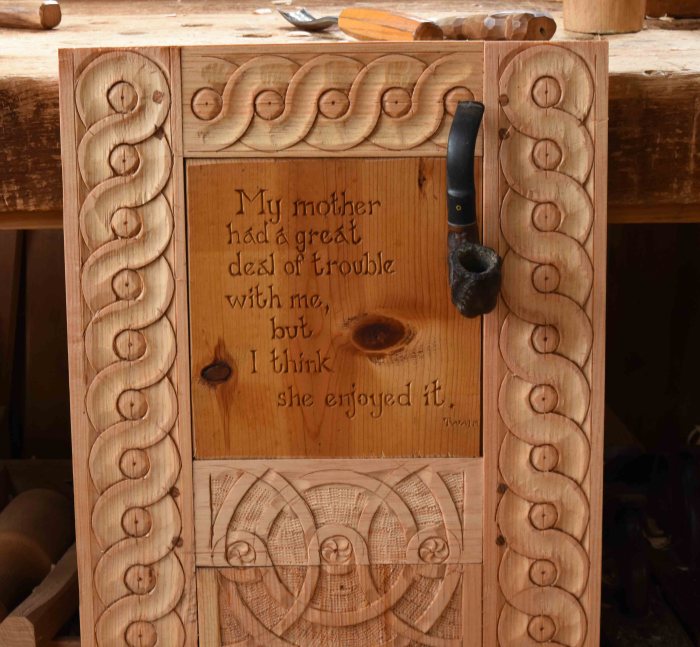
A week or two ago I got to a project that has lingered here for ages. The small panel in this door was made by my friend Heather Neill, way back when. The Mark Twain quote she incorporated in this panel is from the Autobiography, “My mother had a great deal of trouble with me, but I think she enjoyed it.” When Heather & I met in 1982, I had just given up the notion of being a painter, and was concentrating on learning woodworking. She took up chairmaking after I showed her some of the steps involved. She probably made more chairs than me before she gave up chairmaking to concentrate on painting! https://heatherneill.com/
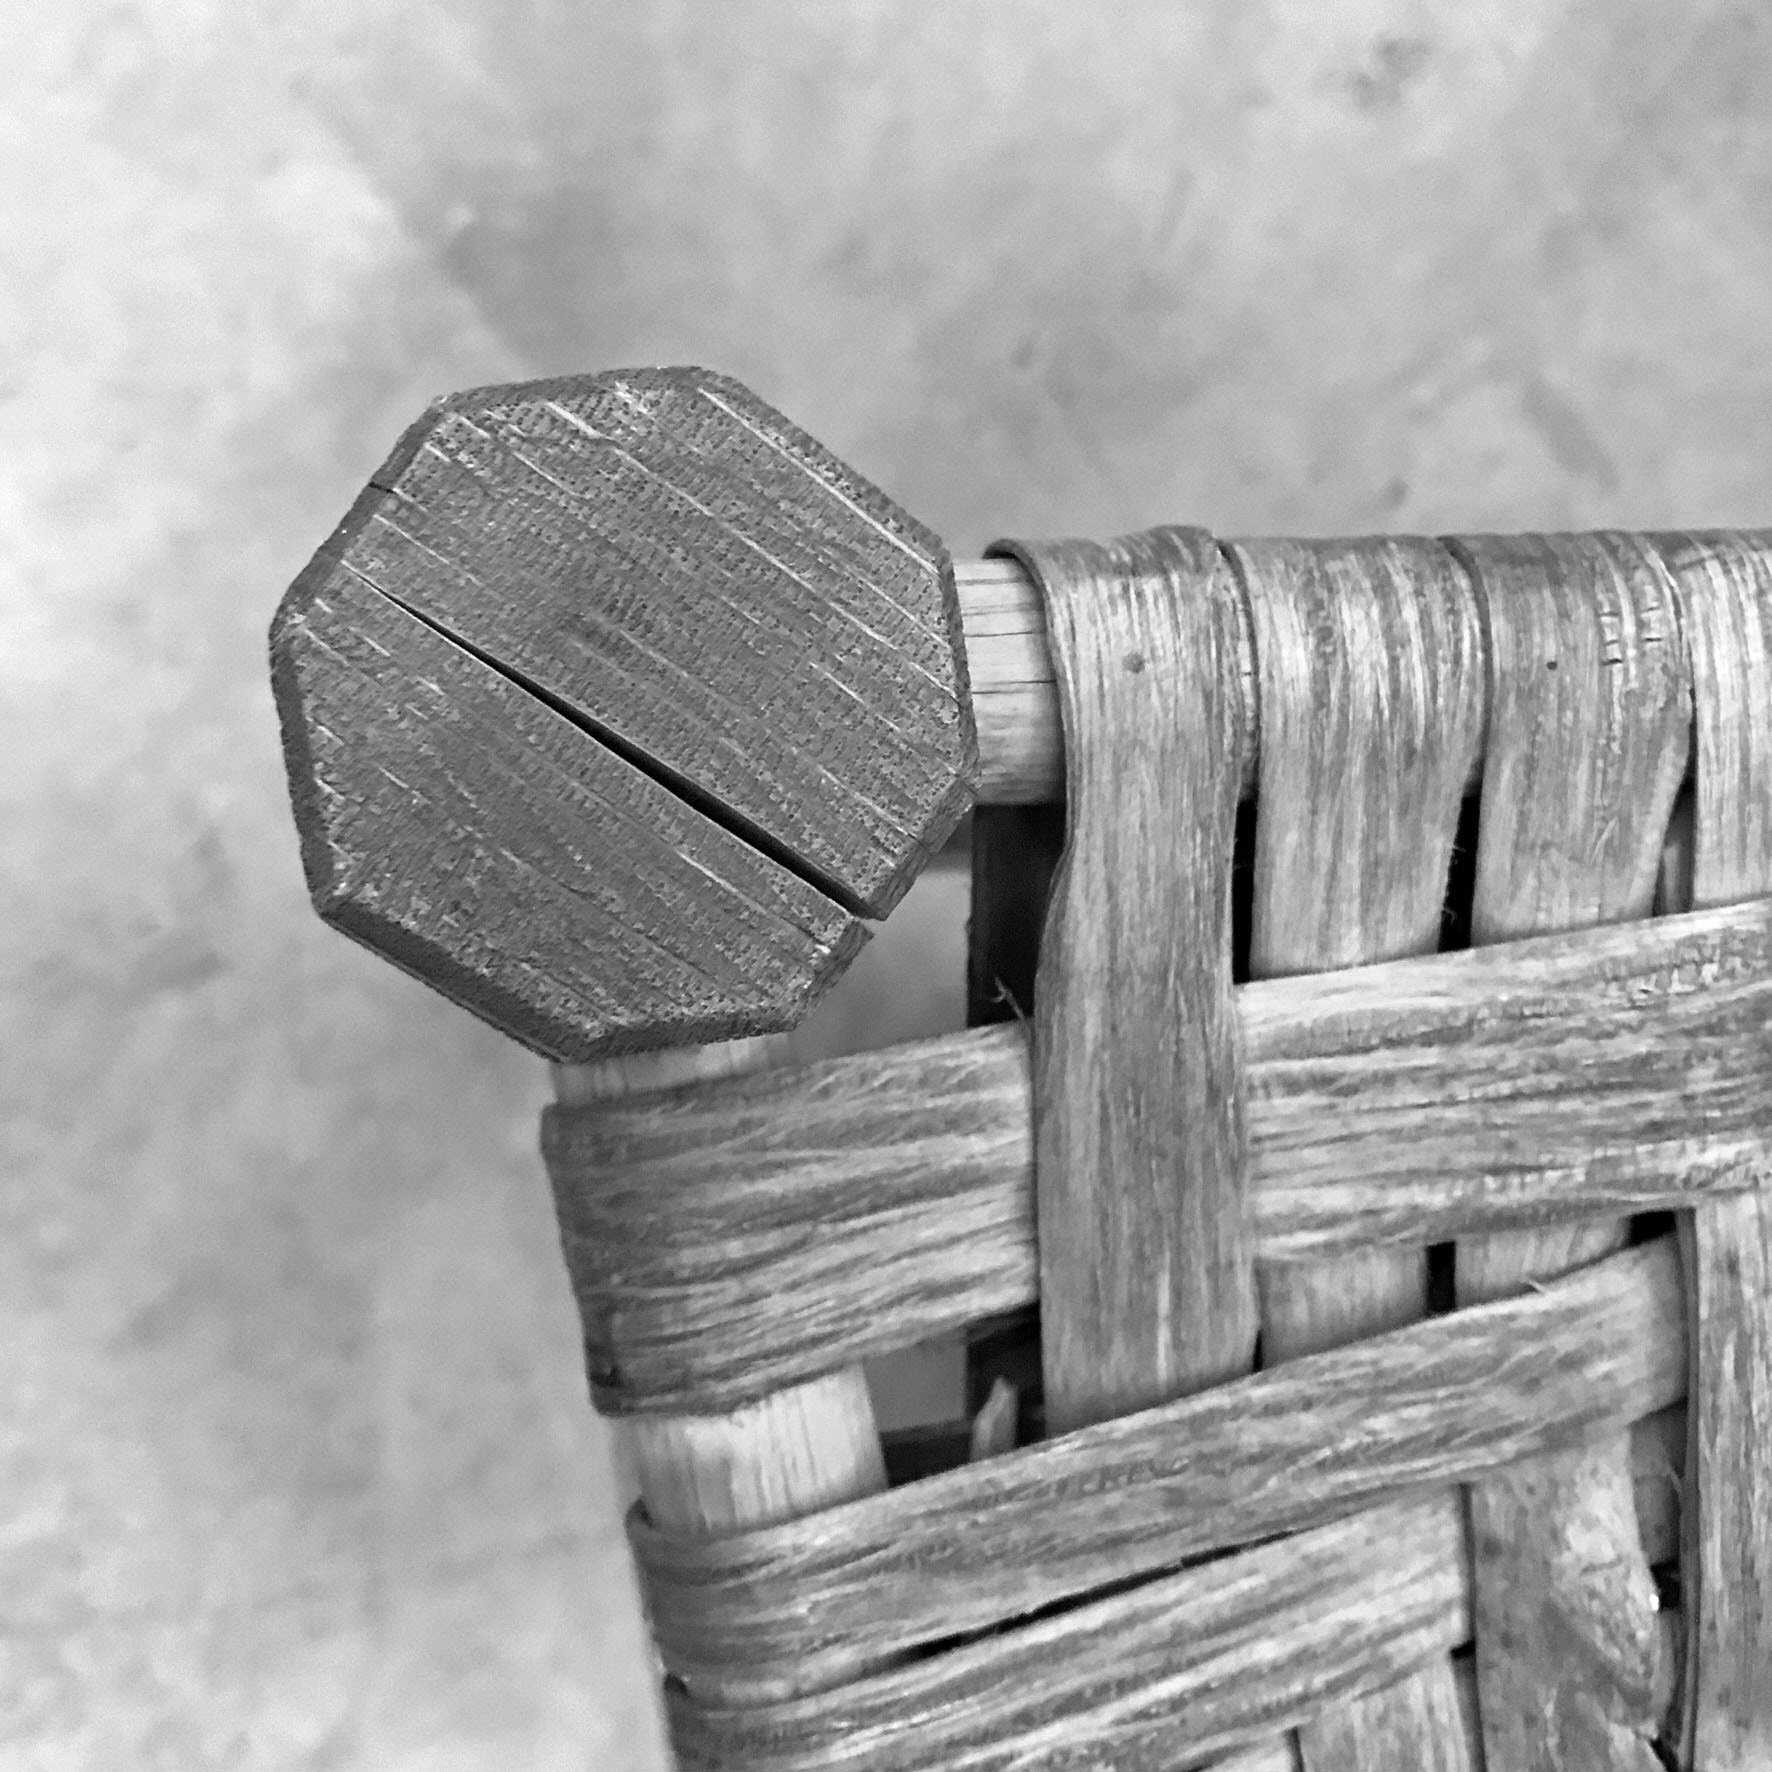
Hanging in my shop is a drawing Heather made for me in 1997; showing her chairmaking space when it was active. In this detail, note the cupboard door with the pipe door handle. (my camera was tilted, Heather’s chair is not squished…)
So for a long time, I’ve been thinking of how to incorporate her Twain-quote-panel in a new door. I have two cupboards near the back of the shop – one for axes, and the other for turning tools. I made the axe one first, and it got doors.
When I made the next one across the shop, I had run out of “extra” pine boards. So left it door-less til now. But now that I was going to all the trouble of making the door – I couldn’t leave it plain. In for a penny…
I made it with flush-fitting panels – because the Twain quote had no margin to speak of. Then decorated it.
I haven’t carved pine since I carved the timber frame of the shop. I decided to use something simple & quick. This braid is featured in the book I did with Lost Art Press – this time there’s no V-tool involved, just incised marks with different-sized gouges. The layout is done w two compasses.
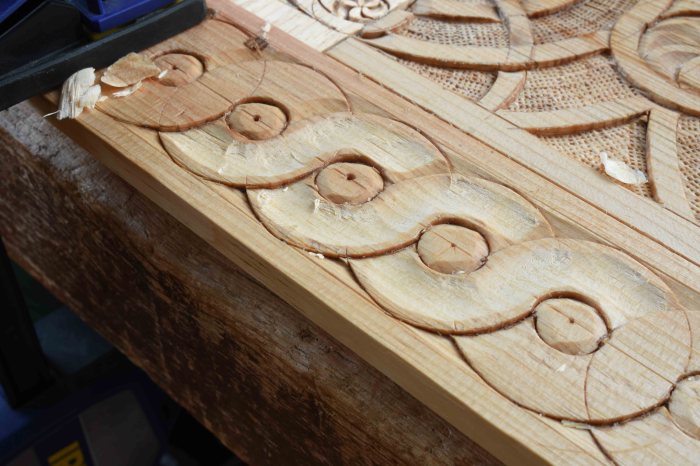
In this example, the large circle is 2 1/2″ wide, the smaller one 3/4″ – I used a 1″ wide #5 Swiss-made gouge, and a 3/8″ wide #7 Stubai gouge. Then a nearly-flat tool to remove some chips.
This is the dramatic view down the line.
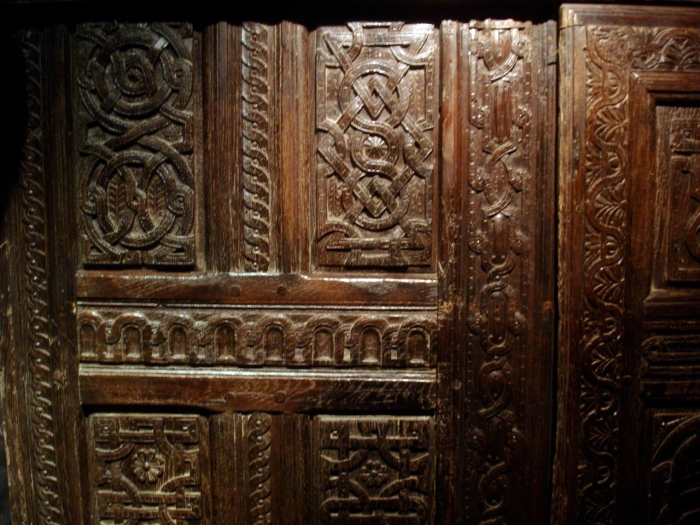
This sort of design is common all over the place. My photos from Sweden a few years ago include a few different versions of it. Notice on this arch the way the effect changes according to the relationship between the large & small circles.
One more – again in an arch, but this time with its columns also.
But in the end, I decided to hollow the circles – the scribed design was as prominent as the carved one – and I didn’t like it. I took a large gouge and worked along each band of the circles. This gives the whole thing more shadow.
My version is simpler, too much blank space between the elements. But it will do, although I can’t wait to try it again.
Oh, I forgot about the pipe – why is that there? Heather swears it was one of my father’s, that my mother & I gave to her, no doubt as painting & drawing props. I swear I don’t recognize it. But my father had lots of pipes…so I might as well believe it.
I’ve been carving spoons again lately, after a long hiatus. It came about mostly from shop-cleaning. I found some riven walnut; but not enough to make a joined stool. These are years old, as dry as a bone. Riven radially. To make spoons from them, I took a couple different steps than I do when using green wood. It’s a lot of pictures…
First thing I want to know with the walnut is about sapwood. As these blanks have aged, they’ve discolored and I don’t want to find out when the spoon is shaped that the sapwood is still there. So I hew a few stokes to expose some fresh color. This first one has a wide band of dull-grey/white sapwood. Reject.
This one’s better. Now I begin hewing a new surface and then tapering the width where the spoon’s handle will be.
Now I want to make the area where I’ll work the bowl of the spoon concave. I start with the hatchet coming into the blank at an angle.
Then I pitch the hatchet’s poll toward the spoon, sort of a “flick of the wrist” action. This helps me hew a concavity here. I repeat these two steps until I get the shape I’m after.
Then I hew under the tip of the spoon’s bowl – just a bevel really.
Then under the handle, so far nothing terribly different from when I carve a similar spoon from green wood.
Now it does change, however. Here’s the blank’s general shape.
I sketch the shape I think I want, then put the piece in the vise to hollow the bowl.
I use a #8 bent gouge about 1 1/4″ wide, and a mallet to hollow across the bowl. I’ve left the edges of the blank pretty square at this point, so I can grab it in the vise. To begin, the gouge’s handle is upright…
Then as I come across the bowl, I lower the handle to bring the edge out of the cut at the other side.
Then what I have referred to as the “chicken” maneuver – sawing the shoulders. Hewing this material away in dry wood is a chore, so I skip it.
Back to the chopping block. The sawcuts allow pretty easy work of chopping out that reversing fiber-area – toward the bowl first.
Away from it second.
None of this is revolutionary or anything – all this is perfectly valid regardless of the moisture content. One more departure from my “normal” technique though is the shaving horse. It’s a step that’s now inserted between the hatchet work and the knife work. I think Tim Manney was the first person I saw using a shaving horse & drawknife to make spoons – he & Curtis Buchanan use them with steam-bent blanks. Curtis just did a co-teaching gig on it with Elia Bizzarri http://handtoolwoodworking.com/spoon-carving-videos-with-curtis-buchanan/
I start with the bevel down, hollowing the curve in the back of the handle. Holding the blank gently in the shaving horse…
Now bevel up to fair out the shape on the underside of the bowl.
Using it as a push-knife to work the rounded back of the bowl.
After all this, I just proceed as usual with slojd knives and hollowing knives to finish the spoon.